

|
Learn about what to check when proofreading page proofs prior to publication.

|


|
Want to learn how to craft a standout editorial website that makes you visible in the search engines and compels your ideal clients to hire you?
Check out Editor Website Essentials, my flagship online training course created just for editors and proofreaders. |
Louise Harnby is a line editor, copyeditor and proofreader who specializes in working with crime, mystery, suspense and thriller writers.
She is an Advanced Professional Member of the Chartered Institute of Editing and Proofreading (CIEP), a member of ACES, a Partner Member of The Alliance of Independent Authors (ALLi), and co-hosts The Editing Podcast.
She is an Advanced Professional Member of the Chartered Institute of Editing and Proofreading (CIEP), a member of ACES, a Partner Member of The Alliance of Independent Authors (ALLi), and co-hosts The Editing Podcast.
- Get in touch: Louise Harnby | Fiction Editor & Proofreader
- Connect: Twitter at @LouiseHarnby, Facebook and LinkedIn
- Learn: Books and courses
- Discover: Resources for authors and editors
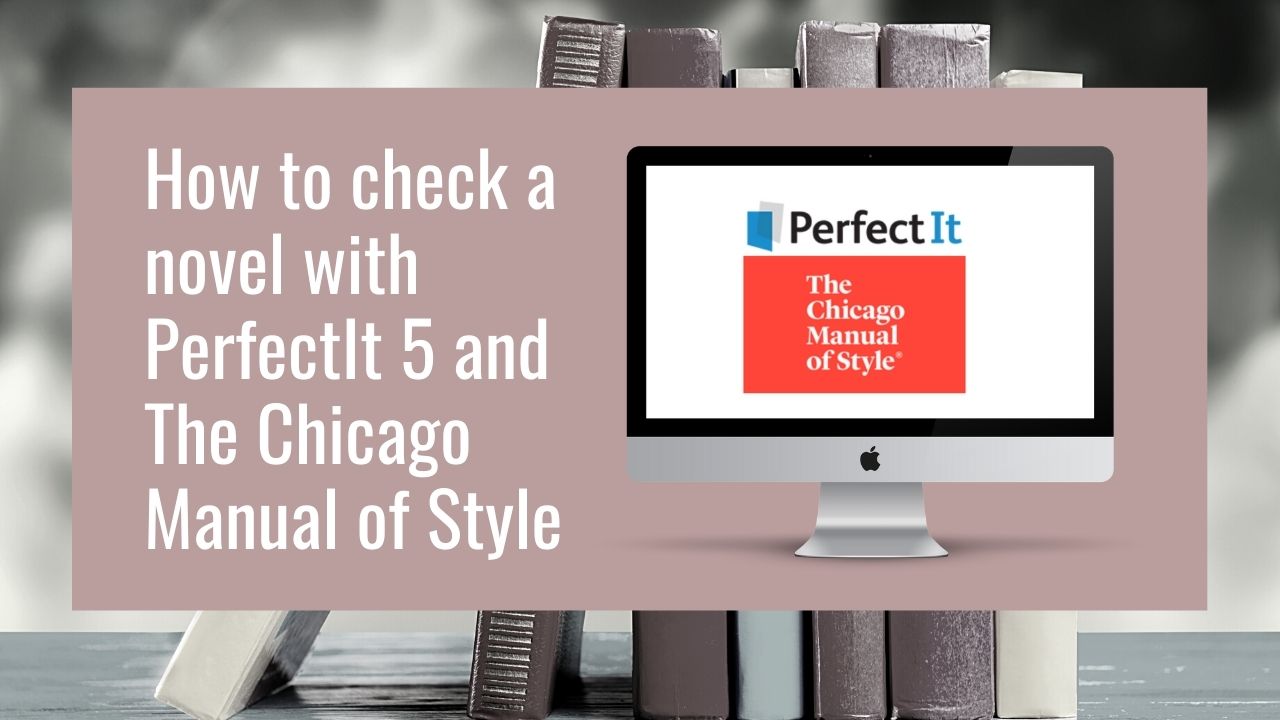
Find out more about The Chicago Manual of Style for PerfectIt. Developer Daniel Heuman talks with Louise Harnby and Denise Cowle about the union of a 115-year-old style guide and advanced copyediting software technology, and how it will help you edit faster and better.
Listen to find out more about
- What The Chicago Manual of Style for PerfectIt is
- How much it costs
- How the union came about
- Full integration of CMOS into PerfectIt 5
- Why it's free to subscribers of both products
- What PerfectIt can and can't do
- Working with the CMOS team
- Favourite features that help editors learn
- Why CMOS is a style guide rather than a rule book
- How users can suggest additions
- Customizing the CMOS style sheet
- The Mac-user experience
- Accessing The Chicago Manual of Style for PerfectIt
Music credit
‘Vivacity’ Kevin MacLeod (incompetech.com). Licensed under Creative Commons: By Attribution 3.0 License. http://creativecommons.org/licenses/by/3.0/
More fiction-skills resources
|
Check out these additional resources that will help you develop your fiction-editing business.
|
|
Louise Harnby is a line editor, copyeditor and proofreader who specializes in working with crime, mystery, suspense and thriller writers.
She is an Advanced Professional Member of the Chartered Institute of Editing and Proofreading (CIEP), a member of ACES, a Partner Member of The Alliance of Independent Authors (ALLi), and co-hosts The Editing Podcast.
She is an Advanced Professional Member of the Chartered Institute of Editing and Proofreading (CIEP), a member of ACES, a Partner Member of The Alliance of Independent Authors (ALLi), and co-hosts The Editing Podcast.
- Get in touch: Louise Harnby | Fiction Editor & Proofreader
- Connect: Twitter at @LouiseHarnby, Facebook and LinkedIn
- Learn: Books and courses
- Discover: Resources for authors and editors
Do you use PerfectIt to find inconsistencies in a novel? Do you follow The Chicago Manual of Style? Now you can use both from a single platform! I might be in love. Here’s why.
What's in this post
- What is PerfectIt?
- What is The Chicago Manual of Style (CMOS)?
- What is The Chicago Manual of Style for PerfectIt?
- Beta testing on a novel
- Why the editor retains control
- How to customize The Chicago Manual of Style for PerfectIt
- Wow factor 1: CMOS learning at the editor’s fingertips
- Wow factor 2: Seamless access
- Wow factor 3: Shifting the burden of search
- What PerfectIt won't do
- How much does The Chicago Manual of Style for PerfectIt cost?
- How to unlock access to the CMOS style sheet
- My beta test: The verdict
- Where to get The Chicago Manual of Style for PerfectIt
What is PerfectIt?
PerfectIt is software developed by Intelligent Editing. It helps editors and authors check a Word document for:
I’ve been using PerfectIt since its first iteration and, for me, it’s a must-have. Not because the human brain isn’t able to handle the checks it carries out but because software can do it faster.
And that means I can spend more of my time (which is what my clients are paying for) helping authors craft a compelling story rather than hunting down important but small details.
In other words, PerfectIt does the heavy-lifting but lets me retain complete control of the changes being made.
- Consistency: eg spelling, capitalization, hyphenation, acronym definitions.
- Adherence to style preferences: eg how numbers are rendered, punctuation of lists, capitalization of titles, ize/ise suffixes.
I’ve been using PerfectIt since its first iteration and, for me, it’s a must-have. Not because the human brain isn’t able to handle the checks it carries out but because software can do it faster.
And that means I can spend more of my time (which is what my clients are paying for) helping authors craft a compelling story rather than hunting down important but small details.
In other words, PerfectIt does the heavy-lifting but lets me retain complete control of the changes being made.
What is The Chicago Manual of Style (CMOS)?
CMOS is a 115-year-old style guide published by The University of Chicago Press. For many editors, even those beyond US shores, it too is a must-have because of its mindful, sensible advice.
CMOS isn’t a rule book. It’s a manual of style preferences. And given that novel editing requires a flexible approach to grammar, spelling and punctuation – one that serves rhythm and voice first and foremost – many editors choose to customize its guidance, ignore some of it, or blend it with another style guide’s preferences.
CMOS’s strength lies in how comprehensive it is, and the fact that the online version is easy to search.
Even though fifty per cent of my clients write in British English, CMOS is still my go-to style guide because lots of its guidance can be universally applied. The rest I tweak to fit my authors’ needs.
What is The Chicago Manual of Style for PerfectIt?
Until recently, these two editing staples were in my editing studio but sitting at different digital tables. But what if CMOS could be integrated into PerfectIt? Afterall, PerfectIt has lots of built-in style sheets – why not CMOS too?
It was a beautiful dream. Now it’s a beautiful reality.
The Chicago Manual of Style for PerfectIt is a brand-new product that comes free with PerfectIt 5, and I’ve been privileged to play with it. As I said, I might be in love.
It was a beautiful dream. Now it’s a beautiful reality.
The Chicago Manual of Style for PerfectIt is a brand-new product that comes free with PerfectIt 5, and I’ve been privileged to play with it. As I said, I might be in love.
Beta testing on a novel

I ran The Chicago Manual of Style for PerfectIt on a 65,000-word test document – a copy of a thriller written in British English.
Here’s what else you also need to know about my setup:
Here’s what else you also need to know about my setup:
- The CMOS style sheet sits within PerfectIt 5
- I have an existing subscription to CMOS Online and PerfectIt
- I work on a PC and my OS is Windows 10, so I run the Windows version of PerfectIt
- I use Microsoft 365, which means I’m always working in the latest edition of Microsoft Word
- I’m based in the UK but work for clients all over the world and in a variety of Englishes and styles.
Why the editor retains control
I chose to test a document written in British English style in order to illustrate the control editors and writers have over any changes PerfectIt suggests.
Just because we’re checking against the built-in CMOS style sheet, which has its own set of defined preferences, doesn’t mean we have to adhere to all of them.
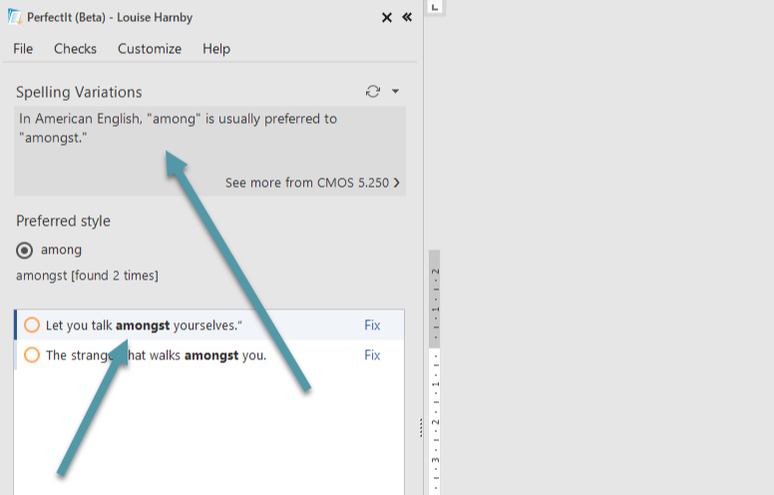
For example, PerfectIt flagged up ‘amongst’. At the top of the Spelling Variations window you can see why: In American English, “among” is usually preferred to “amongst.”
Actually, that preference is common in British English too. But the instances flagged up here are dialogue, and the character who’s speaking would be more likely to use ‘amongst’. And so I elected to ignore the suggestion and click on the Next button.
Using The Chicago Manual of Style for PerfectIt therefore doesn’t force us to make inappropriate changes to a client’s work. The editor retains stylistic control.
Just because we’re checking against the built-in CMOS style sheet, which has its own set of defined preferences, doesn’t mean we have to adhere to all of them.
For example, PerfectIt flagged up ‘amongst’. At the top of the Spelling Variations window you can see why: In American English, “among” is usually preferred to “amongst.”
Actually, that preference is common in British English too. But the instances flagged up here are dialogue, and the character who’s speaking would be more likely to use ‘amongst’. And so I elected to ignore the suggestion and click on the Next button.
Using The Chicago Manual of Style for PerfectIt therefore doesn’t force us to make inappropriate changes to a client’s work. The editor retains stylistic control.
How to customize The Chicago Manual of Style for PerfectIt
I love CMOS’s good-sense guidance, and find much of it helpful for all of the crime fiction, thrillers and mysteries that pass over my desk.
However, half of those books are written in British English style, which means I want to access all the functionality of The Chicago Manual of Style for PerfectIt but tweaked for my own needs.
If spelling is all I’m worried about, a simple workaround is just to turn off PerfectIt’s Spelling Variations check. However, there are other customizations I usually like to do with novels in British English style in addition to spelling.
For me, the ability to customize PerfectIt has always been one of its biggest selling points. That flexibility is fantastic for any editor who regularly uses CMOS’s guidance but just as regularly needs to adapt key aspects of it.
We can’t amend built-in style sheets. What PerfectIt does instead is allow us to create a copy and amend that. Which is why I now have this little gem in the dropdown menu of available style sheets: Chicago Manual of Style LHUK.
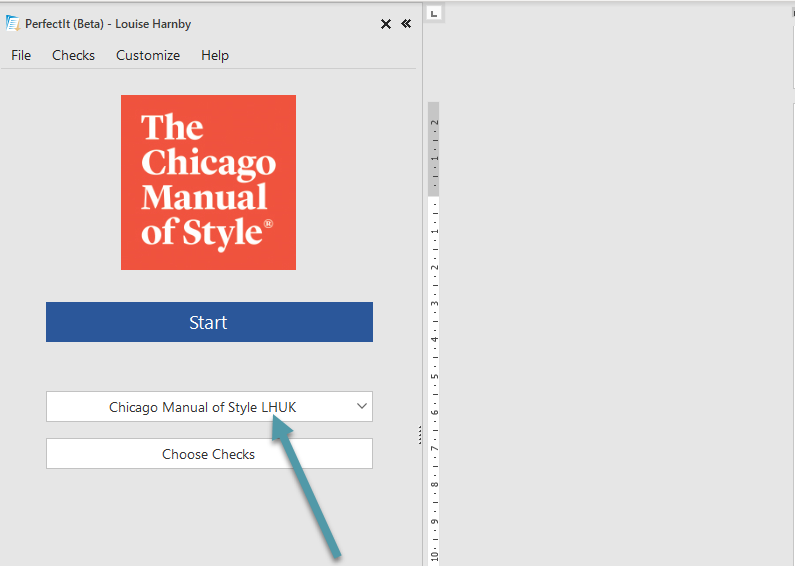
This is still CMOS, but CMOS for me and some of my clients! I’ve edited the copied style sheet so that now it has a different set of preferences:
- Yze and yse endings: preference set to 'Prefer 's'.
- Personal title format: preference set to Mrs, Mx etc.
- Hyphens next to spaces: preference set to convert to en dash.
- Percent symbol: preference set to open (per cent).
- Space around dashes: preference set to en dash with spaces.
I retained the following:
- Quotes with punctuation: preference left at 'final before quotation mark' (because in British English fiction dialogue, that’s the convention followed).
- Ize and ise endings: preference left at -ize (because -ize suffixes aren’t American English style. They’ve been used in British English for centuries and are favoured by many British publishers).
Wow factor 1: CMOS learning at the editor’s fingertips
With The Chicago Manual of Style for PerfectIt, editors can access the best features of both from one platform, which means we can learn CMOS’s style preferences in tandem with our consistency checking.
Yes, we’re running PerfectIt 5. And, yes, we’re able to set it to work to CMOS’s recommendations. That in itself is a gem.
But the wow factor is the advice that comes with it – that mindful guidance I mentioned above.
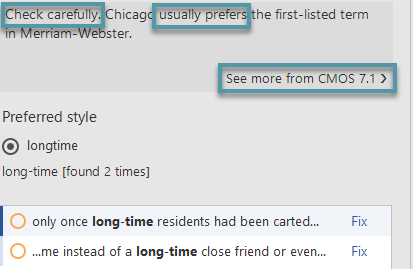
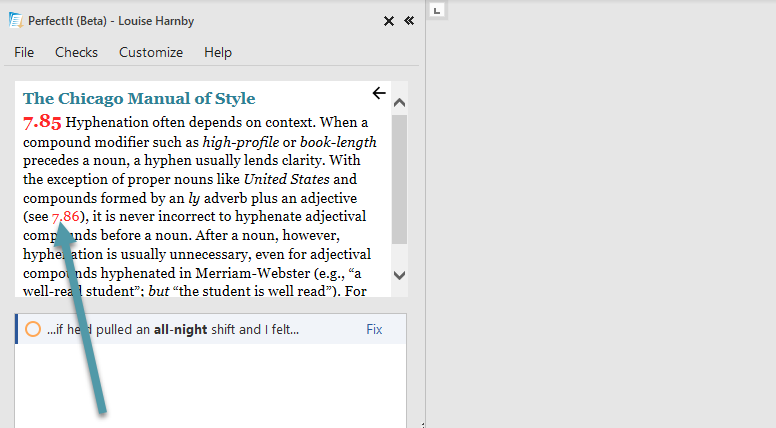
In the screenshot below, you can see what The Chicago Manual of Style for PerfectIt has flagged up: ‘long-time’ versus the preferred ‘longtime’. Now look at the comment above. This isn’t prescriptivism in play. Instead, we’re asked to ‘check carefully’ because of what Chicago ‘usually prefers’.
That’s a subtle but important reminder that regardless of whether we’re following CMOS or some other style guide, we’re dealing with preferences, not rules. This concept is foundational to professional editorial practice, and I’m pleased to see it shining through here.
Yes, we’re running PerfectIt 5. And, yes, we’re able to set it to work to CMOS’s recommendations. That in itself is a gem.
But the wow factor is the advice that comes with it – that mindful guidance I mentioned above.
In the screenshot below, you can see what The Chicago Manual of Style for PerfectIt has flagged up: ‘long-time’ versus the preferred ‘longtime’. Now look at the comment above. This isn’t prescriptivism in play. Instead, we’re asked to ‘check carefully’ because of what Chicago ‘usually prefers’.
That’s a subtle but important reminder that regardless of whether we’re following CMOS or some other style guide, we’re dealing with preferences, not rules. This concept is foundational to professional editorial practice, and I’m pleased to see it shining through here.
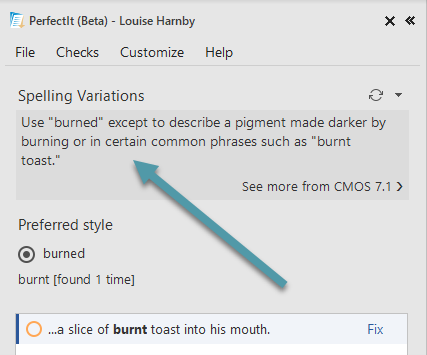
There’s more too. Perhaps we need additional information. Sure, we now know why this issue has been flagged up, but what if we want to verify that, just to be sure?
Perhaps we have to open our print or online dictionary after all. Not so. By clicking on ‘See more from CMOS 7.1 >’, we open another pane.
Within that pane are links not only to more detailed information from CMOS but also to the website of the external source cited, in this case Merriam Webster.com, which allows us to verify and learn if we want to.
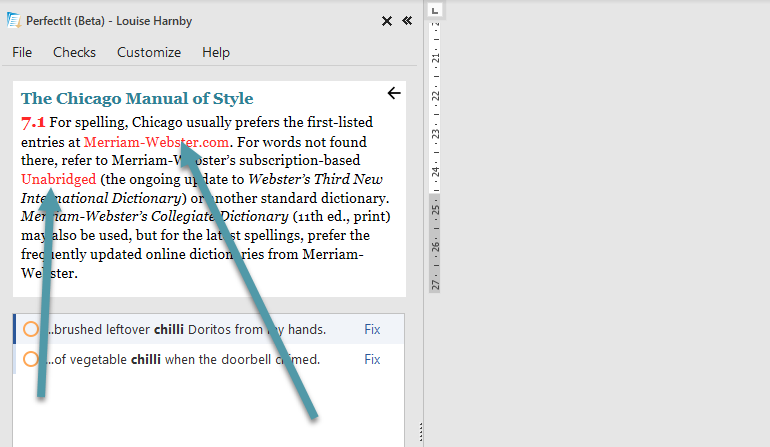
Or perhaps we want to explore the issue in more detail via our CMOS Online subscription. It’s right there in a clickable link.
It’s seconds saved, but those seconds add up – fewer keystrokes and zero searching for where the solution to our problem lies. The Chicago Manual of Style for PerfectIt has done the heavy-lifting for us.
Wow factor 2: Seamless access

Editors often want quick access to information that enables us to develop our learning. Impatience and software aren’t always favourite cousins, and clicking through to external resources while a program’s in the middle of doing its thing is usually a no-no.
Would clicking through to CMOS Online or Merriam Webster.com in the middle of a PerfectIt run be too much? Would the software slow down, stall or even crash? Would that instant access to learning be more trouble that it was worth?
I’m delighted to report that the clickthroughs were seamless.
The nub of it is this. CMOS hasn’t been shoehorned in PerfectIt 5. It, and the external links built into it, are fully integrated. So when we want to access external content via those links, we can do so and be assured that the software will remain stable.
That’s a big plus for busy editors who want software that works without clunk
Wow factor 3: Shifting the burden of search
CMOS is comprehensive. Any editor who owns the print version knows just how comprehensive. The online version made finding solutions to problems easier. Integrating some of the core elements of style within PerfectIt 5 has taken things a stage further.
It comes down to who or what bears the burden of search. Ordinarily, the editor does. We spot a style-consistency issue, open up our reference source, check the preference and make a decision.
It comes down to who or what bears the burden of search. Ordinarily, the editor does. We spot a style-consistency issue, open up our reference source, check the preference and make a decision.
With this product, the burden shifts. Now The Chicago Manual of Style for PerfectIt is bearing some of the load. It’s spotting potential problems, suggesting the fix, explaining the reasoning behind that suggestion, and taking us to the exact place in one of the world’s premier style guides where deeper learning resides.
That’s a time-saver and a stress-reducer. No editor wants to spend time on searching for anything. Pro editors love to learn but none of us love struggling to find answers. After all, we’re paid to edit, not to search.
And so for those of us working to fixed project fees, time saved means a better hourly rate and a more profitable business.
What PerfectIt 5 won't do
I don’t expect my roofer to comment on the condition of my hair or how well my car’s running. Similarly, we mustn’t expect PerfectIt 5 to check our book files for problems it’s not designed to handle.
CMOS is huge, and there’s a ton of information in it that isn’t related to the kind of checks PerfectIt runs.
PerfectIt is a consistency checker, so if you want guidance on how to cite a reference according to CMOS or any other style guide, you’re still going to have to look it up.
Same thing if you’re wondering whether to place a comma between two independent clauses separated by coordinating conjunctions. CMOS has advice on this, but fiction editors will need to consider context and sentence rhythm too.
How much does it cost?

If you have a subscription to PerfectIt 4 and to CMOS Online, you’ll pay nothing. That’s right. Zero! You’ll automatically be upgraded to PerfectIt 5, which includes the CMOS style guide. Are you falling in love now?
You will have to grab the latest update from the Intelligent Editing website, but that’s always been the case.
So who needs to pay? If you have a subscription to one product but not the other, you’ll need to rectify that if you want to use The Chicago Manual of Style for PerfectIt.
You will have to grab the latest update from the Intelligent Editing website, but that’s always been the case.
So who needs to pay? If you have a subscription to one product but not the other, you’ll need to rectify that if you want to use The Chicago Manual of Style for PerfectIt.
How to unlock access to the CMOS style sheet
Once you’ve downloaded PerfectIt 5, you’ll see that CMOS is available in the dropdown list of styles. However, there’s one more step you’ll need to take before you can use it.
First, link your PerfectIt account to an active CMOS Online subscription. That will give you a new license key that unlocks The Chicago Manual of Style for PerfectIt.
First, link your PerfectIt account to an active CMOS Online subscription. That will give you a new license key that unlocks The Chicago Manual of Style for PerfectIt.
My beta test: The verdict

I love it. So should you buy it? If you already subscribe to PerfectIt and CMOS Online, you don’t need to spend a penny! All you need to do is link both accounts and unlock the features.
If you’re already using CMOS regularly, want to build your knowledge about the guide’s preferences, and check for consistency in line with CMOS within a seamless interface, yes, I recommend you invest in PerfectIt.
PerfectIt and CMOS are both trusted resources. This digital partnership will help all of us edit more confidently and mindfully.
Where to get The Chicago Manual of Style for PerfectIt
Here's what to do:
And if you’ve bought one of my courses, there’s a discount code waiting for you on the course page.
Then let me know if you fall in love too!
- If all you need to do is link your existing subscriptions to PerfectIt and CMOS, sign in to your PerfectIt account and follow the instructions.
- If you want to buy PerfectIt for the first time, head over to the Intelligent Editing website.
And if you’ve bought one of my courses, there’s a discount code waiting for you on the course page.
Then let me know if you fall in love too!
Resources
Louise Harnby is a line editor, copyeditor and proofreader who specializes in working with crime, mystery, suspense and thriller writers.
She is an Advanced Professional Member of the Chartered Institute of Editing and Proofreading (CIEP), a member of ACES, a Partner Member of The Alliance of Independent Authors (ALLi), and co-hosts The Editing Podcast.
She is an Advanced Professional Member of the Chartered Institute of Editing and Proofreading (CIEP), a member of ACES, a Partner Member of The Alliance of Independent Authors (ALLi), and co-hosts The Editing Podcast.
- Get in touch: Louise Harnby | Fiction Editor & Proofreader
- Connect: Twitter at @LouiseHarnby, Facebook and LinkedIn
- Learn: Books and courses
- Discover: Resources for authors and editors
This outline of the proofreading, copyediting and line-editing process is one way of organizing your editorial workflow rather than bowling straight into a project.
What follows is my process – the steps I take and the order in which I take them. That doesn’t mean it’s THE process! You might prefer to organize yourself differently.
Editorial business parameters
My business model might look very different to yours. Here’s what you need to know about me when considering the process I outline below.
- I work on raw-text files in Microsoft Word.
- I work directly with crime fiction, thriller and mystery writers. I might be the only editorial person the author’s worked with.
- I work only on fiction so my editing projects are straight text.
- Most of my projects require line editing rather than proofreading.
- Even when hired to proofread, I tend to work on raw-text files rather than designed PDF or hardcopy page proofs.
- Unless otherwise agreed (and billed for), a project involves a single pass.
Proofreading designed page proofs
I no longer work on designed page proofs (PDF or hardcopy), but at the point in my career when I did, I used the checklist below.
Step 1. Project legalities
I carry out the project legalities as soon as the author and I have agreed to work together and decided on the project's time frame.
This part of the process protects me and my client, and ensures we have a mutual understanding of the project’s terms and conditions.
This part of the process protects me and my client, and ensures we have a mutual understanding of the project’s terms and conditions.
Step 2. File checking and organization
This work takes place as soon as the book file arrives. The checks ensure I can find the material, and that it’s usable when it’s time for the edit to begin.
WHAT I DO
- Create a project folder
- Check the book file can be opened and is readable
- Check the page count to confirm that all the content is available
- Save a copy of the project file with a unique name, eg Smith-LH-Edit-020421-v1
- Place the original and the copy in the project folder
Step 3. Template creation
This part of the process helps me get organized. I do it before the edit begins.
|
WHAT I DO
|
|
Step 4. Technical setup
Next up is some technical setup related to Microsoft Word.
WHAT I DO
- Open the book file and make sure Track Changes is switched on
- Check that the VisibleTrackOff macro is functioning. This ensures I never forget I’ve switched off Track Changes temporarily
- Open Word’s Set Proofing Language function to ensure it’s recognizing the appropriate version of English
- Uncheck the ‘Do not check spelling or grammar’ box
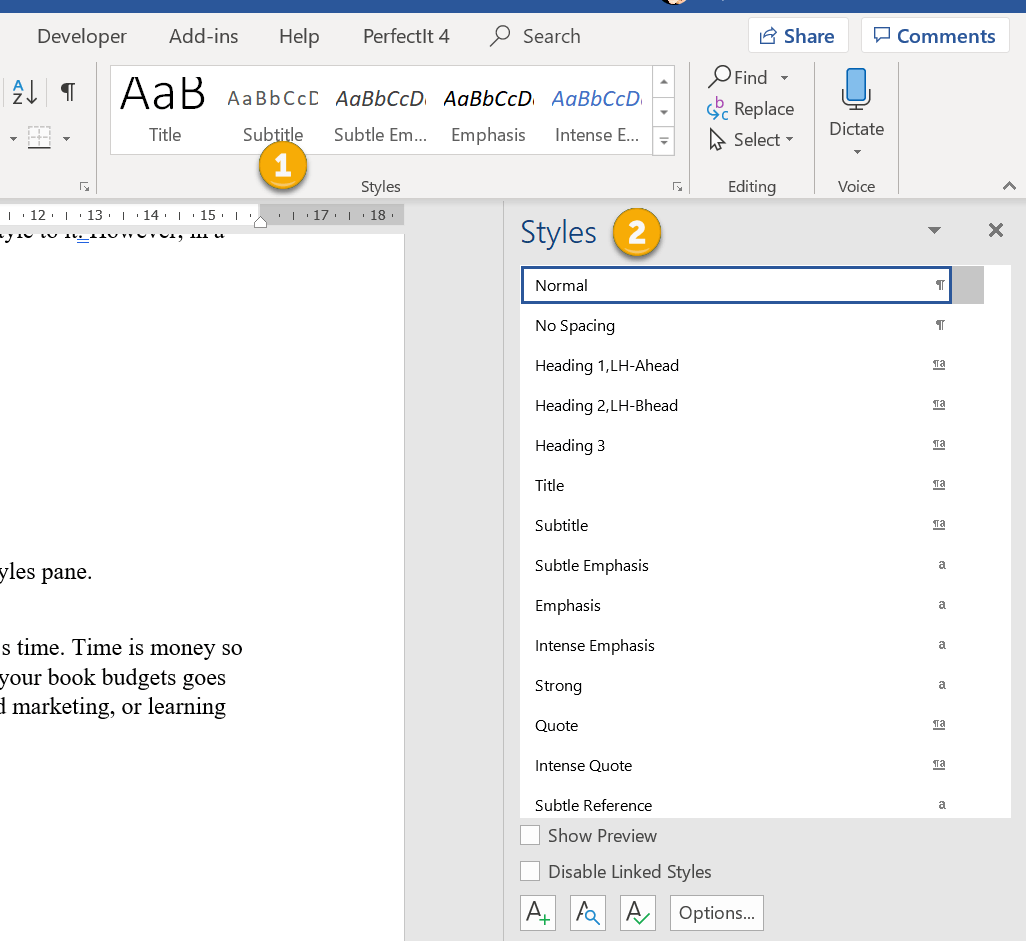
Step 5. Styles
Now it’s time to assess the book file’s styling. Even though an interior formatter might work on the design at a later stage, I want to ensure that the different elements are formatted consistently.
Word’s styles palette is the tool of choice. If I decide to make changes, I can amend the style rather than trawling through the entire book file line by line.
Word’s styles palette is the tool of choice. If I decide to make changes, I can amend the style rather than trawling through the entire book file line by line.
If I’m line editing, the author might have done some or all of this work. If I’m proofreading, another editor might have done it.
After I’ve set up the styles, I apply them to the book file.
Step 6. Chapter sequence check
Now that my chapter headings are styled, I can locate them in Word’s navigation pane and ensure the numbering is correct.
It’s not uncommon for authors to shift chapters around, and that’s where problems slip in.
It’s not uncommon for authors to shift chapters around, and that’s where problems slip in.
WHAT I CHECK
- That the chapters are sequenced correctly
- That there are no chapters with the same number
- That there are no missing chapter numbers
- That the headings, subheadings and first-paragraph indents are styled properly
Step 7. Front-matter check
I like to cast my eye over the front matter separately from the main edit.
The most exciting part of the project for me is the edit itself, so doing mundane but critical technical checks separately ensures my eye’s on the ball and I'm not making assumptions.
The most exciting part of the project for me is the edit itself, so doing mundane but critical technical checks separately ensures my eye’s on the ball and I'm not making assumptions.
|
WHAT I TYPICALLY CHECK
|

|
Step 8. Macro run and style-sheet build
Next, I run a selection of pre-edit macros.
Editors use all sorts of different software and tools to complement their eye depending on the issues they need to check, the material they’re working on, and their clients’ needs.
The macros I've listed below are not what you must use; they’re just my preferences.
Editors use all sorts of different software and tools to complement their eye depending on the issues they need to check, the material they’re working on, and their clients’ needs.
The macros I've listed below are not what you must use; they’re just my preferences.

I use what I learn to start filling in the project’s style sheet.
At this stage I’m making early decisions about spelling, hyphenation, capitalization and proper noun usage, and noting any red flags.
RED FLAGS INCLUDE
- Inconsistent character names
- Characters with similar or the same names
- Inconsistent spelling of place names
- Language that’s prejudicial or misrepresentational
Even if I locate problematic language, I’ll not make any decisions about what needs to be done until the contextual edit begins and I can review it within the wider story arc. At this point, I'll just highlight.
I’ll also record initial observations that are key to the line edit.
INITIAL OBSERVATIONS
- Narration style (e.g. first or third person)
- The novel’s base tense (eg past, present)
- The author’s preferences (expressed via the Author Preferences form or email)
Step 9. The edit
Now it’s time to begin editing. This is the fun bit, what I've been hired for! It's the non-technical part of the job but the most time-consuming.
I work through the book file line by line and edit according to the agreed scope of the project.
I work through the book file line by line and edit according to the agreed scope of the project.
|
WHAT I DO
|

|
Step 10. The part-way PerfectIt check
One third of the way through the line edit, I run PerfectIt again.
That’s because I’ll have made many new style choices that affect, for example, spelling, capitalization and hyphenation, ones that I didn’t pick up during my pre-edit macro run.
That’s because I’ll have made many new style choices that affect, for example, spelling, capitalization and hyphenation, ones that I didn’t pick up during my pre-edit macro run.
BENEFITS
- A part-way PerfectIt check does the heavy lifting, allowing me to locate additional inconsistencies quickly.
- The more mundane technical work the software does, the fewer distractions for me while I’m editing for sense and sensibility.
Step 11. The technical tidy-up
When the edit is complete, I carry out another round of checks for layout, consistency, spelling and grammar – a final technical tidy-up to that ensures everything’s spit spot. A little Mary Poppins never hurt anyone!
|
WHAT I DO
|

|
Step 12. Style sheet check
Next, I review the style sheet to ensure that it’s fit for purpose.
Step 13. Create the editorial report
Now I create my editorial report. I use a detailed template that’s already populated with client-friendly summaries of the theory behind the edits (accessible via my course How to Write the Perfect Fiction Editorial Report).
WHAT THE REPORT INCLUDES

|
|
Step 14. Delivery and invoicing
Finally, I prepare the files for my client. It's time to show them what I've done and why I've done it!
WHAT I INCLUDE
- The edited book file with all tracked changes and comments
- The edited book file with all changes accepted but comments still showing
- The edited book file with all tracked changes accepted and comments removed
- A PDF of the style sheet
- A PDF of the editorial report

After I’ve emailed the files, I issue an invoice for the outstanding fee. Some editors choose to send the files only after all monies have been paid. How you do it is for you to decide.
Wrapping up
So that's my way. I hope it'll help you streamline your process if you're unsure where to start.
Just bear this in mind: There's no one best way. We all work differently, and there are multiple ways to edit efficiently and productively.
Just bear this in mind: There's no one best way. We all work differently, and there are multiple ways to edit efficiently and productively.
Louise Harnby is a line editor, copyeditor and proofreader who specializes in working with crime, mystery, suspense and thriller writers.
She is an Advanced Professional Member of the Chartered Institute of Editing and Proofreading (CIEP), a member of ACES, a Partner Member of The Alliance of Independent Authors (ALLi), and co-hosts The Editing Podcast.
FIND OUT MORE
> Get in touch: Louise Harnby | Fiction Editor & Proofreader
> Connect: Twitter at @LouiseHarnby, Facebook and LinkedIn
> Learn: Books and courses
> Discover: Resources for authors and editors
If you edit or proofread directly in Microsoft Word, PerfectIt is must-have software. This post highlights my favourite features, and explains why I think it's the best consistency-checking software on the planet.

What is PerfectIt?
PerfectIt is a sophisticated consistency-checker and style-enforcer. By customizing its built-in style sheets, creating your own, or uploading some of the free ones others have shared, you can define your preferences and let PerfectIt locate variations and possible errors.
PerfectIt comes in two versions:
In this article, I'll highlight the features I find most useful when editing directly in Microsoft Word for independent authors.
Disclaimer: I have a PerfectIt licence and am a long-time user of the software. However, the developer has not asked me to write this review, nor have I been remunerated in any way for doing so. The views expressed herein are mine and based solely on my experience of using PerfectIt on a regular basis.
PerfectIt comes in two versions:
- the Windows option, which you download to your device and use locally
- the Cloud version, which works with Mac OS.
In this article, I'll highlight the features I find most useful when editing directly in Microsoft Word for independent authors.
Disclaimer: I have a PerfectIt licence and am a long-time user of the software. However, the developer has not asked me to write this review, nor have I been remunerated in any way for doing so. The views expressed herein are mine and based solely on my experience of using PerfectIt on a regular basis.
Why I wouldn't be without a PerfectIt licence
- It saves me time.
- It helps me return a better-quality manuscript to my clients.
- It does the hard graft faster than I can, which means I can focus on flow, mood, rhythm and context.
Why the software works best when the user takes control
To get the best out of PerfectIt, you must tell it what you want it to do.
That means launching one of the style sheets and taking time to consider the various options (and there are a lot). During my early days of using the software, I found it missed inconsistencies and flagged up false positives.
It turned out is wasn't PerfectIt that was functioning inadequately. It was me. I hadn't told it what was relevant to me, so it did the best it could with the information it had. I spent time refining my style sheets to meet my needs, and was rewarded for my effort.
If you don't make the time to customize PerfectIt, you'll get good result. If you do, you'll get great results.
A summary of PerfectIt's core functions
Here's an overview of what the software can do for you when you're writing and editing in Word.
- Abbreviations: Checks they're rendered consistently and defined according to your preferences.
- Capitalization: Checks that headings, words and phrases are capitalized consistently and according to your style preferences.
- Dashes: Checks hyphens and dashes in words, prefixes, compound phrases, fractions, compass points and and number spans, and makes them consistent according to your style preferences.
- Spelling: Checks for spelling variations, whether numbers are spelled out or rendered in numerals, and flags common mistakes.
- Stylistic control: Allows you to customize onboard and imported style sheets to ensure a document is on brand.
- Tables and figures: Checks heading style and numbering.
My favourite features and how they help me
Here's what I love most about PerfectIt. These are the checks I carry out routinely and why I think it's must-have software for the editorial freelancing pro.
1. Wildcard searches
2. Missing brackets and quotation marks
3. Oxford/serial comma
4. Italic text
5. Dashes and non-breaking spaces
6. Heading format
7. Custom style guides
2. Missing brackets and quotation marks
3. Oxford/serial comma
4. Italic text
5. Dashes and non-breaking spaces
6. Heading format
7. Custom style guides
1. Wildcard searches
PerfectIt allows you to harness the power of wildcard searches using exactly the same terms you’d use in Word.
I love this feature because it means I can work more efficiently – I don’t have to run a set of find/replace searches in Word and then go and do a bunch of other stuff in PerfectIt. I can consolidate all my wildcard searches in one place, which saves me time.
Plus, Word can get a little grumpy with wildcards if we're editing with Track Changes on, which is essential for the kind of work I do.
2. Missing brackets and quotation marks
This is a gem for those work on academic projects with lots of brackets (e.g. author/date citations or quoted matter) and those of us who proofread and edit fiction (e.g. dialogue).
3. Oxford/serial comma
The debate about whether the Oxford comma is useful or unnecessary rumbles on in the world of words.
No matter – editors and proofreaders often find themselves instructed by their client to use it or bin it (except where enforcing the preference would lead to a lack of clarity). PerfectIt allows you to set a preference either way.
No matter – editors and proofreaders often find themselves instructed by their client to use it or bin it (except where enforcing the preference would lead to a lack of clarity). PerfectIt allows you to set a preference either way.
4. Italic text
If your client has insisted that a particular word is italicized (or not), you’ll love this function. PerfectIt already has a built-in list of words that can be styled, but you can add your own.
5. Dashes and non-breaking spaces
If you work on documents riddled with hyphens that should be spaced en dashes or closed-up em dashes, or you want to ensure that all those space-separated numbers and measurements aren't going to fall over the cliff at formatting stage, you’ll adore this function.
We can fix this problem with Word’s find/replace tool, but being able to consolidate the search within the PerfectIt platform is another time-saver. The fewer programs we have use to get high-quality consistency within the framework of a client’s brief, the more time we save and the better our hourly rate.
We can fix this problem with Word’s find/replace tool, but being able to consolidate the search within the PerfectIt platform is another time-saver. The fewer programs we have use to get high-quality consistency within the framework of a client’s brief, the more time we save and the better our hourly rate.
6. Heading format
PerfectIt enables us to harness the power of Word’s styles palette. You can set your preferences for several different heading levels, e.g. sentence case, initial caps on significant words, upper case, or all initial capitals.
7. Custom style sheets
You can build your own style sheets or grab one of the fantastic freebies that have been created and generously shared by other editors. My three current favourites are:
Join the PerfectIt Users Facebook group and click on the Files tab to access the style sheets.
- Conscious Language Check, created by Sofia Matias
- CMoS with Compounds (Chicago Manual of Style), created by Tasha Rebekah Bigelow
- Author's proofreading companion, created by Andrea Kay and based on my free booklet Formatting in Word: Find and Replace
Join the PerfectIt Users Facebook group and click on the Files tab to access the style sheets.
How often to run PerfectIt
How often should you run PerfectIt it? It's up to you. I like to run it three times: at the start of a project, in the middle and at the end.
- The first run-through helps me build my custom client style sheet.
- Round two helps me mop up lots of distracting inconsistencies now that my style choices are in place.
- The final run is a quality-control check to pick up inconsistencies introduced as I've edited.
Other benefits
There are three more things I love about PerfectIt's functionality.
That's the thing about PerfectIt and me – we're partners. It does what software's good at so I can do what humans are good at.
Fancy trying it? Visit the Intelligent Editing website. If you've bought one of my courses or books direct from this website, log in and grab your special discount code.
- PerfectIt is stable. I work on novels and need software that can handle large files with multiple corrections without crashing. It can.
- PerfectIt is fast, even more so since Version 4 was launched. Every minute I don't spend waiting for software to do what I've tasked it to means a better hourly rate.
- Perfect does the finding. Do you like editing for consistency? Me too! However, finding what needs to be edited is a time-sucker I can do without. I let the software do the sleuthing so I can focus on the thinking.
That's the thing about PerfectIt and me – we're partners. It does what software's good at so I can do what humans are good at.
Fancy trying it? Visit the Intelligent Editing website. If you've bought one of my courses or books direct from this website, log in and grab your special discount code.
Related resources
|
On The Editing Podcast: How to edit for consistency and style |
> Author resources library (includes links to free webinars and writing tools)
> Editor resources library (see in particular the Editing Tools section)
> Editor resources library (see in particular the Editing Tools section)
Louise Harnby is a line editor, copyeditor and proofreader who specializes in working with crime, mystery, suspense and thriller writers.
She is an Advanced Professional Member of the Chartered Institute of Editing and Proofreading (CIEP), a member of ACES, a Partner Member of The Alliance of Independent Authors (ALLi), and co-hosts The Editing Podcast.
FIND OUT MORE
> Get in touch: Louise Harnby | Fiction Editor & Proofreader
> Connect: Twitter at @LouiseHarnby, Facebook and LinkedIn
> Learn: Books and courses
> Discover: Resources for authors and editors
She is an Advanced Professional Member of the Chartered Institute of Editing and Proofreading (CIEP), a member of ACES, a Partner Member of The Alliance of Independent Authors (ALLi), and co-hosts The Editing Podcast.
FIND OUT MORE
> Get in touch: Louise Harnby | Fiction Editor & Proofreader
> Connect: Twitter at @LouiseHarnby, Facebook and LinkedIn
> Learn: Books and courses
> Discover: Resources for authors and editors
Every professional editor is a business owner, and that role requires us to track the health of our businesses from one year to the next. Managing and analysing all that data can be a burden, especially if you’re more interested in words than numbers!
Fellow editor and Excel authority Maya Berger has created a tool that will make life easy. It’s called The Editor's Affairs (TEA).
Fellow editor and Excel authority Maya Berger has created a tool that will make life easy. It’s called The Editor's Affairs (TEA).

All the data in one place
When it comes to keeping an eye on the health of my business, simple has always been my goal. I’m an editor, not an accountant.
Essentially, I want as much as possible in one place:
And when it’s time to submit a tax return to (in my case) HMRC and evaluate how things are going, I don’t want to be faffing around with several different apps and spreadsheets.
Instead, I want to see the core data at a glance … data that will tell me the following:
On a project basis:
On a business-health basis:
I don’t want to spend ages collecting and collating this data so it’s easy to access. I want summaries that give me a number – automatically generated by the data I’ve inputted throughout the financial year.
Then, when it’s time to review my business and submit my return to the tax authorities, the numbers are ready and waiting for me.
I’ve been tracking my data for years, and while I’m fairly proficient with Excel, I’ve been aware that there’s more I could do to fine-tune my process. However, like many editors, I have neither the time nor the will. So when Maya asked me to take a look at TEA, I jumped at the chance.
When it comes to keeping an eye on the health of my business, simple has always been my goal. I’m an editor, not an accountant.
Essentially, I want as much as possible in one place:
- Project schedule
- Project data
- Business income
- Business expenses
And when it’s time to submit a tax return to (in my case) HMRC and evaluate how things are going, I don’t want to be faffing around with several different apps and spreadsheets.
Instead, I want to see the core data at a glance … data that will tell me the following:
On a project basis:
- Hourly rate
- Start and end dates
- Fees – quotes, paid, pending and overdue
- Baselines data – word count, hours worked
- Client name, project title, how they found me
On a business-health basis:
- Which clients I earn the most money from
- The worth of each client as a percentage of my total income
- Which months are the most lucrative
- Average hourly rates
- Average speeds
- Comparison of data with the previous year
- Income to declare
- Allowable expenses to offset
I don’t want to spend ages collecting and collating this data so it’s easy to access. I want summaries that give me a number – automatically generated by the data I’ve inputted throughout the financial year.
Then, when it’s time to review my business and submit my return to the tax authorities, the numbers are ready and waiting for me.
I’ve been tracking my data for years, and while I’m fairly proficient with Excel, I’ve been aware that there’s more I could do to fine-tune my process. However, like many editors, I have neither the time nor the will. So when Maya asked me to take a look at TEA, I jumped at the chance.

The Editor's Affairs (TEA)
So what is TEA? It’s a one-stop-shop Excel spreadsheet with lots of built-in jiggery-pokery that does all the tricky formula work for you. All you need to do is input the project (and expenses) data as it comes in.
Below are examples of some of the project data an editor can input, and the received data from TEA.
Examples of data the editor can input
Examples of received data from TEA
So what is TEA? It’s a one-stop-shop Excel spreadsheet with lots of built-in jiggery-pokery that does all the tricky formula work for you. All you need to do is input the project (and expenses) data as it comes in.
Below are examples of some of the project data an editor can input, and the received data from TEA.
Examples of data the editor can input
- Invoice number
- Start date
- Finish date
- Date of completion
- Payment due
- Payment date
- Client name
- Notes about the job
- How the client found me
- Total word count
- Estimated words per hour
- Desired hourly rate
- Actual number of hours worked
- Amount invoiced
- Amount received
Examples of received data from TEA
- A status alert if the invoice is overdue
- An estimate of actual words/hr
- An estimate of how many hours I’d have to work to achieve my desired hourly rate
- My actual rate per hour
- My actual speed
- My actual rate per 1,000 words
- The amount I need to quote to achieve my desired hourly rate

5 reasons why TEA is worth it
So why is it worth investing in TEA? I identified 5 standout features that I believe make this a must-have tool.
NOTE: The numbers and client information below are for the purposes of illustration only. I made them up because my business affairs are of no concern to anyone but me!
1. Making informed decisions when quoting
TEA allows you to see the impact of the data you’re inputting on your business, and make informed decisions about how you should quote. Let’s take an example:
John Smith asks me to line edit a 100K-word novel. I estimate I can edit at a speed of 1,750 words per hour, so I input that information along with the word count.
I decide I want to earn £40 per hour. I add that data to the row.
Now I can build my quote. I type 57 into the hours-worked cell.
For argument’s sake, let’s say I know that my client’s budget is £2,000. I can temporarily add this to the amount-received cell.
If I’m happy to work for £35.09 rather than £40 per hour, I’m good to go. If I don’t, I can negotiate with the client. The point is, I can play with the data I’m inputting and see the impact. And that means there are no surprises. I’m making informed decisions.
2. Collecting data for the future
Less experienced editors might not yet have enough older data to know how long a particular type of editing will take, or whether Client A’s work tends to be speedier to complete than Client B’s. TEA helps us build that knowledge via accrued data that we can use later on. Another example …
In April 2019, Jackie Jones asks me to proofread her 30,000-word novella. I have no clue how long it will take so I estimate a speed of 5,000 words an hour. I’m grateful for the opportunity because my business is new. I decide I’ll be happy earning anything over £20 per hour.
TEA tells me my rate per 1,000 words will be £4 and it’ll take 6 hours, so I bill for £120. I get the gig and do the work. In fact, it takes me 10 hours. I input the new data.
But I’ve learned something. And when Jackie comes back to me three months later with another job with the same word count, this time I can input more accurate data, meaning I’ll earn my desired rate of £20 per 1,000 words.
3. Saving time and protecting the data
At no time am I messing around with a calculator. All I do is input the raw data and review what TEA’s analysis cells tell me.
That saves me time because TEA’s doing the maths for me.
Plus, I can’t break the spreadsheet! TEA’s analysis cells are locked so I won’t inadvertently alter the complex formulae within.
4. Client analysis
Some editors work for repeat clients – an agency or publisher, for example. In those cases, we’re not always in control of the price, and yet those clients can still be valuable because of the amount of repeat work they send us and the percentage of our overall income their business accounts for.
Knowing who our most valuable clients are is essential if we’re to avoid knee-jerk reactions to rates of pay.
If Publisher A pays me an hourly rate half that of Agency A but gives me five times as much work, I’ll want to think very carefully before canning that client because I don’t like their pricing structure.
TEA’s Client Summaries Table does what is says on the tin. It’s here that we can see a list of our clients, the percentage their business contributes to our overall income, the number of hours’ work we’ve done for them and the total income received.
Time for another example …
Let’s say I’m scowling at the row on the Income sheet because I’ve yet to crack £15 per hour from Romance Fiction Press. Just above is an entry for John Smith, the indie author from whom I earned £40 per hour.
Terrible rates, I think. Exploitative, disrespectful, unfair. I’m about to head off to a Facebook group with 10,000 editor members and have a bit of a rant. Then I’m going to tell that press where to stick it.
But hang on a mo! What does TEA have to say?
I nip onto the Summaries sheet and take a look at the Client Summaries Table.
Yes, John Smith is a more valuable client on a project-by-project basis but he’s not giving me anywhere near the same volume of work as Romance Fiction Press.
Instead of ranting on Facebook, I need to use that time to plan a strategy that will bring in more John Smiths or better-paying publishers and agencies. Once done, I can phase out Romance Fiction Press. That might take a couple of years of intensive marketing. Until then, the press will stay.
Perhaps I can negotiate a raise with them. Maybe there are efficiency tools I can introduce to increase my speed when I’m editing for them. And they pay on time, are pleasant to work with, and have given me loads of fodder for my portfolio that I can leverage on my website and in future marketing.
The work is regular, too, and lands on my lap without my having to promote myself to get it. And that time saved is worth something.
5. Making tracking and tax less taxing
There are two additional and extremely useful summary tables in TEA:
The totals are the figures you’ll report to the tax office. They’re right there in front of you – no hunting around in different apps and other spreadsheets. All the data filters through from easy-to-fill-in Income and Expenses sheets accessible via TEA’s tabs.
So why is it worth investing in TEA? I identified 5 standout features that I believe make this a must-have tool.
NOTE: The numbers and client information below are for the purposes of illustration only. I made them up because my business affairs are of no concern to anyone but me!
1. Making informed decisions when quoting
TEA allows you to see the impact of the data you’re inputting on your business, and make informed decisions about how you should quote. Let’s take an example:
John Smith asks me to line edit a 100K-word novel. I estimate I can edit at a speed of 1,750 words per hour, so I input that information along with the word count.
- TEA tells me I’ll need to set aside just over 57 hours for the project.
I decide I want to earn £40 per hour. I add that data to the row.
- TEA tells me my estimated rate per 1,000 words will be £22.86.
Now I can build my quote. I type 57 into the hours-worked cell.
- TEA tells me I need to quote £2,285.71.
For argument’s sake, let’s say I know that my client’s budget is £2,000. I can temporarily add this to the amount-received cell.
- TEA tells me my rate per hour would be £35.09.
If I’m happy to work for £35.09 rather than £40 per hour, I’m good to go. If I don’t, I can negotiate with the client. The point is, I can play with the data I’m inputting and see the impact. And that means there are no surprises. I’m making informed decisions.
2. Collecting data for the future
Less experienced editors might not yet have enough older data to know how long a particular type of editing will take, or whether Client A’s work tends to be speedier to complete than Client B’s. TEA helps us build that knowledge via accrued data that we can use later on. Another example …
In April 2019, Jackie Jones asks me to proofread her 30,000-word novella. I have no clue how long it will take so I estimate a speed of 5,000 words an hour. I’m grateful for the opportunity because my business is new. I decide I’ll be happy earning anything over £20 per hour.
TEA tells me my rate per 1,000 words will be £4 and it’ll take 6 hours, so I bill for £120. I get the gig and do the work. In fact, it takes me 10 hours. I input the new data.
- TEA tells me I’ve actually achieved only 3,000 words per hour and that my hourly rate was £12, not £20.
But I’ve learned something. And when Jackie comes back to me three months later with another job with the same word count, this time I can input more accurate data, meaning I’ll earn my desired rate of £20 per 1,000 words.
3. Saving time and protecting the data
At no time am I messing around with a calculator. All I do is input the raw data and review what TEA’s analysis cells tell me.
That saves me time because TEA’s doing the maths for me.
Plus, I can’t break the spreadsheet! TEA’s analysis cells are locked so I won’t inadvertently alter the complex formulae within.
4. Client analysis
Some editors work for repeat clients – an agency or publisher, for example. In those cases, we’re not always in control of the price, and yet those clients can still be valuable because of the amount of repeat work they send us and the percentage of our overall income their business accounts for.
Knowing who our most valuable clients are is essential if we’re to avoid knee-jerk reactions to rates of pay.
If Publisher A pays me an hourly rate half that of Agency A but gives me five times as much work, I’ll want to think very carefully before canning that client because I don’t like their pricing structure.
TEA’s Client Summaries Table does what is says on the tin. It’s here that we can see a list of our clients, the percentage their business contributes to our overall income, the number of hours’ work we’ve done for them and the total income received.
Time for another example …
Let’s say I’m scowling at the row on the Income sheet because I’ve yet to crack £15 per hour from Romance Fiction Press. Just above is an entry for John Smith, the indie author from whom I earned £40 per hour.
Terrible rates, I think. Exploitative, disrespectful, unfair. I’m about to head off to a Facebook group with 10,000 editor members and have a bit of a rant. Then I’m going to tell that press where to stick it.
But hang on a mo! What does TEA have to say?
I nip onto the Summaries sheet and take a look at the Client Summaries Table.
- TEA tells me that work from Romance Fiction Press earned me £11,000, which accounts for 54% of my annual income.
- John Smith is responsible for £2,285.71, or 11% of my annual income.
Yes, John Smith is a more valuable client on a project-by-project basis but he’s not giving me anywhere near the same volume of work as Romance Fiction Press.
Instead of ranting on Facebook, I need to use that time to plan a strategy that will bring in more John Smiths or better-paying publishers and agencies. Once done, I can phase out Romance Fiction Press. That might take a couple of years of intensive marketing. Until then, the press will stay.
Perhaps I can negotiate a raise with them. Maybe there are efficiency tools I can introduce to increase my speed when I’m editing for them. And they pay on time, are pleasant to work with, and have given me loads of fodder for my portfolio that I can leverage on my website and in future marketing.
The work is regular, too, and lands on my lap without my having to promote myself to get it. And that time saved is worth something.
5. Making tracking and tax less taxing
There are two additional and extremely useful summary tables in TEA:
- The Monthly Summaries Table shows income, hours worked, expenses and charitable donations compiled from basic data the editor places in the onboard income and expenses sheets. You can see which months are most lucrative. TEA gives you a sense of the degree to which your work is seasonal, and that helps you to plan ahead and promote your business appropriately if you want to fill some gaps.
- The Allowable Expenses Table has an itemized breakdown of what you can offset against your income.
The totals are the figures you’ll report to the tax office. They’re right there in front of you – no hunting around in different apps and other spreadsheets. All the data filters through from easy-to-fill-in Income and Expenses sheets accessible via TEA’s tabs.

How do I find out more about TEA?
Isn’t the name adorable? Using TEA is like having a cuppa! And it’s all about the editor’s affairs – our business affairs.
The data the editor has to input is basic stuff that all of us have access to or can estimate with every new job or expense that comes in.
The data TEA gives takes the stress out of scheduling, accounting and analysis.
Every editor needs to understand the health of their business so that they can make informed decisions about who they work with, how much they charge and where the value lies.
When accessing that data becomes burdensome, the temptation is to wing it. TEA means you don’t have to.
Maya will be making TEA available for purchase in May 2020. For introductory rates or to learn more about customized versions for more complex accounting and analysis, check out whatimeantosay.com/tea.
***
NOTE: I have no commercial stake in TEA, though I was given a free copy to experiment with in return for feeding back my experience of using it.
Louise Harnby is a line editor, copyeditor and proofreader who specializes in working with independent authors of commercial fiction, particularly crime, thriller and mystery writers.
She is an Advanced Professional Member of the Chartered Institute of Editing and Proofreading (CIEP), a member of ACES, a Partner Member of The Alliance of Independent Authors (ALLi), and co-hosts The Editing Podcast.
Visit her business website at Louise Harnby | Fiction Editor & Proofreader, say hello on Twitter at @LouiseHarnby, connect via Facebook and LinkedIn, and check out her books and courses.
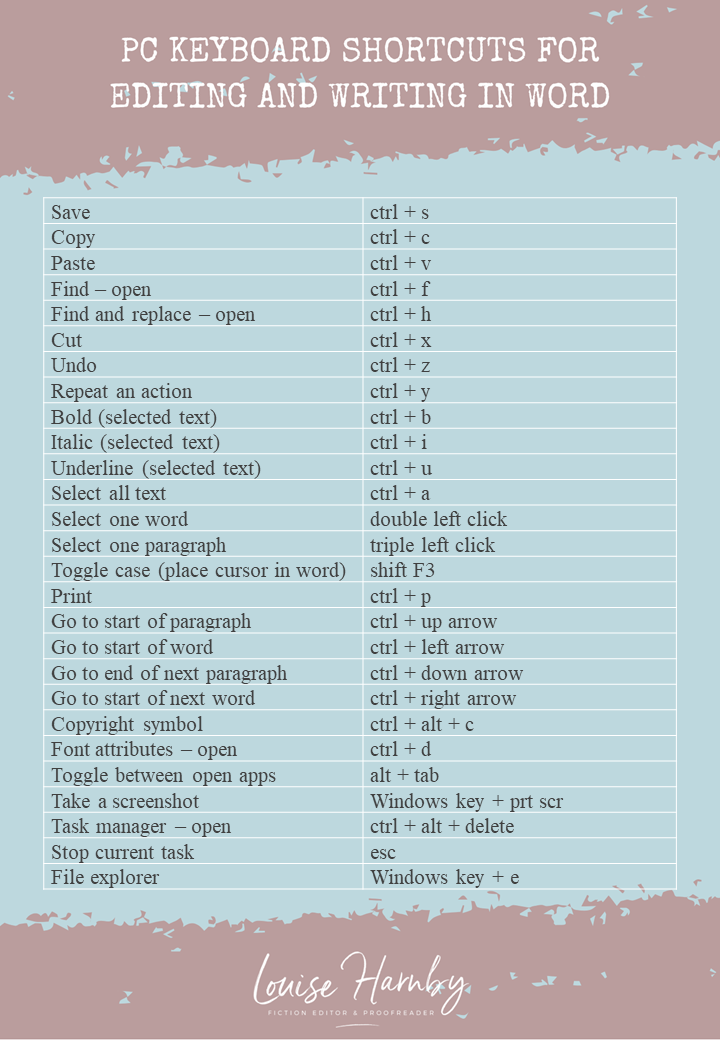
Writing or editing in Microsoft Word on a PC? Save yourself time by learning these 27 keyboard shortcuts.
If you don’t want to learn 27, learn just the first one: Save!
CLICK ON IMAGE TO DOWNLOAD A PDF
Louise Harnby is a line editor, copyeditor and proofreader who specializes in working with crime, mystery, suspense and thriller writers.
She is an Advanced Professional Member of the Chartered Institute of Editing and Proofreading (CIEP), a member of ACES, a Partner Member of The Alliance of Independent Authors (ALLi), and co-hosts The Editing Podcast.
Visit her business website at Louise Harnby | Fiction Editor & Proofreader, say hello on Twitter at @LouiseHarnby, connect via Facebook and LinkedIn, and check out her books and courses.
In this episode of The Editing Podcast, Denise and Louise talk about 10 editing macros that will save you time and improve the quality of your writing.

Click to listen to Season 2, Episode 5
Summary
Listen to find out more about:
Editing bites
Music credit
‘Vivacity’ Kevin MacLeod (incompetech.com). Licensed under Creative Commons: By Attribution 3.0 License.
Listen to find out more about:
- Macros how they work in Word
- CatchPhrase
- CitationLister and CitationListChecker
- CompareWordList
- File Cleaner
- FullPointInDialogue and CommaInDialogue
- MultiSwitch
- PerfectIt
- ProperNounAlyse
- SpellingErrorLister
- VisibleTrack
Editing bites
- ‘Advanced Find and Replace for Microsoft Word’: Available from Jack Lyon
- ‘20-Minute Macro Course’: Available from Tech Tools for Writers
Music credit
‘Vivacity’ Kevin MacLeod (incompetech.com). Licensed under Creative Commons: By Attribution 3.0 License.
Louise Harnby is a line editor, copyeditor and proofreader who specializes in working with crime, mystery, suspense and thriller writers.
She is an Advanced Professional Member of the Chartered Institute of Editing and Proofreading (CIEP), a member of ACES, a Partner Member of The Alliance of Independent Authors (ALLi), and co-hosts The Editing Podcast.
Visit her business website at Louise Harnby | Fiction Editor & Proofreader, say hello on Twitter at @LouiseHarnby, connect via Facebook and LinkedIn, and check out her books and courses.
She is an Advanced Professional Member of the Chartered Institute of Editing and Proofreading (CIEP), a member of ACES, a Partner Member of The Alliance of Independent Authors (ALLi), and co-hosts The Editing Podcast.
Visit her business website at Louise Harnby | Fiction Editor & Proofreader, say hello on Twitter at @LouiseHarnby, connect via Facebook and LinkedIn, and check out her books and courses.
In this episode of The Editing Podcast, Denise and Louise talk with Daniel Heuman, founder of Intelligent Editing and developer of PerfectIt – consistency-checking and style-enforcing software for editors and writers.
Click to listen to Season 2, Episode 3
Summary
Listen to find out more about:
Music credit
‘Vivacity’ Kevin MacLeod (incompetech.com). Licensed under Creative Commons: By Attribution 3.0 License http://creativecommons.org/licenses/by/3.0/
Listen to find out more about:
- What PerfectIt does
- Who uses PerfectIt
- What’s new with PerfectIt 4
- Using the onboard styles
- The PerfectIt 4 interface
- How to access PerfectIt on PC and Mac
- How much a subscription costs and what’s included
- Where to download PerfectIt
Music credit
‘Vivacity’ Kevin MacLeod (incompetech.com). Licensed under Creative Commons: By Attribution 3.0 License http://creativecommons.org/licenses/by/3.0/
Louise Harnby is a line editor, copyeditor and proofreader who specializes in working with crime, mystery, suspense and thriller writers.
She is an Advanced Professional Member of the Chartered Institute of Editing and Proofreading (CIEP), a member of ACES, a Partner Member of The Alliance of Independent Authors (ALLi), and co-hosts The Editing Podcast.
Visit her business website at Louise Harnby | Fiction Editor & Proofreader, say hello on Twitter at @LouiseHarnby, connect via Facebook and LinkedIn, and check out her books and courses.
She is an Advanced Professional Member of the Chartered Institute of Editing and Proofreading (CIEP), a member of ACES, a Partner Member of The Alliance of Independent Authors (ALLi), and co-hosts The Editing Podcast.
Visit her business website at Louise Harnby | Fiction Editor & Proofreader, say hello on Twitter at @LouiseHarnby, connect via Facebook and LinkedIn, and check out her books and courses.
Are you spending too much time on your novel’s text design? Here’s how to use the Styles function in Microsoft Word to ensure the various elements are formatted consistently.
In this article, I’ll walk you through the following:
What is the Styles tool?
The Styles tool allows you to apply design consistency to the various text elements in your book. In a novel, you might want to create different styles for the following:
Microsoft Word has a handy suite of on-board styles, though it’s unlikely they’ll match your specific requirements. Modifying these is still a little quicker than creating fresh styles so take a look at the properties and work out what you’ll retain and what you’ll change.
What properties can you influence?
You can influence every property of your text when you assign a style to it. However, in a novel, you’ll most likely focus on the following:
How to access the Styles tool
There are two ways to access the Styles function onscreen:
- What the Styles tool is
- The properties you can influence
- How to access the Styles tool
- Why it’ll save you time to use styles
- 3 ways to create a style
- 2 ways to modify a style
- How to assign a style to an element of text
- Troubleshooting
- How heading styles help you navigate
What is the Styles tool?
The Styles tool allows you to apply design consistency to the various text elements in your book. In a novel, you might want to create different styles for the following:
- book title
- author
- chapter titles
- subheadings
- indented body text
- full-out paragraphs in new chapters or sections
- displayed matter such as letters, texts, emails, reports
Microsoft Word has a handy suite of on-board styles, though it’s unlikely they’ll match your specific requirements. Modifying these is still a little quicker than creating fresh styles so take a look at the properties and work out what you’ll retain and what you’ll change.
What properties can you influence?
You can influence every property of your text when you assign a style to it. However, in a novel, you’ll most likely focus on the following:
- paragraph indentation
- spacing above and below the text
- font
- size
- colour
- italicization and bolding
- alignment (left, right, centred and justified)
- page flow (widow/orphan control; ensuring headings and corresponding text don’t fall on separate pages; page breaks)
How to access the Styles tool
There are two ways to access the Styles function onscreen:
- the Styles gallery in the ribbon
- the Styles pane
The gallery in the ribbon offers a preview of how the style appears. If I’m working with a lot of different text elements in a document, I find these visual clues useful when I want to locate a style quickly.
On smaller screens, less of the Styles gallery will be visible. To access the previews of all the styles in your gallery, click on the MORE arrow (circled).
On smaller screens, less of the Styles gallery will be visible. To access the previews of all the styles in your gallery, click on the MORE arrow (circled).
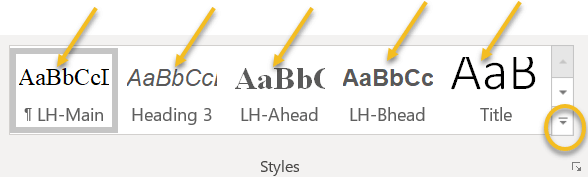
A new window will appear containing the full gallery.

Why you should format with styles
Using styles gives you control over design, consistency and formatting time.
Time is money, so when you do the job instead of asking other professionals to do it, your book budgets goes further. Perhaps you can invest a little more time or money on cover design, sales and marketing, or learning how to improve writing craft.
Can you format manually? Of course, but you could be making a lot of unnecessary work for yourself.
Scenario 1
You complete the writing, drafting, and editing, and get cracking on designing the layout. Now that there are 85,000 words in place, your thriller’s looking more like a textbook thanks to the font you’ve chosen for your main text: Arial 14. A serif font like Times New Roman would be easier on your reader’s eye.
The problem is, you can’t select all the text in the file with CTRL A and change it in one fell swoop because that would affect the chapter headings and the emails your transgressor is sending to the police, all of which are formatted differently. Instead, you have to work through the file, locate the main text elements manually, and change the font.
If, however, you’ve assigned a style to your main text, you can modify that font property in just a few clicks. The change will automatically change all the main text, and only that element, to your new font. Further down, I’ll show you how.
Scenario 2
You’ve written 12 additional paragraphs for your book but they’re in another document. You copy and paste the writing into your book file. Now you have to manually format the new sections so that they match the existing work.
If you’ve assigned styles, however, it’s as simple as cut, paste and left-click. Job done.
How to create a style
There are several ways to create a style in Word:
1A. Manual method
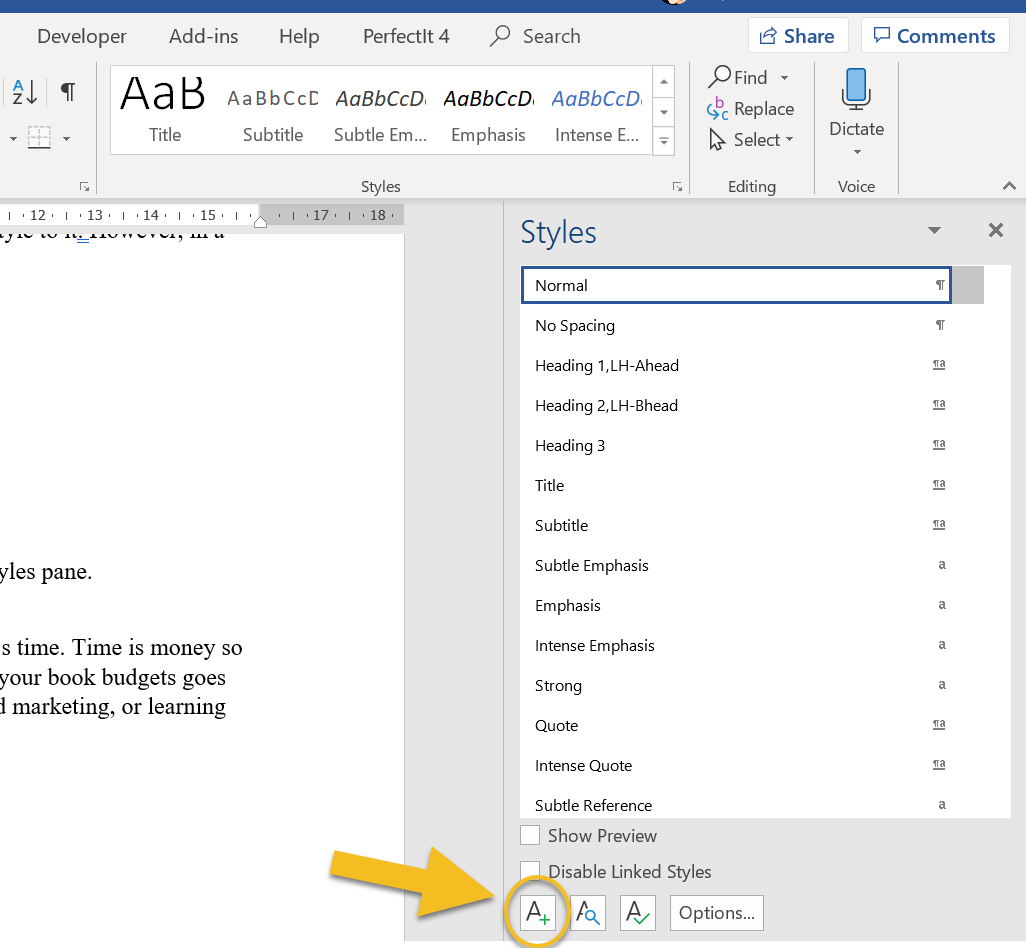
Open the styles pane and left-click on the A+ button in the bottom-left-hand corner.
Using styles gives you control over design, consistency and formatting time.
Time is money, so when you do the job instead of asking other professionals to do it, your book budgets goes further. Perhaps you can invest a little more time or money on cover design, sales and marketing, or learning how to improve writing craft.
Can you format manually? Of course, but you could be making a lot of unnecessary work for yourself.
Scenario 1
You complete the writing, drafting, and editing, and get cracking on designing the layout. Now that there are 85,000 words in place, your thriller’s looking more like a textbook thanks to the font you’ve chosen for your main text: Arial 14. A serif font like Times New Roman would be easier on your reader’s eye.
The problem is, you can’t select all the text in the file with CTRL A and change it in one fell swoop because that would affect the chapter headings and the emails your transgressor is sending to the police, all of which are formatted differently. Instead, you have to work through the file, locate the main text elements manually, and change the font.
If, however, you’ve assigned a style to your main text, you can modify that font property in just a few clicks. The change will automatically change all the main text, and only that element, to your new font. Further down, I’ll show you how.
Scenario 2
You’ve written 12 additional paragraphs for your book but they’re in another document. You copy and paste the writing into your book file. Now you have to manually format the new sections so that they match the existing work.
If you’ve assigned styles, however, it’s as simple as cut, paste and left-click. Job done.
How to create a style
There are several ways to create a style in Word:
- manually – 2 options
- by updating an existing unused style to match a piece of text you’ve selected or clicked within
1A. Manual method
Open the styles pane and left-click on the A+ button in the bottom-left-hand corner.
A new window will open (CREATE NEW STYLE FROM FORMATTING). Now you can give your style a name (1) and assign properties to the font, paragraph spacing and page flow (2 and 3).

1B. Manual method B
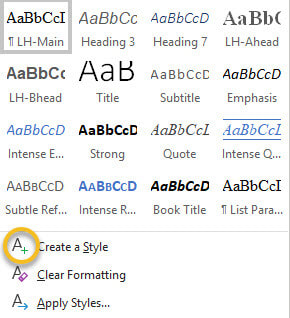
Alternatively, right-click on a piece of text that’s already formatted according to your preferences. A mini toolbar will appear. Click on the Styles button.
Alternatively, right-click on a piece of text that’s already formatted according to your preferences. A mini toolbar will appear. Click on the Styles button.

A new window will appear. Left-click on CREATE A STYLE.
Name your style, modify if you wish, and left-click OK.

2. Updating method
Select a piece of text that’s already formatted according to your preferences. Now head up to the Styles gallery in the ribbon, or the Styles pane, and right-click on an unused style that you’re happy to update. Hover over UPDATE [STYLE] TO MATCH SELECTION, then left-click.
Select a piece of text that’s already formatted according to your preferences. Now head up to the Styles gallery in the ribbon, or the Styles pane, and right-click on an unused style that you’re happy to update. Hover over UPDATE [STYLE] TO MATCH SELECTION, then left-click.
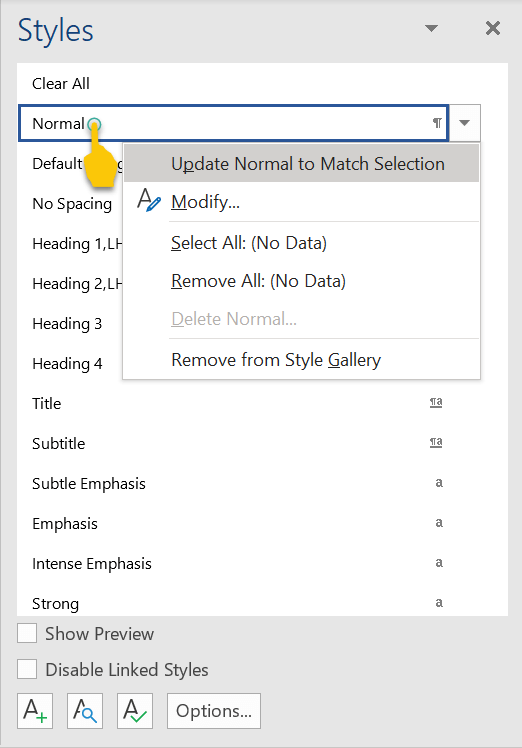
How to modify a style
There are two ways to modify a style in Word:
1. Styles gallery
Go to the Styles gallery in the ribbon and right-click on the style you want to modify.
There are two ways to modify a style in Word:
- via the Styles gallery in the ribbon
- via the Styles pane
1. Styles gallery
Go to the Styles gallery in the ribbon and right-click on the style you want to modify.
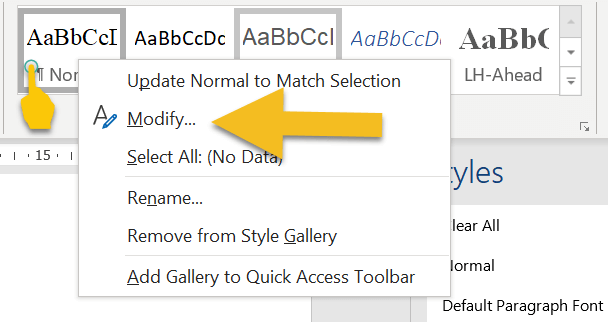
Left-click on MODIFY and amend the properties of your style. Note that this will change every piece of text assigned with that style.
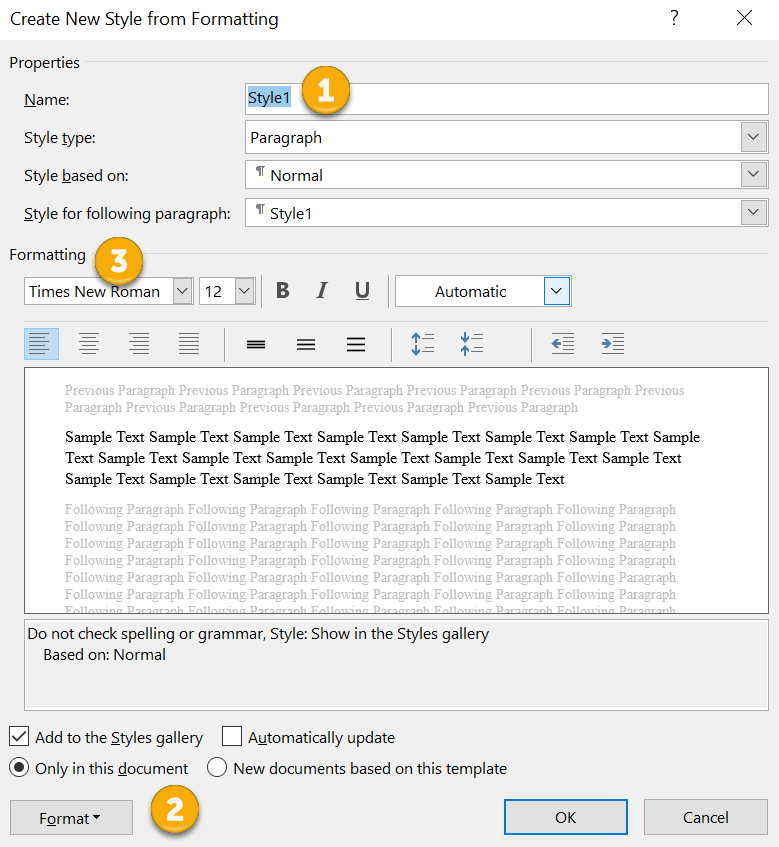
2. Styles pane
Go to the Styles pane on the right-hand side of your screen and right-click on the style you want to modify.
Go to the Styles pane on the right-hand side of your screen and right-click on the style you want to modify.
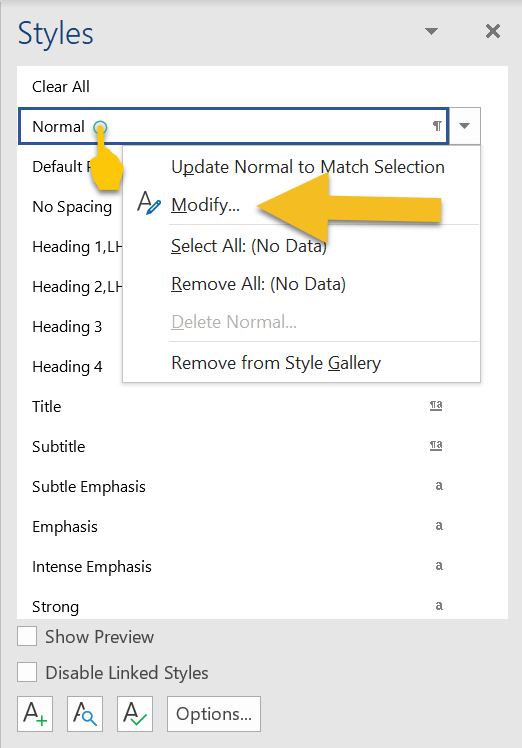
Left-click on MODIFY and amend the properties of your style. Again, bear in mind that this will change every piece of text with that style assigned.
How to assign a style to an element of text
If a piece of text isn’t formatted correctly, left-click the cursor on a word or in a paragraph, or select it by double-clicking.
Now head up to the Styles gallery in the ribbon, or the Styles pane, and left-click on the preferred style. Your style will be assigned.
If you’re working on a smaller screen, you’ll probably find it easier to use the Styles gallery in the ribbon because it takes up less space than the Styles pane.
To close the Styles pane and free up some screen real-estate, left-click on the X in the top-right-hand corner.
Troubleshooting
Here’s how to fix some of the more common problems that arise when working with styles.
1. Styles gallery or pane isn’t visible
If the Styles gallery isn’t visible, make sure you’re in the HOME tab in the ribbon.
Here’s how to fix some of the more common problems that arise when working with styles.
1. Styles gallery or pane isn’t visible
If the Styles gallery isn’t visible, make sure you’re in the HOME tab in the ribbon.

If the Styles pane isn’t visible, left-click on the small arrow in the Styles gallery.
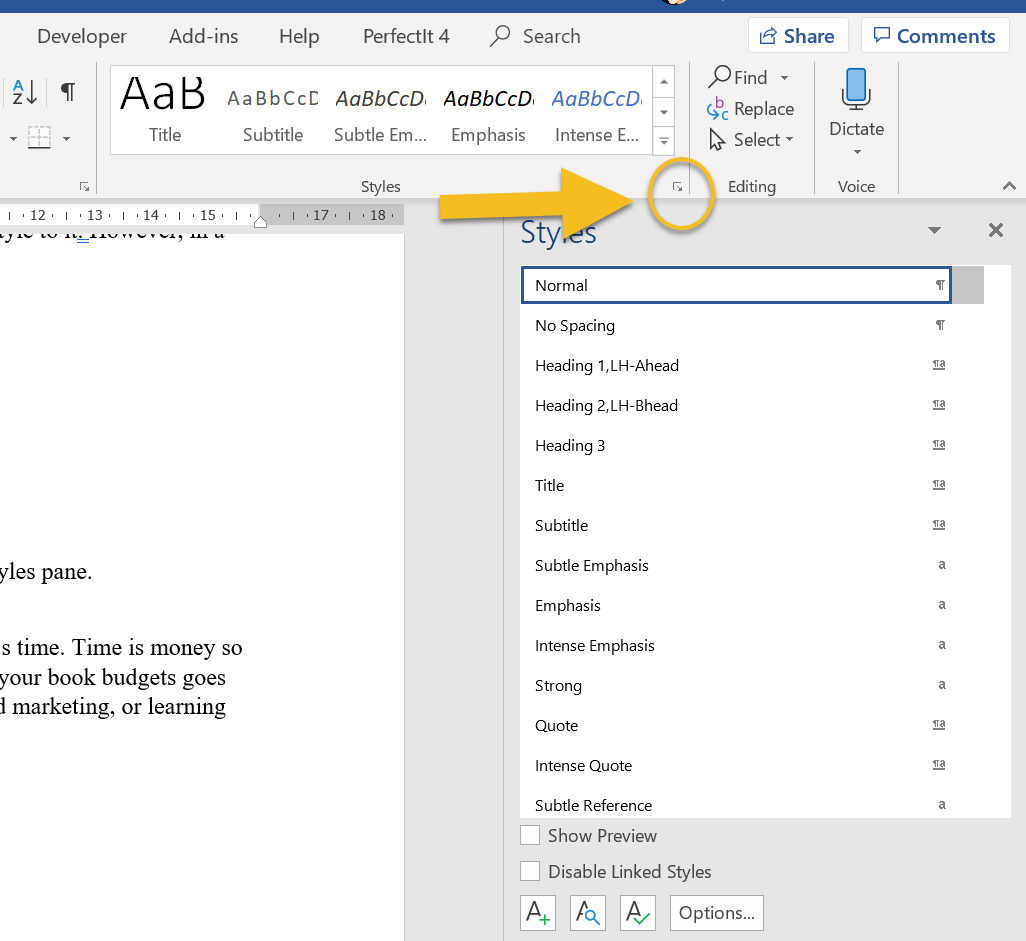
2. Style not showing in gallery
If you’ve created a style and it’s not showing in gallery, head to the Styles pane and right-click on the missing style. This opens the MODIFY pane. Make sure that the ADD TO THE STYLES GALLERY box is checked.
If you’ve created a style and it’s not showing in gallery, head to the Styles pane and right-click on the missing style. This opens the MODIFY pane. Make sure that the ADD TO THE STYLES GALLERY box is checked.
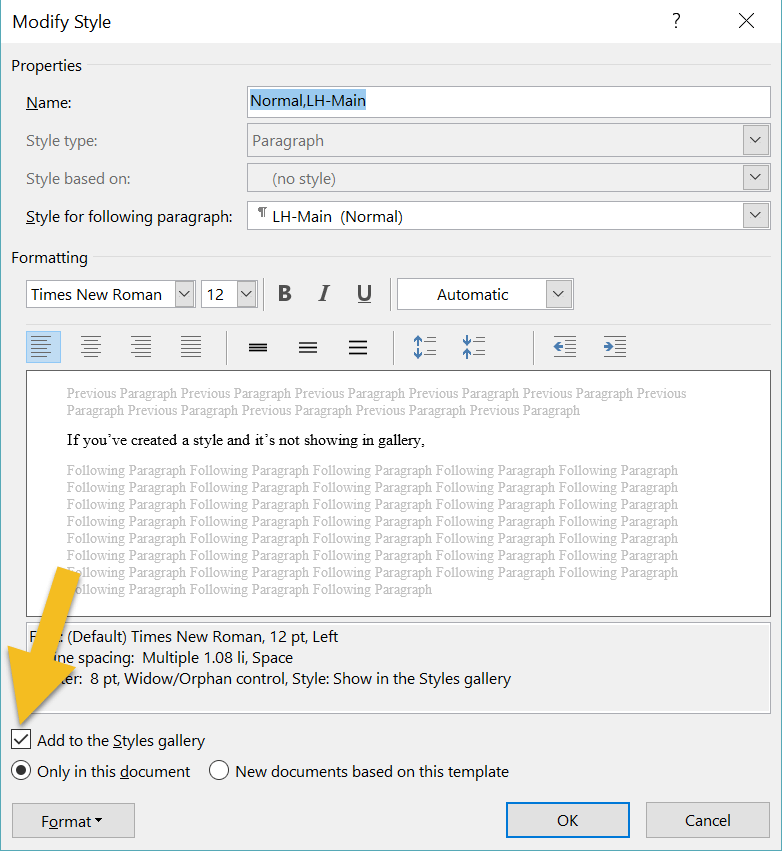
3. The gallery is cluttered with unused styles
If your gallery is busy with styles you don’t need to access, there are two ways to remove them. The quickest method is to right-click on an unwanted style, then left-click on REMOVE FROM STYLE GALLERY.
If your gallery is busy with styles you don’t need to access, there are two ways to remove them. The quickest method is to right-click on an unwanted style, then left-click on REMOVE FROM STYLE GALLERY.
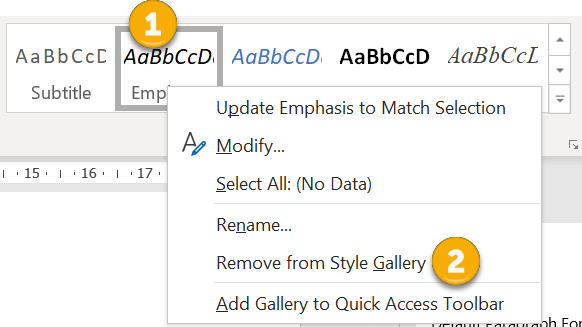
An alternative is to right-click on the unwanted style and left-click on MODIFY. Then uncheck the ADD TO THE STYLES GALLERY box.
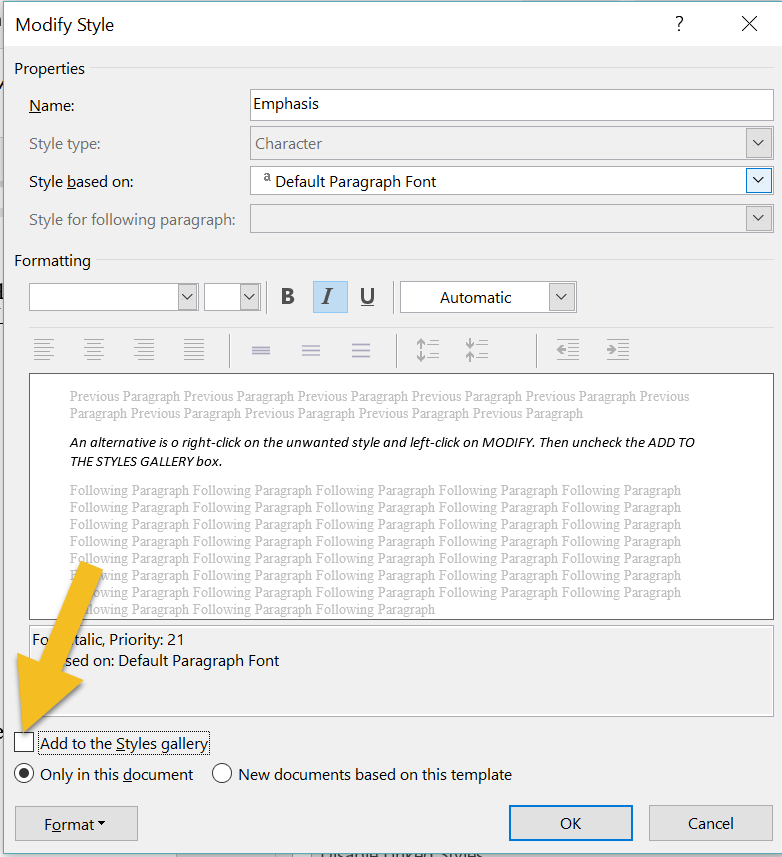
4. You’ve renamed a style but Word’s default name is still displayed in the pane
If you’re using the Styles pane to apply styles, the list might appear cluttered if Word’s default names are displaying, even though you've modified them. To fix, left-click on the OPTIONS button.
If you’re using the Styles pane to apply styles, the list might appear cluttered if Word’s default names are displaying, even though you've modified them. To fix, left-click on the OPTIONS button.
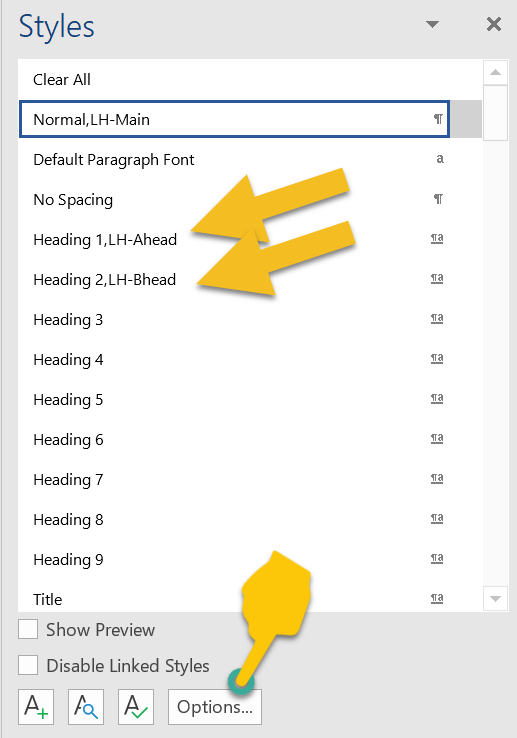
Check the HIDE BUILT-IN NAME WHEN ALTERNATE EXISTS box, then left-click on OK.
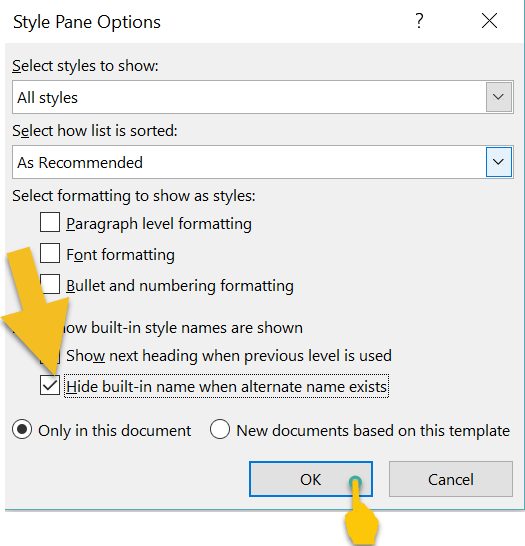
Your list will now display with your modified names.

Heading styles and navigating your Word file
One of the advantages of using the Styles tool for a novel is navigation.
To access the Navigation pane, press CTRL F on a PC. Now, left-click on the HEADINGS tab. Any style based on one of the in-built heading styles will show up in the menu.
One of the advantages of using the Styles tool for a novel is navigation.
To access the Navigation pane, press CTRL F on a PC. Now, left-click on the HEADINGS tab. Any style based on one of the in-built heading styles will show up in the menu.
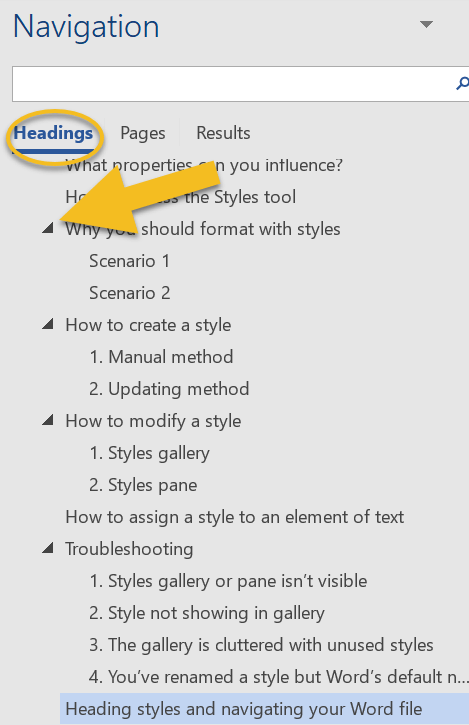
I use this function when I’m editing and want to check that chapter headings (and subheadings) are formatted consistently, assigned the correct level of priority, and numbered chronologically.
Headings with arrows next to them indicate lower-level subheadings. You can expand or collapse subheadings by left-clicking on the arrows.
Furthermore, if you want to shift a headed or subheaded section to another position in your document, left-click on the relevant heading and drag up or down the menu.
Summing up
Styles let you focus on your writing rather than fretting about internal text design.
Applying a style to an element of your book file takes a fraction of the time required for manual formatting. And because any style can be tweaked, you get to change your mind as often as you like.
If you have any problems with using Word’s Styles gallery and pane, drop me a note in the comments and I’ll do my best to fix the issue.
Fancy watching a video tutorial? Visit my YouTube channel and watch: Self-editing Your fiction in Word: How to Use Styles.
Louise Harnby is a line editor, copyeditor and proofreader who specializes in working with crime, mystery, suspense and thriller writers.
She is an Advanced Professional Member of the Chartered Institute of Editing and Proofreading (CIEP), a member of ACES, a Partner Member of The Alliance of Independent Authors (ALLi), and co-hosts The Editing Podcast.
Visit her business website at Louise Harnby | Fiction Editor & Proofreader, say hello on Twitter at @LouiseHarnby, connect via Facebook and LinkedIn, and check out her books and courses.
She is an Advanced Professional Member of the Chartered Institute of Editing and Proofreading (CIEP), a member of ACES, a Partner Member of The Alliance of Independent Authors (ALLi), and co-hosts The Editing Podcast.
Visit her business website at Louise Harnby | Fiction Editor & Proofreader, say hello on Twitter at @LouiseHarnby, connect via Facebook and LinkedIn, and check out her books and courses.
If you're a new proofreader or editor, having a global mindset in regard to choosing reference resources is essential for maximizing editorial business opportunities.
Like many of my fellow editorial business owners, I’m often approached by potential new entrants to the field who want advice about getting started. One of the most oft-asked questions is: ‘Which reference resources – style guides, dictionaries and the like – do I need?'
Bear in mind that anyone you seek guidance from in regard to best-fit resources must respect the fact that you might not be from the same place as them, speak like them, have the same potential clients as them, and spell colour/color like they do, or as a client brief asks them to.
Centrism, whether from the United Kingdom, the United States, or elsewhere in the world, is useless to you as a new entrant because it’s based on false assumptions about you and your potential clients.

Social science ‘styles’ from an international perspective
Here’s a wee case fictive case study. Imagine a new entrant to the editing profession tells me the following:
Based on this, I suggest that social science publishers and academics would be good initial target markets.
Does my new starter’s location affect their choice of potential publishers clients? It’s not clear cut.
The online world has knocked down those geographical boundaries; you don’t have to spend a fortune to send page proofs to someone hundreds of miles away; you can email them to someone thousands of miles away for the price of an Internet connection.
And how does my new starter’s location in the United States more broadly affect what they need to learn in terms of styles and language preferences? Again, it’s not clear cut.
I see The Chicago Manual of Style (CMOS) recommended as the sole must-have resource so often in online discussions about editorial work that I worry that new entrants may fall into the trap of thinking that this ‘bible’ alone will tell them everything they need to know.
Super though it is (I love chunks of it for fiction editing), CMOS is not the be all and end all of style guides, because it depends on what a client wants, the subject matter and country-specific language preferences.
The California-based publisher SAGE Publications asks that its copyeditors have a thorough knowledge of both the CMOS and the Publication Manual of the American Psychological Association (APA).
But note that these are core requirements for SAGE’s US book division. If you want to freelance for the US journal division, you’ll need to add the AMA Manual of Style and The CSE Manual for Authors, Editors, and Publishers to your reading list. (Bear in mind, too, that not all publishers want us to use the most current version of these manuals.)
But why stop there? If my new starter can get work with SAGE in California, might it not be sensible to tap its sister office in London? But in that case, our newbie will also need familiarity with New Hart’s Rules, The Oxford Dictionary for Writers and Editors, and Butcher’s Copyediting.
Or what if our new starter decides to target social science academics who are based in the US? They'll need to ask:
Actually, it’s just as likely that an eminent Boston-based scholar will submit to the European Journal of Political Research as to the American Political Science Review, Scandinavian Political Studies, or the Canadian Journal of Political Science.
This will impact on what our newbie needs to know. For example:
Here’s a wee case fictive case study. Imagine a new entrant to the editing profession tells me the following:
- They're from California.
- They have a degree in public administration.
- They have work experience in the field of policy research and implementation for a public-services organization.
- They're prepared to use their educational qualifications and work experience as an editing specialism.
Based on this, I suggest that social science publishers and academics would be good initial target markets.
Does my new starter’s location affect their choice of potential publishers clients? It’s not clear cut.
The online world has knocked down those geographical boundaries; you don’t have to spend a fortune to send page proofs to someone hundreds of miles away; you can email them to someone thousands of miles away for the price of an Internet connection.
And how does my new starter’s location in the United States more broadly affect what they need to learn in terms of styles and language preferences? Again, it’s not clear cut.
I see The Chicago Manual of Style (CMOS) recommended as the sole must-have resource so often in online discussions about editorial work that I worry that new entrants may fall into the trap of thinking that this ‘bible’ alone will tell them everything they need to know.
Super though it is (I love chunks of it for fiction editing), CMOS is not the be all and end all of style guides, because it depends on what a client wants, the subject matter and country-specific language preferences.
The California-based publisher SAGE Publications asks that its copyeditors have a thorough knowledge of both the CMOS and the Publication Manual of the American Psychological Association (APA).
But note that these are core requirements for SAGE’s US book division. If you want to freelance for the US journal division, you’ll need to add the AMA Manual of Style and The CSE Manual for Authors, Editors, and Publishers to your reading list. (Bear in mind, too, that not all publishers want us to use the most current version of these manuals.)
But why stop there? If my new starter can get work with SAGE in California, might it not be sensible to tap its sister office in London? But in that case, our newbie will also need familiarity with New Hart’s Rules, The Oxford Dictionary for Writers and Editors, and Butcher’s Copyediting.
Or what if our new starter decides to target social science academics who are based in the US? They'll need to ask:
- Will those academics all be writing books for US publishers?
- Will they submit articles only to American journals?
Actually, it’s just as likely that an eminent Boston-based scholar will submit to the European Journal of Political Research as to the American Political Science Review, Scandinavian Political Studies, or the Canadian Journal of Political Science.
This will impact on what our newbie needs to know. For example:
- Will it be ‘behavior’ or ‘behaviour’?
- Will a comma in a sentence come before a closing quotation, or after?
- Will ‘decision-making’ lose its hyphen?
- ‘Organize’ or ‘organise’?
- Spaced parenthetical en dashes or closed-up em dashes?

Location doesn’t determine readership
Where our clients live doesn’t determine where they publish or the location of their intended readership.
Given that the editorial freelancing market is competitive, it makes sense to exploit the most obvious opportunities.
In the Internet Age, the physical barriers are gone. The only barrier to exploring an international work stream is an inability to appreciate that language conventions and preferences differ according to client (whether that be a particular publisher, a particular independent author, a particular journal), not according to one, and only one, globally recognized set of rules.
Honestly – such a thing doesn’t exist; it doesn’t even exist within many countries.
Diversity of geography, language, and preferences
It’s not so much about where we live, but where our clients live and what preferences they have.
If you're a new entrant to the field and are wondering what you need to know, instead of listening to my preferences, familiarize yourself with a number of appropriate resources depending on what your clients want.
Perhaps it’s CMOS; perhaps it’s not. And even if it is, ONLY knowing this could mean you're seriously restricting the base of clients for whom you can work, the types of material you can work on, and the geographical locations you can explore.
So try the following:
If your world revolves around CMOS, it’s possibly a smaller world than it needs to be. And if your world is smaller than it needs to be, so are the opportunities you're exploring in a market that’s already very competitive.
One other item to note. CMOS, CSE, APA, AMA, and the like are style guides; they give you guidance on whether, for example, to close up or hyphenate a compound adjective. They won't necessarily give you extensive guidance on how a word is being used, and whether that usage is considered standard, and in which community.
Usage manuals, which give that kind of information, are as important as style guides. Using a style guide or a usage manual alone is an invitation to disaster.
It’s not so much about where we live, but where our clients live and what preferences they have.
- I live in the UK. I’ve worked with a Swedish fantasy author who wanted to use American terminology but UK spelling with –ize suffixes.
- I've copyedited indie fiction for UK-based authors who wanted to use American spelling.
- I’ve proofread for academic publishers who asked me for US spelling and ‘style’ for one project, and then, two weeks later, sent a brief for a new project that asked for something completely different.
- I’ve proofread law books that used Oxford Standard for Citation of Legal Authorities (OSCOLA), sociology books that used Harvard, and industrial relations journals that used Vancouver.
- I’ve worked on research-methods books that were styled according to CMOS, linguistics books that asked for APA, and politics reports that used The Economist style guide.
- I’ve proofread philosophy books where the style was … let’s just call it ‘go with the flow’.
- Many of the publishers I've worked for have a ‘house’ style.
If you're a new entrant to the field and are wondering what you need to know, instead of listening to my preferences, familiarize yourself with a number of appropriate resources depending on what your clients want.
Perhaps it’s CMOS; perhaps it’s not. And even if it is, ONLY knowing this could mean you're seriously restricting the base of clients for whom you can work, the types of material you can work on, and the geographical locations you can explore.
So try the following:
- Think about which particular client groups you’re most suited to.
- Do some research that will tell you what those clients require.
- Use that information to inform the decision about which resources to invest in.
If your world revolves around CMOS, it’s possibly a smaller world than it needs to be. And if your world is smaller than it needs to be, so are the opportunities you're exploring in a market that’s already very competitive.
One other item to note. CMOS, CSE, APA, AMA, and the like are style guides; they give you guidance on whether, for example, to close up or hyphenate a compound adjective. They won't necessarily give you extensive guidance on how a word is being used, and whether that usage is considered standard, and in which community.
Usage manuals, which give that kind of information, are as important as style guides. Using a style guide or a usage manual alone is an invitation to disaster.

Out with borders and in with flexibility
When you’re the owner of an editorial business you need to learn what your clients want you to learn, whether it’s a manual published by Chicago or Oxford, a house brief designed by a team of publisher project managers, a detailed set of guidelines issued by a European NGO, or a short brief issued by an independent author of fiction.
I encourage you to think broadly, globally, and flexibly. If someone tries to guide to towards only one set of ‘rules’, at best their advice will restrict you; at worst it will be just plain wrong or inappropriate.
There is, alas, no simple answer to the question of which resources are best. Instead, careful thought and planning centred around client- and skill-focused research is a good first step. That way, you’ll learn for yourself what resources, tools, and knowledge bases are suitable for you, your potential market, and your particular business model.
Language usage, styles, and preferences differ – and that’s okay. Don’t let anyone tell you that’s not the case!
Louise Harnby is a line editor, copyeditor and proofreader who specializes in working with crime, mystery, suspense and thriller writers.
She is an Advanced Professional Member of the Chartered Institute of Editing and Proofreading (CIEP), a member of ACES, a Partner Member of The Alliance of Independent Authors (ALLi), and co-hosts The Editing Podcast.
Visit her business website at Louise Harnby | Fiction Editor & Proofreader, say hello on Twitter at @LouiseHarnby, connect via Facebook and LinkedIn, and check out her books and courses.
She is an Advanced Professional Member of the Chartered Institute of Editing and Proofreading (CIEP), a member of ACES, a Partner Member of The Alliance of Independent Authors (ALLi), and co-hosts The Editing Podcast.
Visit her business website at Louise Harnby | Fiction Editor & Proofreader, say hello on Twitter at @LouiseHarnby, connect via Facebook and LinkedIn, and check out her books and courses.
If you think there's no place for macros in fiction editing, think again. My friend Paul Beverley has collated a core group of macros that will have any fiction line editor, copyeditor or proofreader drooling! Self-publishing authors will love them too!
I don't use all of these (every editor has their preferences) but some of them are staples and save me oodles of time!
I don't use all of these (every editor has their preferences) but some of them are staples and save me oodles of time!
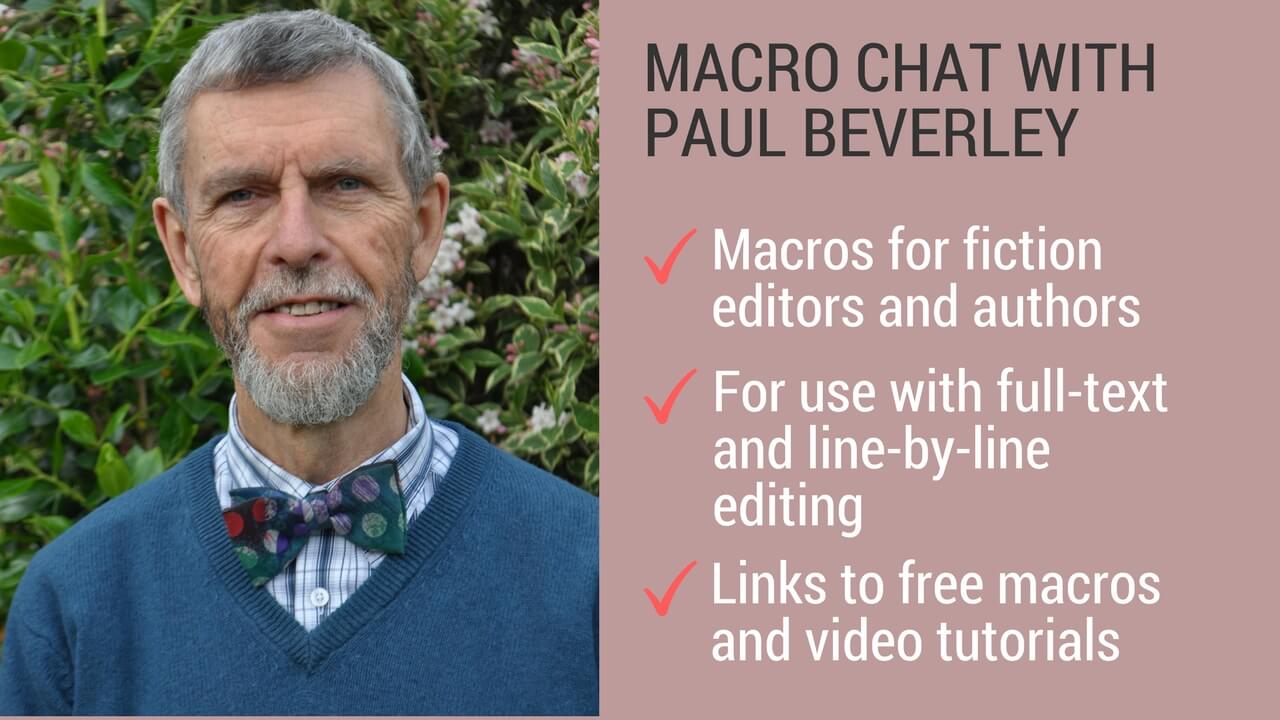
Some of the macros apply when you’re looking at the whole text of a novel, while others are selective ... for use while you’re editing line by line. Bear in mind that they're designed to be used with MS Word files.
Macros that work with the whole text
These macros are ideal near the beginning of the edit, when you’ve put together the whole book in one single file, and you want to look for inconsistencies.
ProperNounAlyse searches the novel for any words that look like proper nouns; it counts their frequency, and then tries to locate, by using a variety of tests, and pairs of names that might possibly be alternative spellings or misspellings, e.g. Jayne/Jane, Beverley/Beverly, Neiman/Nieman, Grosman/Grosmann etc.

FullNameAlyse is similar to ProperNounAlyse, but it searches for multi-part names, Fred Smith, Burt Fry, etc.
ChronologyChecker is aimed at tracing the chronology of a novel. It extracts, into a separate file, all the paragraphs containing appropriate chronology-type words: Monday, Wednesday, Fri, Sat, April, June, 1958, 2017, etc. This file is then more easily searchable to look at the significance of the text for the chronology.
WordsPhrasesInContext tracks the occurrence of specific names through a novel. You give it a list of names/words/phrases, and it searches for any paragraphs in the novel that contain them. It creates a separate file of those paragraphs, with the searched element highlighted in your choice of colour.
CatchPhrase searches your novel for over-used phrases and counts how many times each phrase occurs.
Macros for when editing line by line
FullPoint/Comma/Semicolon/Colon/Dash/QuestionMark/ExclamationMark
These macros change
he said, you know ...
into he said. You know ...
or he said: you know ...
or he said – you know ...
and so on.
FullPointInDialogue and CommaInDialogue
These two macros change
“Blah, blah.” He said.
into “Blah, blah,” he said.
and vice versa.

ProperToPronoun
This macro looks along the line to find the next proper noun, deletes it and types ‘she’. But if you then type Ctrl-Z, it changes it back to ‘he’.
MultiSwitch
You give this macro a list of changes that you might want to implement:
Jane
Jayne
Beverley
Beverly
that
which
which
that
When you click in a word, and run the macro, it finds your alternate and replaces it. It also works with phrases and can also provide a menu of alternates:
he said
he opined
he shouted
he voiced
she said
she opined
she shouted
she voiced

Louise Harnby is a line editor, copyeditor and proofreader who specializes in working with crime, mystery, suspense and thriller writers.
She is an Advanced Professional Member of the Chartered Institute of Editing and Proofreading (CIEP), a member of ACES, a Partner Member of The Alliance of Independent Authors (ALLi), and co-hosts The Editing Podcast.
Visit her business website at Louise Harnby | Fiction Editor & Proofreader, say hello on Twitter at @LouiseHarnby, connect via Facebook and LinkedIn, and check out her books and courses.
She is an Advanced Professional Member of the Chartered Institute of Editing and Proofreading (CIEP), a member of ACES, a Partner Member of The Alliance of Independent Authors (ALLi), and co-hosts The Editing Podcast.
Visit her business website at Louise Harnby | Fiction Editor & Proofreader, say hello on Twitter at @LouiseHarnby, connect via Facebook and LinkedIn, and check out her books and courses.
If you're proofreading final designed page proofs, there's more to look out for than the odd typo or double space. Professional proofreaders identify and find solutions to a range of layout problems too.
This post featured in Joel Friedlander's Carnival of the Indies #84
.
Who's this checklist for?
This is for anyone checking final designed page proofs. For example:
I've proofread over 500 books for the mainstream publishing industry. The checklist below is based on the house guidelines provided by the publishers I've worked for.
The titles I've proofread include social science textbooks, handbooks and monographs, and works of fiction and narrative non-fiction. And while the subject matter has varied, the requirements for checking final page proofs hasn't.
Note my use of the term 'final designed page proofs'. This checklist is not for those doing a final quality-control check in a Word document. Rather, we're dealing with a typeset PDF or hardcopy of the book as it will appear when printed or published online.
For that reason, the proofreader is tasked with ensuring that the appearance of the book is consistent and correct according to client preference. This PDF provides a summary of the required checks.
To get a free copy, sign up to The Editorial Letter, monthly news about fiction editing and editorial business growth.
Who's this checklist for?
This is for anyone checking final designed page proofs. For example:
- self-publishing authors preparing for print-on-demand. Use this when working through the PDF generated by the likes of CreateSpace or Bookbaby.
- business owners producing PDF or printed reports, booklets, manuals or ebooks. Use this to check your file before it's distributed to your clients or uploaded to your website.
- professional proofreaders. Use this to check page proofs for your publisher clients and independent authors.
I've proofread over 500 books for the mainstream publishing industry. The checklist below is based on the house guidelines provided by the publishers I've worked for.
The titles I've proofread include social science textbooks, handbooks and monographs, and works of fiction and narrative non-fiction. And while the subject matter has varied, the requirements for checking final page proofs hasn't.
Note my use of the term 'final designed page proofs'. This checklist is not for those doing a final quality-control check in a Word document. Rather, we're dealing with a typeset PDF or hardcopy of the book as it will appear when printed or published online.
For that reason, the proofreader is tasked with ensuring that the appearance of the book is consistent and correct according to client preference. This PDF provides a summary of the required checks.
To get a free copy, sign up to The Editorial Letter, monthly news about fiction editing and editorial business growth.
Louise Harnby is a line editor, copyeditor and proofreader who specializes in working with crime, mystery, suspense and thriller writers.
She is an Advanced Professional Member of the Chartered Institute of Editing and Proofreading (CIEP), a member of ACES, a Partner Member of The Alliance of Independent Authors (ALLi), and co-hosts The Editing Podcast.
She is an Advanced Professional Member of the Chartered Institute of Editing and Proofreading (CIEP), a member of ACES, a Partner Member of The Alliance of Independent Authors (ALLi), and co-hosts The Editing Podcast.
- Get in touch: Louise Harnby | Fiction Editor & Proofreader
- Connect: Twitter at @LouiseHarnby, Facebook and LinkedIn
- Learn: Books and courses
- Discover: Resources for authors and editors
Can you proofread your own book? Here are some quick tips on formatting your Word file ... final tidy-ups to get your file in shape, and that accord with mainstream publishing standards.
Truly, nothing beats a second pair of eyes on a piece of text, short or long. I know this all too well because I’m a professional proofreader and copyeditor, but I also write – books (yup, I've self-published four times), guides, booklets and blog posts.
And I miss stuff – not because I have a problem with grammar, punctuation or spelling, but because I’m too close to the text. I see my own writing in terms of the ideas I want to convey rather than the text in front of my eyes.
That’s why I hire fellow proofreaders and editors to help make my written materials the best they can be. I don't expect those people to guarantee perfection but I do expect to them to ramp up the quality (and they've never failed me).
Here’s another thing I know – the better shape the file's in, the better the price. Editors and proofreaders are professionals and, though we love what we do, we have bills and mortgages too. So, very broadly speaking, the more intervention needed, the higher the fee.
There are things every writer can do to tidy up a piece of text by themselves, though. I’ve compiled them in one handy resource: The Author’s Proofreading Companion.
The steps in this toolkit won’t replace a rigorous professional developmental edit, line edit/copyedit and final prepublication proofread, but they will help rid your file of some of the nasties!
Here’s what the Companion shows you how to do:
Just click on the image below to get your FREE copy!
And I miss stuff – not because I have a problem with grammar, punctuation or spelling, but because I’m too close to the text. I see my own writing in terms of the ideas I want to convey rather than the text in front of my eyes.
That’s why I hire fellow proofreaders and editors to help make my written materials the best they can be. I don't expect those people to guarantee perfection but I do expect to them to ramp up the quality (and they've never failed me).
Here’s another thing I know – the better shape the file's in, the better the price. Editors and proofreaders are professionals and, though we love what we do, we have bills and mortgages too. So, very broadly speaking, the more intervention needed, the higher the fee.
There are things every writer can do to tidy up a piece of text by themselves, though. I’ve compiled them in one handy resource: The Author’s Proofreading Companion.
The steps in this toolkit won’t replace a rigorous professional developmental edit, line edit/copyedit and final prepublication proofread, but they will help rid your file of some of the nasties!
Here’s what the Companion shows you how to do:
- Remove double spaces
- Remove all rogue spaces at the beginning and end of paragraphs
- Remove double line returns
- Change hyphens used as parentheses to dashes
- Change tabbed paragraph indents to proper line indents (using Word’s ‘Styles’)
- Change a hyphen in a number span
- Find lower-case letters at the beginning of paragraphs
- Find a paragraph that ends with no punctuation
- Find a full point followed by a lower-case letter
- Change date styles with wildcard searches
- Run a confusables macro
- Remove unnecessary spaces before or after punctuation
Just click on the image below to get your FREE copy!
Hope it helps! And come back soon for more handy tips and advice designed especially for beginner writers.
Louise Harnby is a line editor, copyeditor and proofreader who specializes in working with crime, mystery, suspense and thriller writers.
She is an Advanced Professional Member of the Chartered Institute of Editing and Proofreading (CIEP), a member of ACES, a Partner Member of The Alliance of Independent Authors (ALLi), and co-hosts The Editing Podcast.
Visit her business website at Louise Harnby | Fiction Editor & Proofreader, say hello on Twitter at @LouiseHarnby, connect via Facebook and LinkedIn, and check out her books and courses.
If you’re an editor or proofreader who’s never once switched off Track Changes (TC) in the middle of an edit and then forgotten to toggle it back on again, congratulations – you’re a rare creature indeed!
I’m not rare. I’ve done it several times. If you’re like me, you know that sinking feeling – that you’re going to have to go back to where you stopped tracking and redo the work. I've come close to weeping when this has happened. It’s a waste of precious, precious time, pure and simple!
Until recently, my solution consisted of frequently double-checking whether TC was on or off. No big deal, you might think. After all, it’s easy enough to take your eye up to the TC button on the Review tab and see whether it’s greyed out – only a tenth of a second. But those tenths add up.
Furthermore, I’m not billing my clients for my attention to the TC button; I’m billing them for proofreading and editing. I should be focusing on the text, not distracting myself with checking that TC is on.
I could work with ‘All Markup’ (or ‘Final Showing Markup’ in earlier versions of Word) showing, but that’s just another distraction. I want my eyes and brain to focus on what my client has written, not what I’ve amended.
Paul Beverley, naturally, has the solution. It’s a macro called VisibleTrackOff4 and it’s amazing!
Even if you don’t like macros, don’t use macros, are wary of macros, this is one macro that you should consider installing anyway. Trust me. It's a lifesaver.
By the end of this article, you’ll know how to ensure you never forget you’ve switched off Track Changes. I’ll show you the following:
How it works
In brief, VisibleTrackOff4 is an alternative TC on/off switch. You run this macro instead of using Word’s TC button.
I work in Windows 10 with Word 2016. On my screen, the TC button is accessible via the ribbon in the Review tab. Your view may be slightly different.
Until recently, my solution consisted of frequently double-checking whether TC was on or off. No big deal, you might think. After all, it’s easy enough to take your eye up to the TC button on the Review tab and see whether it’s greyed out – only a tenth of a second. But those tenths add up.
Furthermore, I’m not billing my clients for my attention to the TC button; I’m billing them for proofreading and editing. I should be focusing on the text, not distracting myself with checking that TC is on.
I could work with ‘All Markup’ (or ‘Final Showing Markup’ in earlier versions of Word) showing, but that’s just another distraction. I want my eyes and brain to focus on what my client has written, not what I’ve amended.
Paul Beverley, naturally, has the solution. It’s a macro called VisibleTrackOff4 and it’s amazing!
Even if you don’t like macros, don’t use macros, are wary of macros, this is one macro that you should consider installing anyway. Trust me. It's a lifesaver.
By the end of this article, you’ll know how to ensure you never forget you’ve switched off Track Changes. I’ll show you the following:
- How it works
- How to install it
- How to run it efficiently
- Alternative versions with different formatting options
How it works
In brief, VisibleTrackOff4 is an alternative TC on/off switch. You run this macro instead of using Word’s TC button.
I work in Windows 10 with Word 2016. On my screen, the TC button is accessible via the ribbon in the Review tab. Your view may be slightly different.

When you use VisibleTrackOff4 (rather than the TC button shown above) to switch on TC, your page appears white, as usual. However, when you use it to switch off TC, your page turns yellow. As you toggle TC on and off, your page colour toggles too. If the page is yellow, you know TC is off. That’s something you can’t miss, and that’s why it’s foolproof.
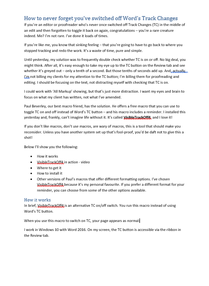
View with Track Changes ON
|
View with Track Changes OFF
|
To use the macro efficiently, you can do one of the following:
How to install it
Here’s how to install the macro:
- Create a shortcut key
- Add the macro to your Quick Access Toolbar
- Create a custom button in your ribbon (Word version 2010 onwards)
How to install it
Here’s how to install the macro:
- Download Paul’s book from his website, Archive Publications
- Open TheMacros.doc
- Search for VisibleTrackOff4
- Select and copy the script, including the title ‘Sub VisibleTrackOff4()’, right down to and including ‘End Sub’
- Open the ‘View’ tab on Word’s ribbon
- Click on the ‘Macros’ button

- A window will open (with the header ‘Macros’). Click on the ‘Step Into’ button
- This will open Visual Basic. In this will be another window (with the header ‘Normal – NewMacros (Code)’. Use the scroll bar on the right to go to the bottom. If you need help installing a macro for the first time, see ‘Another useful proofreading/editing macro: Paul Beverley’s MultiSwitch’
- Click under the last line of text
- Paste the macro script that you copied earlier
- Close Visual Basic using the ‘X’ in the top right-hand corner
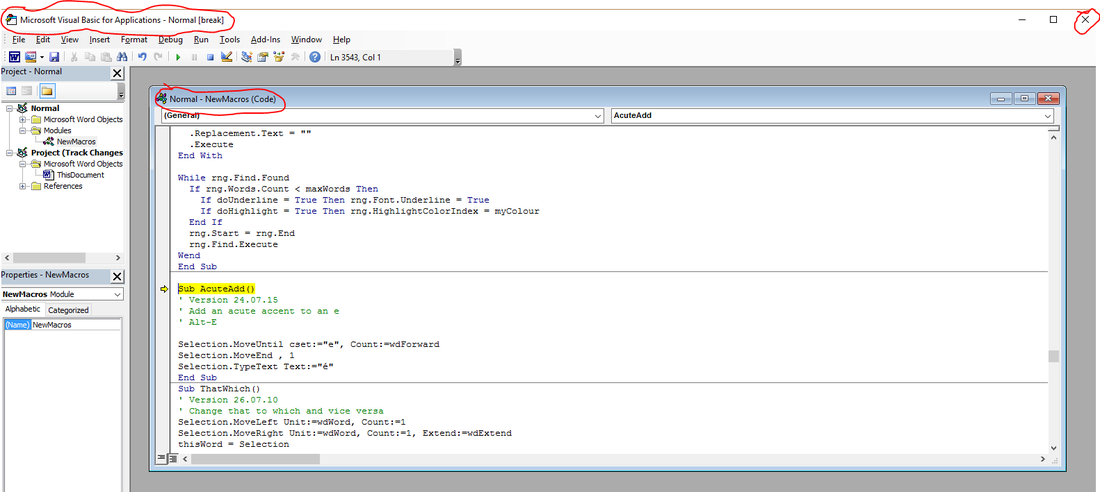
- Click ‘OK’ if you get the message ‘This command will stop the debugger’
How to run it efficiently
To switch TC on and off efficiently using VisibleTrackOff4, you can do one of the following:
- Create a shortcut key
- Add the macro to your Quick Access Toolbar
- Create a custom button in your ribbon (Word version 2010 onwards)
Create a shortcut key
- Right-click anywhere on the ribbon
- Select ‘Customize the Ribbon’, or ‘Customize Quick Access Toolbar’, depending on your software
- Click on the ‘Customize…’ button at the bottom
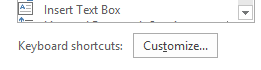
- Under ‘Categories’, select ‘Macros’
- Go to the right-hand ‘Macros’ column. Scroll down and select VisibleTrackOff4
- Type in your preferred shortcut key
- Click on the ‘Assign’ button followed by the ‘Close’ button
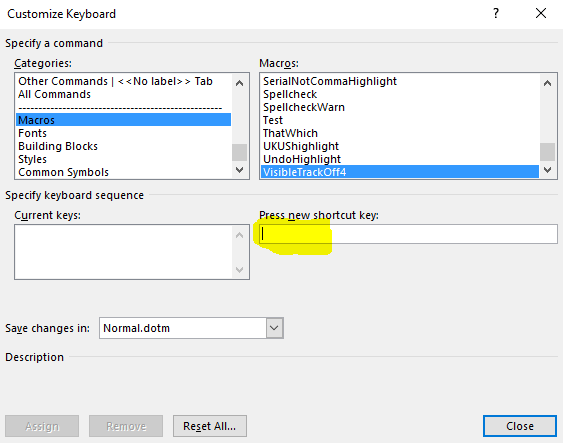
Add the macro to your Quick Access Toolbar
- Right-click anywhere on the ribbon
- Select ‘Customize Quick Access Toolbar’
- From the drop-down ‘Choose commands from:’ box, choose ‘Macros’
- Scroll down to find the macro and click on it
- Click on the ‘Add’ button followed by the ‘OK’ button

Create a custom button in your ribbon (Word version 2010 onwards)
- Right-click anywhere on the ribbon
- Select ‘Customize the Ribbon’
- Look to the right-hand column
- Scroll down and click on ‘Review’
- Click on the subentry ‘Tracking’
- Click the ‘New Group’ button
- Now look to the left-hand column
- From the drop-down ‘Choose commands from:’ box, choose ‘Macros’
- Scroll down to find the macro and click on it to select it
- Go back to the right-hand column and click on ‘New Group (Custom)’
- Click the ‘Add’ button followed by the ‘OK’ button
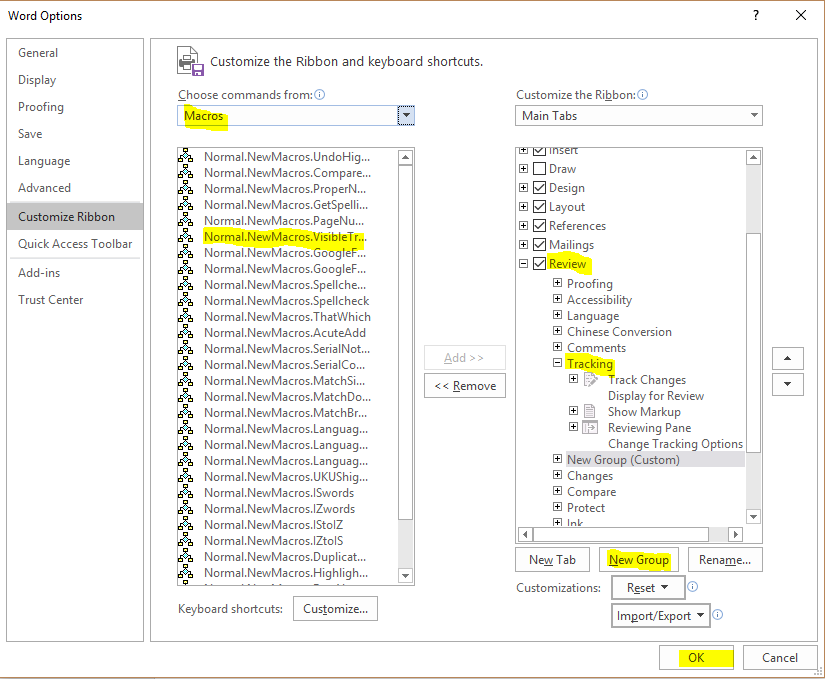
This is what your new button will look like:

Other versions
You don’t have to go for the yellow-page effect. Paul’s provided other options. The installation and quick-access instructions are the same; only the script you’ll need to copy and paste is different:
- VisibleTrackOff – embossed effect
- VisibleTrackOff2 – blue dotted underline
- VisibleTrackOff3 – wiggly lines
- TrackOnOffAudible – beeps
Summing up
I prefer the yellow-page effect because it’s so obvious, and because it doesn’t interfere with my view of the text while I’m amending with TC off.
I also prefer to run the macro with a custom ribbon-based button because it’s right up there alongside Word’s TC button, which is what I’m used to. I’ve created a shortcut key so that I have choice in the matter. This comes in handy when I need regular access to the Styles tab and don’t want to keep switching the tabs on the ribbon.
I urge you to try this macro. Remember, you need never again endure the frustration of having forgotten to switch on Track Changes!
P.S. My colleague Adrienne Montgomerie was single-handedly responsible for showing me how easy it is to customize the ribbon so that you can easily and quickly access any command. Her article ‘Make a Custom Tab on Word’s Ribbon’ is a must-read if you want to increase your onscreen efficiency.
And, as always, thanks to Paul Beverley for creating some brilliant macros, and for giving me permission to bang on about them via my blog!
Louise Harnby is a line editor, copyeditor and proofreader who specializes in working with crime, mystery, suspense and thriller writers.
She is an Advanced Professional Member of the Chartered Institute of Editing and Proofreading (CIEP), a member of ACES, a Partner Member of The Alliance of Independent Authors (ALLi), and co-hosts The Editing Podcast.
Visit her business website at Louise Harnby | Fiction Editor & Proofreader, say hello on Twitter at @LouiseHarnby, connect via Facebook and LinkedIn, and check out her books and courses.
She is an Advanced Professional Member of the Chartered Institute of Editing and Proofreading (CIEP), a member of ACES, a Partner Member of The Alliance of Independent Authors (ALLi), and co-hosts The Editing Podcast.
Visit her business website at Louise Harnby | Fiction Editor & Proofreader, say hello on Twitter at @LouiseHarnby, connect via Facebook and LinkedIn, and check out her books and courses.
MultiSwitch is another gem of created by my colleague Paul Beverley. This useful little macro speeds up onscreen editing and proofreading.
The macro is available in his free book, Computer Tools for Editors. In a nutshell, it allows you to switch around a word (or words) with a single keyboard shortcut. I use it to save time with every single Word-based project I work on.
Imagine that you’re editing or proofreading a Word file in which the author repeatedly uses ‘which’ for restrictive relative clauses. You want to change it to ‘that’. This means carrying out three small actions: select, delete and retype.
Imagine that you’re editing or proofreading a Word file in which the author repeatedly uses ‘which’ for restrictive relative clauses. You want to change it to ‘that’. This means carrying out three small actions: select, delete and retype.
That’s not a problem if the issue occurs twice in a file, but if it occurs tens or hundreds of times, those seconds are going to add up and eat into your hourly rate. And let’s not get started on the ache in your wrist!
Naturally, you might notice that a particular job has a number of similar niggles that you want to attend to, in which case this macro will be even more of a productivity-enhancer.
Give it a whirl!
MultiSwitch in action
To run MultiSwitch, you simply place your cursor before or in the word you want to change (in our example here, ‘which’), and hit your keyboard shortcut (I’ve assigned alt-3, but you can choose whatever you like). Then, bingo, the macro amends ‘which’ to ‘that’.
Here's a teeny-tiny video of me using MultiSwitch. This demo aims merely to show you where to place the cursor prior to hitting your assigned shortcut key command, and what you will see on your screen (a little flickering as the macro makes the switch).
If you don’t know how to assign a keyboard shortcut, don’t worry – I’ll show you how later in the article.
The beauty of MultiSwitch is that you need only one keyboard shortcut for a ton of different word switches. Here are a few examples from my switch list:
- that – which
- which – that
- last – past
- like – such as
- less – fewer
- will not – won't
- is not – isn't
- he is – he's
- they will – they'll
I love this macro for editing fiction because it's so quick to create contractions when I'm helping the author create a more informal narrative, or dialogue that's closer to natural speech.
Further down, I explain how to create your list – it's a doddle. Or, if you'd like to save even more time, grab a free copy of my contraction switch list. You can edit it to include your own word switches.

Installing MultiSwitch
Go to Paul’s website and download Computer Tools for Editors.
Save the zipped folder to your computer and extract three files: one is an overview of the macros – what they are, what they do, how to store them and so on – plus all the programs themselves; another contains just the actual macro programs; a third is called ‘Beginners Start Here’; and the final file is a style sheet. The file you need to open in Word is ‘The Macros’.
Use Word’s navigation menu on a Mac (or Ctrl F on a PC) to open the Find function. Type ‘Sub MultiSwitch’ into the search field and hit ‘Return’ twice. That will take you to the start of the relevant script.
Select and copy the script from ‘Sub MultiSwitch()’ down to ‘End Sub’.
Still working in Word, open the ‘View’ tab and click on the ‘Macros’ icon on the ribbon:

A new window will open.
If you don’t have any macros already loaded:
If you don’t have any macros already loaded:
- Create a test macro that you can delete later.
- First, make sure the ‘Normal.dotm’ template is showing in the ‘Macros in:’ box.
- Type ‘TEST’ into the ‘Macro name:’ box.
- Click on the ‘Create’ button.
- Your TEST macro will now show up. From now on, it’ll be easy as pie to add additional macros.
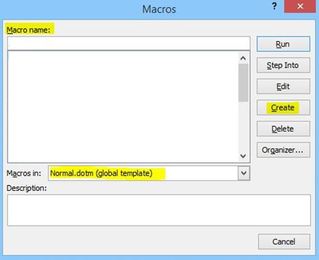
If you already have macros loaded (your TEST macro or any other):
- Click on ‘Edit’.
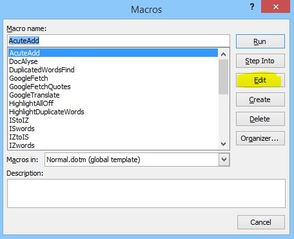
This will open up another window:
This will open up another window:

- If necessary, use the scroll bar to take you to the bottom of the text.
- Paste the MultiSwitch script at the end, under ‘End Sub’.
Don’t close this Visual Basic window quite yet – there’s something else you need to do first!
Creating your MultiSwitch list
Now head over to Word. Open a new document and call it zzSwitchList.
Create your list using the following style:
that
which
which
that
last
past
like
such as
less
fewer
Less
Fewer
it is
it's
Save it somewhere just as meaningful! Mine’s in my Macros folder, but you can save it wherever it suits you. Now close the document.
You can amend this list any time you want to – just add or delete words as you see fit.
Changing the MultiSwitch script
Now you're going to make a small amendment to the macro script so that it's personalized for you, so go back to the window into which you pasted the MultiSwitch script.
At the top of the script, you’ll see the following:
Sub MultiSwitch()
' Version 06.12.17
' Scripted word/phrase switching
maxWords = 8
listName = "zzSwitchList"
myDir = "C:\Users\Louis\Dropbox\Macros\"
' Set min number of chars for an abbreviation
minChars = 2
includeApostrophe = True
useSpike = True
' Version 06.12.17
' Scripted word/phrase switching
maxWords = 8
listName = "zzSwitchList"
myDir = "C:\Users\Louis\Dropbox\Macros\"
' Set min number of chars for an abbreviation
minChars = 2
includeApostrophe = True
useSpike = True
The text in red shows how I’ve customized the script to suit my needs – you need to put in your own location.
Now you can close the window by clicking on the ‘X’ in the top right-hand corner. Do the same with the general Visual Basic window too. Don’t worry if you get a message about a debugger – just press ‘OK’.
Creating the keyboard shortcut for running MultiSwitch
If you don't know how to create keyboard shortcuts, this section's for you. If you do know how to do this, you don't need to read any further!
I'm working in Word 2016 on a PC. If you are too, the instructions are as follows:
- In Word, select ‘File’, ‘Options’, ‘Customize Ribbon’ (1).
- Click on ‘Customize’ (2). A new box will open up entitled ‘Customize Keyboard’.
- In the ‘Categories:’ window (3), scroll down and select ‘Macros’.
- In the ‘Macros’ window (4), select ‘MultiSwitch’.
- Finally, choose your preferred keyboard combination by typing it into the ‘Press New Shortcut Key’ window (5).
- Select ‘Assign’ and ‘Close’.
(If you are working in a different version of Word, see pp. 14–15 of the ‘ComputerTools4Eds’ file in the Macros folder that you've downloaded from Paul’s site in order to install this macro. There, he provides details of the process for different versions of the software.)
The image below shows how I assigned a keyboard shortcut to another macro called ‘UndoHighlight’. The steps are exactly the same.
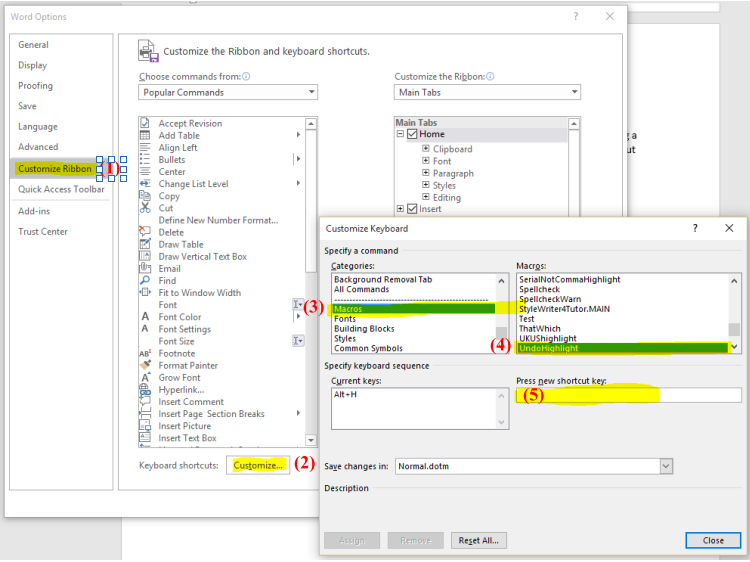
That's it! I hope this macro saves you as much time as it's saving me!
Louise Harnby is a line editor, copyeditor and proofreader who specializes in working with crime, mystery, suspense and thriller writers.
She is an Advanced Professional Member of the Chartered Institute of Editing and Proofreading (CIEP), a member of ACES, a Partner Member of The Alliance of Independent Authors (ALLi), and co-hosts The Editing Podcast.
Visit her business website at Louise Harnby | Fiction Editor & Proofreader, say hello on Twitter at @LouiseHarnby, connect via Facebook and LinkedIn, and check out her books and courses.
She is an Advanced Professional Member of the Chartered Institute of Editing and Proofreading (CIEP), a member of ACES, a Partner Member of The Alliance of Independent Authors (ALLi), and co-hosts The Editing Podcast.
Visit her business website at Louise Harnby | Fiction Editor & Proofreader, say hello on Twitter at @LouiseHarnby, connect via Facebook and LinkedIn, and check out her books and courses.
Every writer, copy-editor and proofreader comes across words that are used correctly but spelled incorrectly (typos), but we also have to look out for words that are spelled correctly but used incorrectly – this is the world of confusables.

What are confusables?
Some confusables are not only spelled differently, they sound very different too, e.g. imply/infer; militate/mitigate; reactionary/reactive. In this case, the writer might have misunderstood the meaning.
Some confusables are homophones – words that are spelled differently but sound the same, e.g. rein/reign; stationary/stationery; prophecy/prophesy; loath/loathe. In this case, the writer understands the different meanings, but is unsure of the appropriate spelling.
Then there are errors that are simply a result of hands moving too fast over a keyboard – the meanings and correct spellings are known to the writer, but, in their haste, perhaps they’ve transposed a couple of letters or omitted a character.
Or it may be that the automatic spellcheck has kicked into gear and the writer hasn’t noticed the problem because they’re concentrating on the bigger picture. Examples might include e.g. filed/field; adverse/averse; pubic/public.
Blind spots
Writers aren't the only ones with blind spots. Editorial pros do too. It’s our job to spot these problems and fix them. However, we’re only human and most of us have a few blind-spot words that our eyes are, on occasion, less likely to notice, even though we do know the differences in meaning and spelling.
My own blind spots are gaffe/gaff, brake/break and peek/pique/peak. I don’t know why my eye doesn’t spot these pesky confusables as readily, especially when the likes of compliment/complement or stationary/stationery scream at me from the page! However, I accept that I do have blind spots and have taken steps to ameliorate the problem with a little mechanical help – the macro.
How can macros help?
Using macros enables us to identify possible problems before we get down to the business of actually reading, line by line, for sense.
Every time we find an error, we have to think about it and decide whether to amend. By reducing the number of interruptions, we can focus our attention on the flow of the words in front of us and increase efficiency.
For this reason, I, like many of my colleagues, run my macros at the beginning of a project (though I often repeat the process at the end stage too).
What’s on offer in the world of confusables?
There are several free macros available to the copy-editor or proofreader who wants to tackle confusables with efficiency. See, for example, the excellent “A Macro for Commonly Confused Words” published by C.K. MacLeod on Tech Tools for Writers (updated July 2015).
Another option, and the one that I’m currently using, is the CompareWordList macro created by Allen Wyatt on WordTips. See “Highlight Words from a List” (updated July 2015).
As some of you will already know, Wyatt has two WordTips sites; the one you use will be determined by which version of Word you’re running.
The linked article above will take readers to the article written for MS Word 2007, 2010 and above. If you are working with an older version of Word, you’ll need to follow Wyatt’s links to the sister site.
Why I’m using Wyatt’s CompareWordList
CompareWordList is currently my preferred tool simply because of how easy it is to create and update my own list of words to be checked – words that can, on occasion, be blind spots for me.
As I’ll show below, customizing the list of confusables doesn’t require me to amend the script of the macro once it’s installed. Instead, all I have to do is amend a basic list in a Word document – nice and simple!
Using CompareWordList 1: Create your list of confusables
The first thing to do is to create a list of the words you want the macro to find, and highlight, in a Word document.
Using CompareWordList 2: Get, and tweak, the code
Visit “Highlight Words from a List” and copy the code. If you’re completely new to installing macros, just paste the script in a Word document for now so that you can tweak it easily.
Below is a screenshot of Wyatt's code. The highlighted sections show where I’ve tweaked the code to suit my own needs.
Some confusables are not only spelled differently, they sound very different too, e.g. imply/infer; militate/mitigate; reactionary/reactive. In this case, the writer might have misunderstood the meaning.
Some confusables are homophones – words that are spelled differently but sound the same, e.g. rein/reign; stationary/stationery; prophecy/prophesy; loath/loathe. In this case, the writer understands the different meanings, but is unsure of the appropriate spelling.
Then there are errors that are simply a result of hands moving too fast over a keyboard – the meanings and correct spellings are known to the writer, but, in their haste, perhaps they’ve transposed a couple of letters or omitted a character.
Or it may be that the automatic spellcheck has kicked into gear and the writer hasn’t noticed the problem because they’re concentrating on the bigger picture. Examples might include e.g. filed/field; adverse/averse; pubic/public.
Blind spots
Writers aren't the only ones with blind spots. Editorial pros do too. It’s our job to spot these problems and fix them. However, we’re only human and most of us have a few blind-spot words that our eyes are, on occasion, less likely to notice, even though we do know the differences in meaning and spelling.
My own blind spots are gaffe/gaff, brake/break and peek/pique/peak. I don’t know why my eye doesn’t spot these pesky confusables as readily, especially when the likes of compliment/complement or stationary/stationery scream at me from the page! However, I accept that I do have blind spots and have taken steps to ameliorate the problem with a little mechanical help – the macro.
How can macros help?
Using macros enables us to identify possible problems before we get down to the business of actually reading, line by line, for sense.
Every time we find an error, we have to think about it and decide whether to amend. By reducing the number of interruptions, we can focus our attention on the flow of the words in front of us and increase efficiency.
For this reason, I, like many of my colleagues, run my macros at the beginning of a project (though I often repeat the process at the end stage too).
What’s on offer in the world of confusables?
There are several free macros available to the copy-editor or proofreader who wants to tackle confusables with efficiency. See, for example, the excellent “A Macro for Commonly Confused Words” published by C.K. MacLeod on Tech Tools for Writers (updated July 2015).
Another option, and the one that I’m currently using, is the CompareWordList macro created by Allen Wyatt on WordTips. See “Highlight Words from a List” (updated July 2015).
As some of you will already know, Wyatt has two WordTips sites; the one you use will be determined by which version of Word you’re running.
The linked article above will take readers to the article written for MS Word 2007, 2010 and above. If you are working with an older version of Word, you’ll need to follow Wyatt’s links to the sister site.
Why I’m using Wyatt’s CompareWordList
CompareWordList is currently my preferred tool simply because of how easy it is to create and update my own list of words to be checked – words that can, on occasion, be blind spots for me.
As I’ll show below, customizing the list of confusables doesn’t require me to amend the script of the macro once it’s installed. Instead, all I have to do is amend a basic list in a Word document – nice and simple!
Using CompareWordList 1: Create your list of confusables
The first thing to do is to create a list of the words you want the macro to find, and highlight, in a Word document.
- Simply open up a new Word document, give it a name (I called mine “confusables”), and save it in your preferred folder (I chose to save it in my Macros folder, but you can save yours wherever you want).
- Make a note of the location of your document (for example, mine is in c:\Users\Louise\Dropbox\Macros\confusables.docx).
Using CompareWordList 2: Get, and tweak, the code
Visit “Highlight Words from a List” and copy the code. If you’re completely new to installing macros, just paste the script in a Word document for now so that you can tweak it easily.
Below is a screenshot of Wyatt's code. The highlighted sections show where I’ve tweaked the code to suit my own needs.
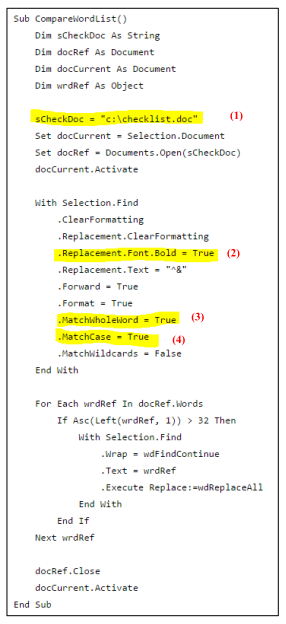
Screenshot of Allen Wyatt's CompareWordList macro code
Tweaks to consider
(1) I’ve changed Wyatt's code (as per his suggestion) so that it describes where my list of confusables is located: sCheckDoc = "c:\Users\Louise\Dropbox\Macros\confusables.docx". You’ll use the location you made a note of when you created your own list (see the section above – Using CompareWordList 1: Create your list of confusables).
(2) Wyatt's code emboldens the words found by the macro; I wanted them highlighted so I replaced the highlighted text as follows: .Replacement.Highlight = True.
(3) I changed the Match Whole Word instruction to False because I wanted the macro to find part words. This, of course, will pull up some false positives but it was the easiest solution I could find.
(4) I also changed the Match Case instruction to False.
Now that you’ve tweaked the code to suit your own needs, you’re ready to install it (the basic, step-by-step instructions below are provided for the benefit of those who are completely new to macro installation).
Using CompareWordList 3: Install the code
With Word open, open the “View” tab and click on the “Macros” icon on the ribbon.

This will open up a new window.
If you don’t have any macros already loaded:
If you don’t have any macros already loaded:
- To get you going, create a test macro that you can delete later.
- First, make sure the Normal.dotm template is showing in the "Macros in:” box.
- Type TEST into the “Macro name:” box.
- Click on the “Create”. Your TEST macro will now show up. From now on, it’ll be easy as pie to add additional macros.

If you have macros loaded (your TEST macro or any other):
- Click on “Edit”.

This will open up a further window:

- If necessary, use the scroll bar to take you to the bottom of the text.
- Paste the CompareWordList script at the end, under “End Sub”
- Close the window using the X in the top right-hand corner.
Running CompareWordList
- Open the Word file in which you want to locate potential confusbles.
- Click the “View” tab.
- Click the “Macros” icon on the ribbon.
- Select "CompareWordList" from the list.
- Click “Run”.
Removing highlights one by one
Here’s a tiny macro that I recorded to remove a highlight as I move through a Word document. Installing this means I simply have to click on a highlighted word and run the macro.
Assigning a shortcut button (see below) makes the job easy and efficient. I decided on Alt H because I don’t have that keyboard shortcut assigned to any function that I carry out regularly.
Sub UndoHighlight()
'
' UndoHighlight Macro
'
'
Options.DefaultHighlightColorIndex = wdNoHighlight
Selection.Range.HighlightColorIndex = wdNoHighlight
End Sub
To install: Simply copy the red script above and install it in the same way that you installed the CompareWordList macro.
To create a shortcut key: In Word, select File, Options, Customize Ribbon (1). Click on Customize (2). A new box will open up entitled “Customize keyboard”. In the Categories window (3), scroll down and select Macros. In the Macros window (4), select UndoHighlight. Finally, choose your preferred keyboard combination by typing it into the Press New Shortcut Key window (5). Select Assign and Close.

To remove ALL highlighting in one go: For this job, Paul Beverley’s your man. A huge number of macros are available in his free book, Computer Tools for Editors (available on his website at Archive Publications).
Hope you find this useful!
Hope you find this useful!
Louise Harnby is a line editor, copyeditor and proofreader who specializes in working with crime, mystery, suspense and thriller writers.
She is an Advanced Professional Member of the Chartered Institute of Editing and Proofreading (CIEP), a member of ACES, a Partner Member of The Alliance of Independent Authors (ALLi), and co-hosts The Editing Podcast.
Visit her business website at Louise Harnby | Fiction Editor & Proofreader, say hello on Twitter at @LouiseHarnby, connect via Facebook and LinkedIn, and check out her books and courses.
She is an Advanced Professional Member of the Chartered Institute of Editing and Proofreading (CIEP), a member of ACES, a Partner Member of The Alliance of Independent Authors (ALLi), and co-hosts The Editing Podcast.
Visit her business website at Louise Harnby | Fiction Editor & Proofreader, say hello on Twitter at @LouiseHarnby, connect via Facebook and LinkedIn, and check out her books and courses.
If you proofread or copyedit fiction or non-fiction, or you're self-editing your own books, here's a macro that will highlight potential inconsistencies in proper-noun usage.
I've been meaning to review some of my favourite proofreading macros for a while now and ProperNounAlyse deserves its first place in the queue (only because it performed so brilliantly on a recent proofreading project!).
ProperNounAlyse is just one tool among many, of course. Those of us who use macros on a regular basis have a whole suite of them that we run during the process of a proofread or a copy-edit.
ProperNounAlyse was created by my colleague Paul Beverley, and it’s just one of a huge number of macros available in his free book, Computer Tools for Editors (available on his website at Archive Publications).
I've written this post for the person who doesn't use macros and is nervous about trying. I think it’s such a shame when a fear of tech leads to lost opportunities for those who want to increase productivity (which is great for the editorial pro) and improve quality (which is great for the client).
Why bother? Three reasons
Go to Paul’s website and download Computer Tools for Editors.
Save the zipped folder to your computer and extract three files: One is an overview of the macros – what they are, what they do, how to store them and so on – plus all the programs themselves; another contains just the actual macro programs; and the final file is a style sheet. The file you need to open in Word is “The Macros”.
Use Word’s navigation menu (or Ctrl F on a PC) to open the Find function. Type “Sub ProperNounAlyse” into the search field and hit Return. That will take you to the start of the relevant script.
Select and copy the script from “Sub ProperNounAlyse()” down to “End Sub”. Paul’s helped us out by highlighting the name of each new macro.
Still with Word open, open the “View” tab and click on the “Macros” icon on the ribbon.
ProperNounAlyse is just one tool among many, of course. Those of us who use macros on a regular basis have a whole suite of them that we run during the process of a proofread or a copy-edit.
ProperNounAlyse was created by my colleague Paul Beverley, and it’s just one of a huge number of macros available in his free book, Computer Tools for Editors (available on his website at Archive Publications).
I've written this post for the person who doesn't use macros and is nervous about trying. I think it’s such a shame when a fear of tech leads to lost opportunities for those who want to increase productivity (which is great for the editorial pro) and improve quality (which is great for the client).
Why bother? Three reasons
- ProperNounAlyse is easy to install, even for those with absolutely no technical savvy, and quick to run.
- It’s great for picking up inconsistencies in proper nouns (even double words, e.g. Louise Harnby vs Louise Hornby) while allowing you to maintain complete control over the text. This is because it’s not changing anything in the document you’re working on; rather, it works through the text in a Word document and provides a summary analysis of what it finds. That leaves you free to identify what needs sorting and what needs leaving well enough alone. I find it particularly useful when I'm proofreading fiction with lots of characters whose names may inadvertently end up being spelled slightly differently. A writer can become so immersed in the story they’re building that these kinds of slippages are easily missed. And even the best professional proofreader is only human, so using a little bit of simple tech to complement the eyes and brain makes good sense.
- While you’ll find it useful for paid work, it’s also a sharp little tool for providing insight into the state of a file you’re being asked to quote for. One of my colleagues routinely runs this in conjunction with another couple of macros in order to get an overview of the author’s consistency. I've taken a leaf out of her book and started using ProperNounAlyse in this way too.
Go to Paul’s website and download Computer Tools for Editors.
Save the zipped folder to your computer and extract three files: One is an overview of the macros – what they are, what they do, how to store them and so on – plus all the programs themselves; another contains just the actual macro programs; and the final file is a style sheet. The file you need to open in Word is “The Macros”.
Use Word’s navigation menu (or Ctrl F on a PC) to open the Find function. Type “Sub ProperNounAlyse” into the search field and hit Return. That will take you to the start of the relevant script.
Select and copy the script from “Sub ProperNounAlyse()” down to “End Sub”. Paul’s helped us out by highlighting the name of each new macro.
Still with Word open, open the “View” tab and click on the “Macros” icon on the ribbon.

This will open up a new window.
If you don’t have any macros already loaded:
If you don’t have any macros already loaded:
- To get you going, create a test macro that you can delete later.
- First, make sure the Normal.dotm template is showing in the "Macros in:” box.
- Type TEST into the “Macro name:” box.
- Click on “Create”. Your TEST macro will now show up. From now on, it’ll be easy as pie to add additional macros.
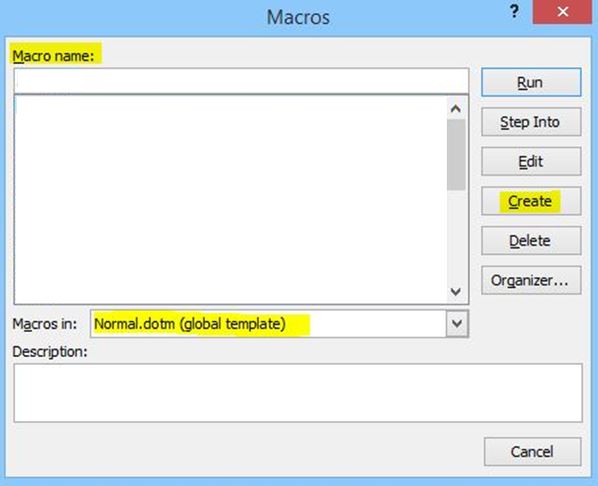
If you have macros loaded (your TEST macro or any other):
- Click on “Edit”.
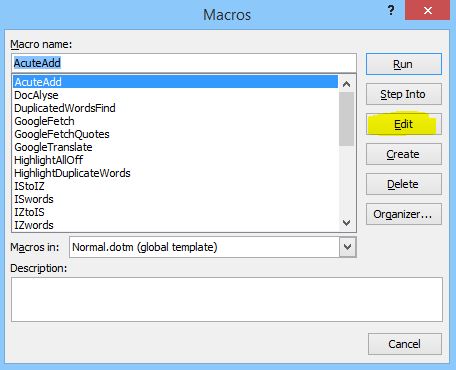
This will open up another window:
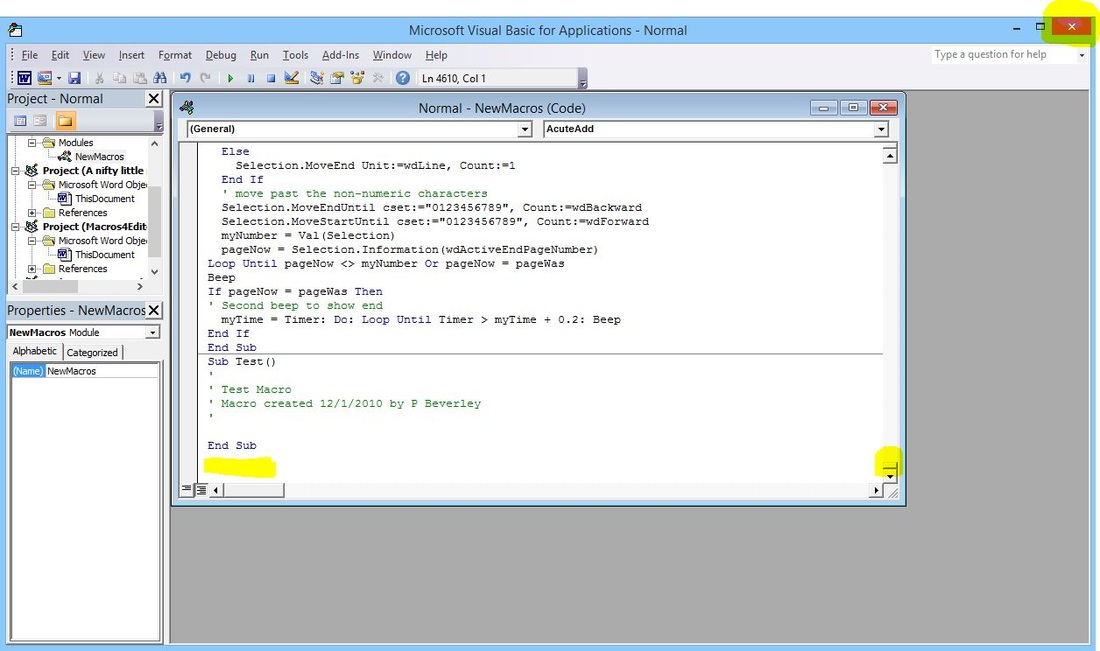
- If necessary, use the scroll bar to take you to the bottom of the text.
- Paste the ProperNounAlyse script at the end, under “End Sub”.
- Close the window using the X in the top right-hand corner.
Running ProperNounAlyse
- Open the Word file you want to analyse.
- Click the “View” tab.
- Click the “Macros” icon on the ribbon.
- Select "ProperNounAlyse" from the list.
- Click “Run”.

A fictive sample
Below is a simple word list of proper nouns with lots of inconsistencies – differences in accent use, apostrophe use and spelling.
Below is a simple word list of proper nouns with lots of inconsistencies – differences in accent use, apostrophe use and spelling.
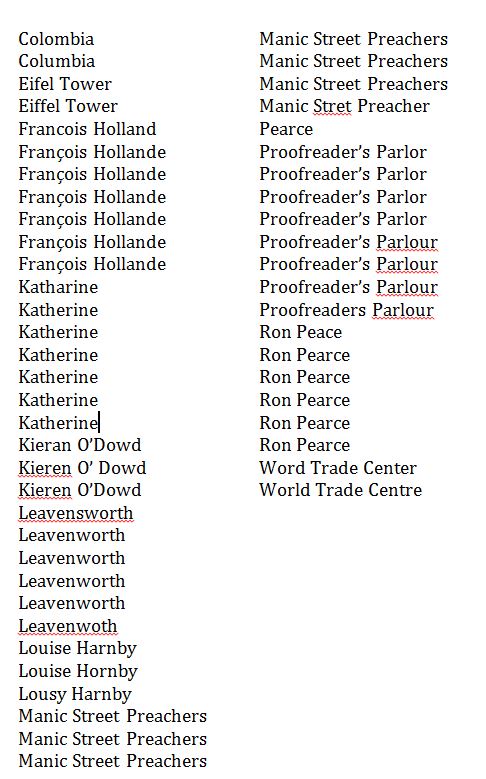
I run ProperNounAlyse on the document. It analyses the text and then creates a new Word file with the following results:
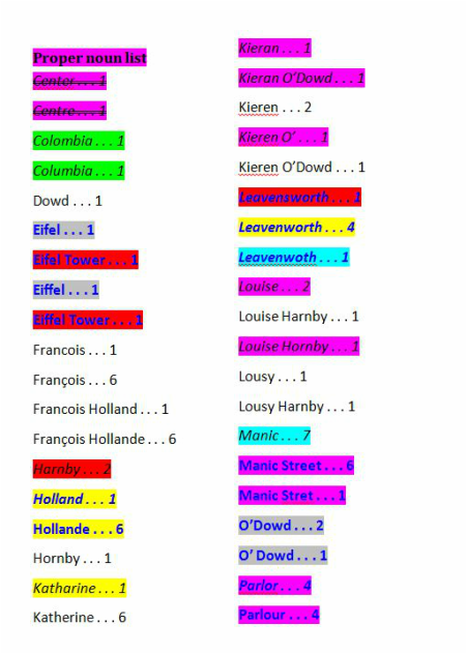
|
|
I’m provided with an at-a-glance summary of potential problems that I need to check. It may be that the differences identified are not mistakes, but I know what to look for.
“I don’t need to use techie tools … my eyes are good enough”
Macros don’t get tired. Macros don’t get distracted. I don’t believe any proofreader who claims they can do as good a job with their eyes alone as they can do with their eyes and some electronic assistance. It’s a case of using these kinds of tools as well as, not instead of, the eyes and brain.
I could have relied on my eyes to find all of the above problems, and in a small file I would hope to have hit the mark 100%. But if I’d been working on 100,000 words of text, and there were twenty key characters, a plethora of grammatical glitches, two major plot holes, numerous layout problems, and a mixture of hundreds of other inconsistencies regarding hyphenation, capitalization, punctuation and regional spelling variation, there would have been a lot of problems to solve; I want to utilize every tool available to help me do that.
Yes, my eyes and brain are two of those tools. But using macros like ProperNounAlyse and others (PerfectIt, for example, just because it’s another favourite!) speeds me up, pure and simple, and massively reduces the chance of a miss.
I ran ProperNounAlyse on a recent fiction proofread for an independent author who is a phenomenally good writer – great plot, excellent pacing, engaging characters. But he was so busy crafting the 95,000 words it took to build a fantastic story that he’d introduced a lot of proper-noun inconsistencies. That’s fine – it’s not his job to deal with these; it’s mine. It took me minutes, rather than hours, to locate them and deal with them. And I know I found them – every one of them.
What will the client remember?
If you’re still reluctant to try out ProperNounAlyse (or any other editorial tool for that matter), consider this: What will the client remember? The three hundred mistakes that you spotted or the three howlers you missed?
When it comes to proper nouns, especially in large volumes of character-based editorial work, it’s too easy to miss a discrepancy. And character names stand out to readers. Taking just a few minutes to run a simple-to-use macro might determine whether your client thinks your work was pretty good or outstanding.
Which of those is likely to gain you a repeat booking or a referral to another potential client?
Louise Harnby is a line editor, copyeditor and proofreader who specializes in working with crime, mystery, suspense and thriller writers.
She is an Advanced Professional Member of the Chartered Institute of Editing and Proofreading (CIEP), a member of ACES, a Partner Member of The Alliance of Independent Authors (ALLi), and co-hosts The Editing Podcast.
Visit her business website at Louise Harnby | Fiction Editor & Proofreader, say hello on Twitter at @LouiseHarnby, connect via Facebook and LinkedIn, and check out her books and courses.
She is an Advanced Professional Member of the Chartered Institute of Editing and Proofreading (CIEP), a member of ACES, a Partner Member of The Alliance of Independent Authors (ALLi), and co-hosts The Editing Podcast.
Visit her business website at Louise Harnby | Fiction Editor & Proofreader, say hello on Twitter at @LouiseHarnby, connect via Facebook and LinkedIn, and check out her books and courses.
Do we still need to learn how to use traditional proof-correction symbols given that most proofreading work is done onscreen these days?
My answer is an emphatic “Yes, you should learn them!”
As I'll show below, knowing how to use them will increase your efficiency, productivity, clarity, marketability, and professionalism.
Traditional proofreading: Checking typeset proofs
Many proofreaders work directly in Word, making actual changes to the text.
In my experience, it's primarily self-publishing authors, academics, students and businesses that commission such direct intervention; almost all of my publishers want me to use the proof-correction symbols.
That’s because I’m not editing the text; rather, I’m annotating pages that have been professionally designed – the pages appear as I would expect to see them if I walked into a bookshop and pulled the published book from a shelf.
In this situation, I'm not just looking for spelling and grammar mistakes. I also need to annotate for problems with layout, for example:
So, if you plan to work on page proofs that have been professionally typeset prior to publication, and you hope to acquire this work from mainstream publishing houses, you will need to know how to annotate the pages correctly with these symbols, even if you are proofreading onscreen.
What do the marks look like?
It depends where you live. If you need guidance about proof-correction marks in your particular region, contact your national editorial society. In some countries, the UK’s BSI marks are accepted for proofreading and copy-editing practice.
In the UK, there is a single set of industry-recognized symbols. These have been prepared by the British Standards Institution (BSI) and are entitled “Marks for copy preparation and proof correction”. Over time they’ve been updated. The current marks are identified as follows: BS 5261C:2005.
If you’re working for Canadian or US clients, read Adrienne Montgomerie’s article, “The Secret Code of Proofreaders” (Copyediting.com, 2014). As she points out, the Canadian Translation Bureau’s Canadian Style guide marks are quite different from the marks preferred by the Chicago Manual of Style.
Why are proof-correction marks useful?
When we proofread typeset page proofs, there’s little room to indicate what we want to change. Recall that each page we’re working on appears almost as it would if the printed book had been published.
Using industry-standard proof-correction marks is an efficient way to annotate the page with the desired corrections. The symbols are a short-cut code of instructions that tell the designer exactly what to do. Once you’ve learned all the symbols by heart, they’re much quicker to use than long-hand text and take up minimal space.
Open the nearest book you have to hand and look at how much white space there isn’t between the text and the margin – it’s not uncommon for me to work on page proofs with a 2cm margin either side of the text.
Notice, too, how small the space is above and below a single line of text.
The book has been designed and there's little room to annotate.
Now imagine that in a given line there is a missing comma, a spelling mistake, and a word that needs decapitalizing.
The example below illustrates how these problems would be marked up using the BSI proof-correction symbols.
The long-hand alternative might be something on the lines of <Change “fax” to “fox”> in the left-hand margin, and <Insert comma after “grass” and decapitalize “Legs”> in the right-hand margin.
Given that we only have 2cm margins to play with, that each line is spaced closely to its neighbours above and below, and that in a real set of proofs there may be several corrections in multiple lines, any instructions to the typesetter are likely to become cluttered and confusing.
Proof-correction symbols solve the problem.
As I'll show below, knowing how to use them will increase your efficiency, productivity, clarity, marketability, and professionalism.
Traditional proofreading: Checking typeset proofs
Many proofreaders work directly in Word, making actual changes to the text.
In my experience, it's primarily self-publishing authors, academics, students and businesses that commission such direct intervention; almost all of my publishers want me to use the proof-correction symbols.
That’s because I’m not editing the text; rather, I’m annotating pages that have been professionally designed – the pages appear as I would expect to see them if I walked into a bookshop and pulled the published book from a shelf.
In this situation, I'm not just looking for spelling and grammar mistakes. I also need to annotate for problems with layout, for example:
- misaligned text
- incorrect indentation
- inconsistent line or paragraph spacing
- the wrong font
- heading design problems
- widows, orphans, and short lines
- chapter-drop inconsistencies
- incorrect positioning of different elements on a page, from boxes to images to tables
- bad word breaks
- recto word breaks
So, if you plan to work on page proofs that have been professionally typeset prior to publication, and you hope to acquire this work from mainstream publishing houses, you will need to know how to annotate the pages correctly with these symbols, even if you are proofreading onscreen.
What do the marks look like?
It depends where you live. If you need guidance about proof-correction marks in your particular region, contact your national editorial society. In some countries, the UK’s BSI marks are accepted for proofreading and copy-editing practice.
In the UK, there is a single set of industry-recognized symbols. These have been prepared by the British Standards Institution (BSI) and are entitled “Marks for copy preparation and proof correction”. Over time they’ve been updated. The current marks are identified as follows: BS 5261C:2005.
If you’re working for Canadian or US clients, read Adrienne Montgomerie’s article, “The Secret Code of Proofreaders” (Copyediting.com, 2014). As she points out, the Canadian Translation Bureau’s Canadian Style guide marks are quite different from the marks preferred by the Chicago Manual of Style.
Why are proof-correction marks useful?
When we proofread typeset page proofs, there’s little room to indicate what we want to change. Recall that each page we’re working on appears almost as it would if the printed book had been published.
Using industry-standard proof-correction marks is an efficient way to annotate the page with the desired corrections. The symbols are a short-cut code of instructions that tell the designer exactly what to do. Once you’ve learned all the symbols by heart, they’re much quicker to use than long-hand text and take up minimal space.
Open the nearest book you have to hand and look at how much white space there isn’t between the text and the margin – it’s not uncommon for me to work on page proofs with a 2cm margin either side of the text.
Notice, too, how small the space is above and below a single line of text.
The book has been designed and there's little room to annotate.
Now imagine that in a given line there is a missing comma, a spelling mistake, and a word that needs decapitalizing.
The example below illustrates how these problems would be marked up using the BSI proof-correction symbols.
The long-hand alternative might be something on the lines of <Change “fax” to “fox”> in the left-hand margin, and <Insert comma after “grass” and decapitalize “Legs”> in the right-hand margin.
Given that we only have 2cm margins to play with, that each line is spaced closely to its neighbours above and below, and that in a real set of proofs there may be several corrections in multiple lines, any instructions to the typesetter are likely to become cluttered and confusing.
Proof-correction symbols solve the problem.
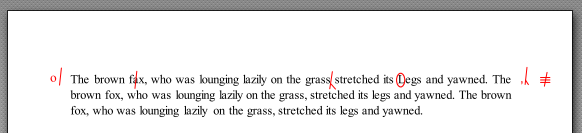
The use of proof-correction symbols therefore offers increased efficiency, productivity, and clarity. And if you’re a proofreader-to-be who wants to ensure you’re marketable to as wide a range of clients as possible, acquiring the ability to use this mark-up process is a no-brainer.
Attending to professional standards
In addition to enabling you to work efficiently, productively, and clearly, and maximizing your marketability, there is also the issue of professionalism. Membership of a professional editorial society often requires knowledge of the relevant nationally approved mark-up symbols as a standard of good practice.
Where to find the UK marks
The BSI provides a laminated 8-page summary sheet of all the marks you need to know for proofreading. Also included are short notes that enable the proofreader or copy-editor to identify the correct mark for both marginal and in-text mark-up, colour of ink to be used, and positioning of the symbols.
The CIEP has an arrangement with the BSI whereby members can purchase the sheet for a reduced price.
How to learn to use the marks
Any comprehensive proofreading course worth its salt should test your ability to use the marks according to industry standards. It's not just about using the right mark so that the instruction is unambiguous, but also about knowing when to use the mark and when to leave well enough alone.
In the UK, the CIEP and The Publishing Training Centre are examples of organizations offering industry-recognized courses that attend to these issues. If you live outside the UK, ask your national editorial society for guidance.
Further reading
If you’re considering embarking on a professional proofreading career, you might find the following related articles of use:
Attending to professional standards
In addition to enabling you to work efficiently, productively, and clearly, and maximizing your marketability, there is also the issue of professionalism. Membership of a professional editorial society often requires knowledge of the relevant nationally approved mark-up symbols as a standard of good practice.
- The Australian standards for editing practice, 2nd ed. (2013), states, "Editors should be up to date and proficient in the following: [...] A6.6 Standard mark-up symbols and conventions for copyediting and proofreading."
- Chartered Institute of Editing and Proofreading (CIEP) Code of practice notes at section 5.6, Proofreading printed materials: Basic skills, "A proofreader should be competent in the following skills: [...] 5.6.4 Proof-correction symbols: Use current British Standard proof-correction symbols or terms, and colour coding for corrections (if required by the client) to permit accurate apportioning of costs."
- The Editors' Association of Canada's Professional Editorial Standards: "E. Standards for Proofreading" says: "A professional proofreader requires a mastery of Part A: The Fundamentals of Editing and meets the following standards. [...] E16 When working on paper proofs, mark clearly and use standard proofreading marks unless another system has been agreed upon."
Where to find the UK marks
The BSI provides a laminated 8-page summary sheet of all the marks you need to know for proofreading. Also included are short notes that enable the proofreader or copy-editor to identify the correct mark for both marginal and in-text mark-up, colour of ink to be used, and positioning of the symbols.
The CIEP has an arrangement with the BSI whereby members can purchase the sheet for a reduced price.
How to learn to use the marks
Any comprehensive proofreading course worth its salt should test your ability to use the marks according to industry standards. It's not just about using the right mark so that the instruction is unambiguous, but also about knowing when to use the mark and when to leave well enough alone.
In the UK, the CIEP and The Publishing Training Centre are examples of organizations offering industry-recognized courses that attend to these issues. If you live outside the UK, ask your national editorial society for guidance.
Further reading
If you’re considering embarking on a professional proofreading career, you might find the following related articles of use:
- Proofreading checklist
- Not all proofreading is the same: Part I – Working with page proofs
- Not all proofreading is the same: Part II – Working directly in Word
- Does training matter? What publishers say about proofreading & editing courses
- Thoughts on proofreading and the art of leaving well enough alone
- The proofreader’s corner: Page proofs and the domino effect
- Proofreading: Using training to learn the appropriate mind-set
- Editorial business building books
- Roundup: PDF proofreading stamps (quick-access links)
Louise Harnby is a line editor, copyeditor and proofreader who specializes in working with crime, mystery, suspense and thriller writers.
She is an Advanced Professional Member of the Chartered Institute of Editing and Proofreading (CIEP), a member of ACES, a Partner Member of The Alliance of Independent Authors (ALLi), and co-hosts The Editing Podcast.
Visit her business website at Louise Harnby | Fiction Editor & Proofreader, say hello on Twitter at @LouiseHarnby, connect via Facebook and LinkedIn, and check out her books and courses.
She is an Advanced Professional Member of the Chartered Institute of Editing and Proofreading (CIEP), a member of ACES, a Partner Member of The Alliance of Independent Authors (ALLi), and co-hosts The Editing Podcast.
Visit her business website at Louise Harnby | Fiction Editor & Proofreader, say hello on Twitter at @LouiseHarnby, connect via Facebook and LinkedIn, and check out her books and courses.
Like so many of my proofreading and editing colleagues, I never rely on my eye alone. I’m human, and my eye sometimes sees what it wants to see rather than what’s there, even when I’m working with clients rather than reading for pleasure.
TextSTAT: Creating a frequency list
One of my favourite tools is TextSTAT. Actually, it wasn’t created with the proofreader or editor in mind. Rather, the program was designed to enable users to analyse texts for word frequency and concordance. However, I use it to generate, very quickly, simple alphabetized word lists.
Time and again, those word lists have flagged up potential problems that I need to check in a proofreading or copyediting project.
If I'm proofreading a PDF, I strip the text from the PDF proof and dump it into a Word file. I remove word breaks from that Word file (using "-^p") so that TextSTAT generates a list of whole words that I can compare, rather than thousands of useless broken words).
If I'm editing in Word, I can obviously bypass the above steps.
Identifying potential problems in text
Here’s a small sample from a word list I generated in TextSTAT. As you can see, there are several possible problems:
- -se vs -ze spelling
- US-English vs British-English spelling
- possible misspelling of cited author name
- possible inconsistency with regard to hyphenation
- possible misspelling of non-English words
- inconsistent terminology
- misspelling
|
analog
analogue analyse analyze beginings Bronislav Bronislaw Bronisław artifacts artefacts behavior behaviour |
Benedict
Benedikt Caille Caillé Davies Davis Daviss decommodified de-commodified Defourney Defourny deproletariatization deproletarization |
Frans
Franz Herman Hermans Hrdy Malinovski Malinowski mercadante mercatante metafisico metafico |
(The colour coding is mine; I've provided it for clarity only. TextSTAT's word lists are in plain text.)
Upon checking the actual proofs, some of these issues turned out to be fine. For example:
Some issues had to be queried. For example:
Some issues needed further checking and amending. For example:
When proofreading hard-copy or PDF proofs, would I have spotted these problems with my eye alone? I'm not confident I'd have got everything, particularly the issues with the names of the less well-known cited authors. And if "beginings" had been in point-9 italic text, my eye might have passed over the missing letter.
Upon checking the actual proofs, some of these issues turned out to be fine. For example:
- The US/UK and -s/-z spelling variations did not need amending because within-chapter consistency was acceptable to the client.
- Hrdy wasn’t a typo – it’s someone’s name.
- Herman and Hermans were two different people; both spelling variants were correct.
- The hyphenation inconsistency didn’t exist – the hyphenated version was simply an end-of-line word break in the PDF.
Some issues had to be queried. For example:
- Both “deproletariatization” and “deproletarization” were used several times in close proximity, and the context didn’t make it clear whether the difference was warranted or there should be consistency. If the latter was called for, it wasn't clear which was the preferred term.
Some issues needed further checking and amending. For example:
- Defourny became Defourney
- Malinovski became Malinowski
- Caille became Caillé
- Bronislav and Bronislaw were both changed to Bronisław
- mercadante became mercantante
- metafico became metafisico
When proofreading hard-copy or PDF proofs, would I have spotted these problems with my eye alone? I'm not confident I'd have got everything, particularly the issues with the names of the less well-known cited authors. And if "beginings" had been in point-9 italic text, my eye might have passed over the missing letter.
Where’s the context?
There is no context – that’s the point. When using TextSTAT as a word-list generation tool, we’re just looking at one word and how it compares with words above and below it in our list.
We’re not reading phrases; we’re not paying attention to grammar and syntax. It’s just a long list of words in alphabetical order.
Later, we can focus on the words in context – TextSTAT’s word lists are just a tiny part of a process that help the proofreader or editor to provide his or her client with a polished piece of work.
Fast, free and offline
TextSTAT isn’t the only word-list generation tool available for free. However, I love it because it can handle huge chunks of text without glitching – it will quickly generate word lists for books with hundreds of thousands of words (the sample I gave above was taken from a project of over 150,000 words, but I’ve used the program for larger projects). It’s never crashed on me.
You can download the software to your own computer, so there’s no issue regarding confidentiality. My clients don’t want me to upload their content to third-party browsers without their permission, so when I use a particular proofreading tool to augment my eye, that tool needs to be able to sit offline on my PC.
Furthermore, it costs nothing. Say the creators: “TextSTAT is free software. It may be used free of charge and it may be freely distributed provided the copyright and the contents of all files, including TextSTAT.zip itself, are unmodified. Commercial distribution of the programme is only allowed with permission of the author. Use TextSTAT at your own risk; the author accepts no responsibility whatsoever. The sourcecode version comes with its own license."
Is it worth the effort?
Some might think that an hour or so trawling through a simple word list, and cross-checking any potential problems against hard copy or PDF, is a lot of extra time to build into a proofreading project. I think that time improves the quality of my work and increases my productivity.
When I come to the actual reading-in-context stage, I'm confident that some really serious snags have already been attended to. That gives me peace of mind and enables me later to focus on other important issues like the page layout, the sense of the text, and more.
I've found that using this method for dense academic projects has been particularly worthwhile. However, I'll not forget a recent fiction project (a "big name"-authored book that's in its nth edition and was first published over two decades ago) where the main protagonist's name was spelled incorrectly in two places: an easy thing to miss again and again over many years and many proofreads.
I caught it – not because my eyes are better than those who came before me, or because I'm a better proofreader than those who came before me, but because I used a simple tool that allowed me to concentrate on just the words.
Want to try TextSTAT?
If you want to give it a spin, it’s available from NEON - NEDERLANDS ONLINE.
The usual caveat applies: generating word lists as part of the proofreading and editing process isn't the one and only true way. TextSTAT is an example of one tool that I and some of my colleagues utilize to improve the quality of our work. You might utilize different tools and different methods to achieve the same ends. All of which is great!
The usual caveat applies: generating word lists as part of the proofreading and editing process isn't the one and only true way. TextSTAT is an example of one tool that I and some of my colleagues utilize to improve the quality of our work. You might utilize different tools and different methods to achieve the same ends. All of which is great!
How to use TextStAT
These instructions are correct as of 24 June 2021.
- Go to http://neon.niederlandistik.fu-berlin.de/en/textstat/.
- Download TextSTAT 2.9c for Windows.
- Extract the files.
- Go to TextSTAT-2.9c > TextSTAT-2 > TextSTATE.exe (I’ve pinned this file to my desktop ribbon).
- Select New Corpus.
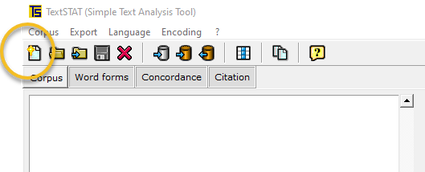
- Create a file name, then save.

- A window will pop up saying you can add files. Choose OK.
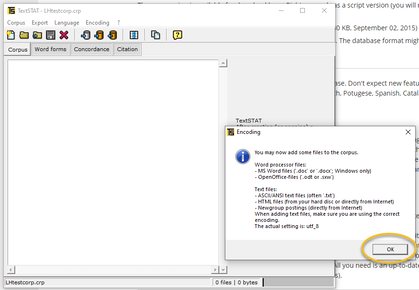
- Select Add Local File.

- Find your Word doc and left-click on it. Then choose Open.
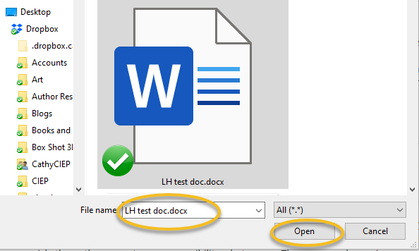
- Select Show Word Frequencies and your list will appear.
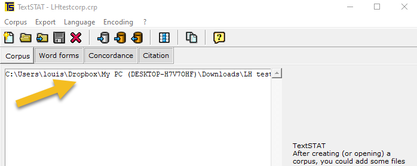
- Export the word list. I usually use Excel because I can easily remove all the tiny words (like ‘the’ and ‘and’ that appear hundreds of times).
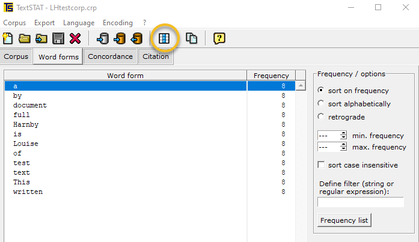
- Copy and paste the frequency list into a Word doc.
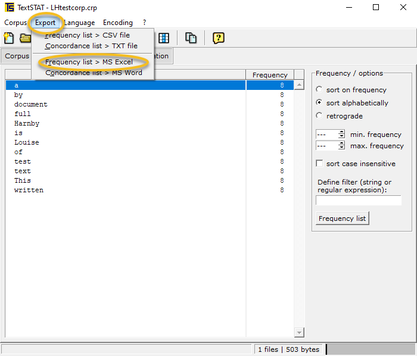
Louise Harnby is a line editor, copyeditor and proofreader who specializes in working with crime, mystery, suspense and thriller writers.
She is an Advanced Professional Member of the Chartered Institute of Editing and Proofreading (CIEP), a member of ACES, a Partner Member of The Alliance of Independent Authors (ALLi), and co-hosts The Editing Podcast.
She is an Advanced Professional Member of the Chartered Institute of Editing and Proofreading (CIEP), a member of ACES, a Partner Member of The Alliance of Independent Authors (ALLi), and co-hosts The Editing Podcast.
- Get in touch: Louise Harnby | Fiction Editor & Proofreader
- Connect: Twitter at @LouiseHarnby, Facebook and LinkedIn
- Learn: Books and courses
- Discover: Resources for authors and editors
If your client wants sensitive end-of-line word-breaks in their text, and they will if they're asking you to proofread for print, this online tool will help you decide where to break the word and insert the hyphen.

For example, Oxford Dictionaries recommends the following:
|
therapist
|
ther ¦ ap | ist
|
|
lineage
|
lin | eage
|
|
whorish
|
whor | ish
|
|
material
|
ma | ter ¦ ial
|
There's always the trusty New Oxford Spelling Dictionary, an authority on spelling and word division. However, if you have clients that want every end-of-line hyphen checked, you'll need something more efficient than a book.
Perhaps you work on magazine articles, three columns to a page. Word breaks abound. And since the client pays on a flat-fee basis for each job, looking up these darn things impacts on your hourly rate in no small way.
Oxford Dictionaries includes online access to its dictionaries and thesauri, New Hart's Rules and Pocket Fowler's Modern English Usage.
It also includes a function for checking word-breaks.
I'm not chucking away my print book quite yet. There are limitations to the online version. For example, 'wingless' doesn't have its own entry, but is part of the definition of 'wing', so the preferred break (wing | less) isn't offered.
Still, productivity increases are only a click away if you have to check end-of-line word-breaks frequently.
To access, go to Oxford Dictionaries.

You might have to pay for an account. However, if you're a member of a UK library, access is free. Pop in your library card number (1) and click on the LOGIN button (2).
Now select the language.
Type in your word, then scroll down to FOR EDITORS AND PROOFREADERS. There you'll find the recommended break where the word should be broken and the hyphen inserted.
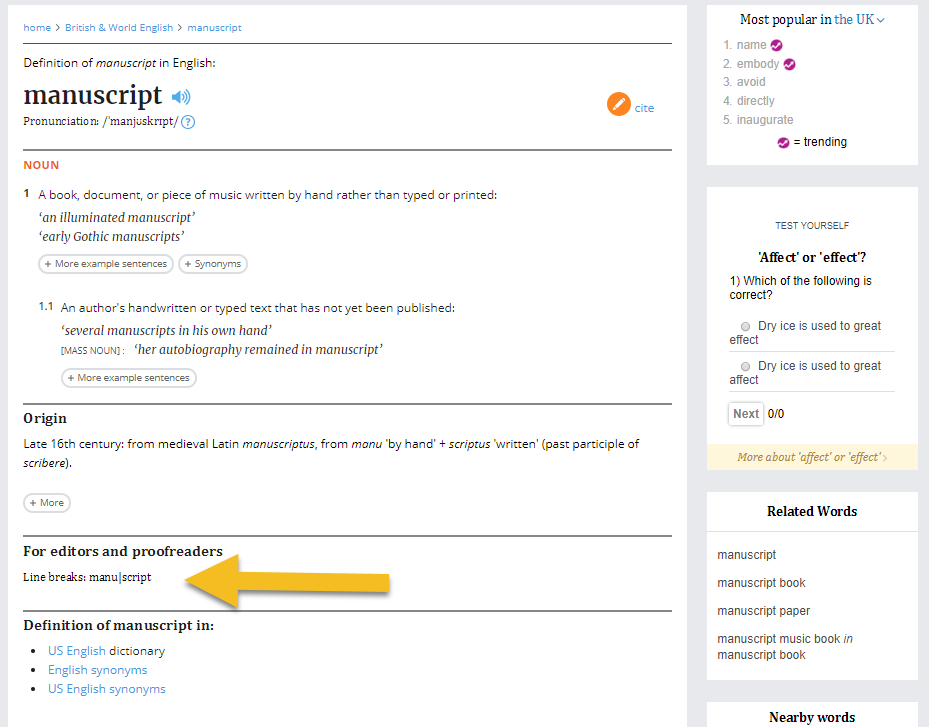
Louise Harnby is a line editor, copyeditor and proofreader who specializes in working with crime, mystery, suspense and thriller writers.
She is an Advanced Professional Member of the Chartered Institute of Editing and Proofreading (CIEP), a member of ACES, a Partner Member of The Alliance of Independent Authors (ALLi), and co-hosts The Editing Podcast.
Visit her business website at Louise Harnby | Fiction Editor & Proofreader, say hello on Twitter at @LouiseHarnby, connect via Facebook and LinkedIn, and check out her books and courses.

PDF MARKUP

AUTHOR RESOURCES

EDITOR RESOURCES


TESTIMONIALS
Dare Rogers
'Louise uses her expertise to hone a story until it's razor sharp, while still allowing the author’s voice to remain dominant.'
Jeff Carson
'I wholeheartedly recommend her services ... Just don’t hire her when I need her.'
J B Turner
'Sincere thanks for a beautiful and elegant piece of work. First class.'
Ayshe Gemedzhy
'What makes her stand out and shine is her ability to immerse herself in your story.'
Salt Publishing
'A million thanks – your mark-up is perfect, as always.'
CATEGORIES
All
Around The World
Audio Books
Author Chat
Author Interviews
Author Platform
Author Resources
Blogging
Book Marketing
Books
Branding
Business Tips
Choosing An Editor
Client Talk
Conscious Language
Core Editorial Skills
Crime Writing
Design And Layout
Dialogue
Editing
Editorial Tips
Editorial Tools
Editors On The Blog
Erotica
Fiction
Fiction Editing
Freelancing
Free Stuff
Getting Noticed
Getting Work
Grammar Links
Guest Writers
Indexing
Indie Authors
Lean Writing
Line Craft
Link Of The Week
Macro Chat
Marketing Tips
Money Talk
Mood And Rhythm
More Macros And Add Ins
Networking
Online Courses
PDF Markup
Podcasting
POV
Proofreading
Proofreading Marks
Publishing
Punctuation
Q&A With Louise
Resources
Roundups
Self Editing
Self Publishing Authors
Sentence Editing
Showing And Telling
Software
Stamps
Starting Out
Story Craft
The Editing Podcast
Training
Types Of Editing
Using Word
Website Tips
Work Choices
Working Onscreen
Working Smart
Writer Resources
Writing
Writing Tips
Writing Tools
ARCHIVES
July 2024
June 2024
May 2024
April 2024
March 2024
October 2023
August 2023
July 2023
June 2023
May 2023
April 2023
March 2023
January 2023
December 2022
November 2022
October 2022
September 2022
August 2022
July 2022
June 2022
May 2022
April 2022
March 2022
February 2022
January 2022
December 2021
November 2021
October 2021
September 2021
August 2021
July 2021
June 2021
May 2021
April 2021
March 2021
February 2021
January 2021
December 2020
November 2020
October 2020
September 2020
August 2020
July 2020
June 2020
May 2020
April 2020
March 2020
February 2020
January 2020
December 2019
November 2019
October 2019
September 2019
August 2019
July 2019
June 2019
May 2019
April 2019
March 2019
February 2019
January 2019
December 2018
November 2018
October 2018
September 2018
August 2018
July 2018
June 2018
May 2018
April 2018
March 2018
February 2018
January 2018
December 2017
November 2017
October 2017
September 2017
August 2017
July 2017
June 2017
May 2017
April 2017
March 2017
February 2017
January 2017
December 2016
November 2016
October 2016
September 2016
June 2016
May 2016
April 2016
March 2016
February 2016
January 2016
December 2015
November 2015
October 2015
September 2015
July 2015
June 2015
May 2015
March 2015
February 2015
January 2015
November 2014
October 2014
September 2014
August 2014
July 2014
June 2014
March 2014
January 2014
November 2013
October 2013
September 2013
August 2013
June 2013
February 2013
January 2013
November 2012
October 2012
September 2012
August 2012
July 2012
June 2012
May 2012
April 2012
March 2012
February 2012
January 2012
December 2011
 RSS Feed
|
|
|
|

|

|
|
|
|

© 2011–2024 Louise Harnby