

|
Are you spending too much time on your novel’s text design? Here’s how to use the Styles function in Microsoft Word to ensure the various elements are formatted consistently.
In this article, I’ll walk you through the following:
What is the Styles tool? The Styles tool allows you to apply design consistency to the various text elements in your book. In a novel, you might want to create different styles for the following:
Microsoft Word has a handy suite of on-board styles, though it’s unlikely they’ll match your specific requirements. Modifying these is still a little quicker than creating fresh styles so take a look at the properties and work out what you’ll retain and what you’ll change. What properties can you influence? You can influence every property of your text when you assign a style to it. However, in a novel, you’ll most likely focus on the following:
How to access the Styles tool There are two ways to access the Styles function onscreen:
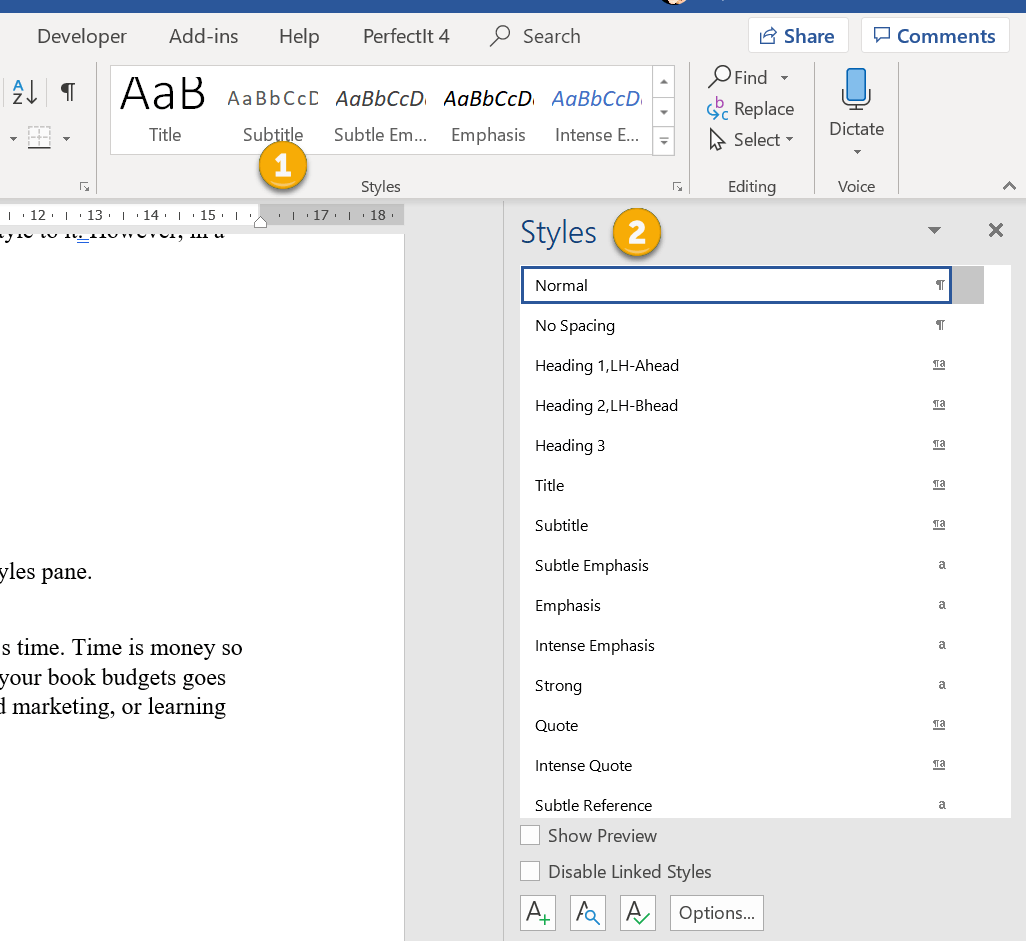
The gallery in the ribbon offers a preview of how the style appears. If I’m working with a lot of different text elements in a document, I find these visual clues useful when I want to locate a style quickly.
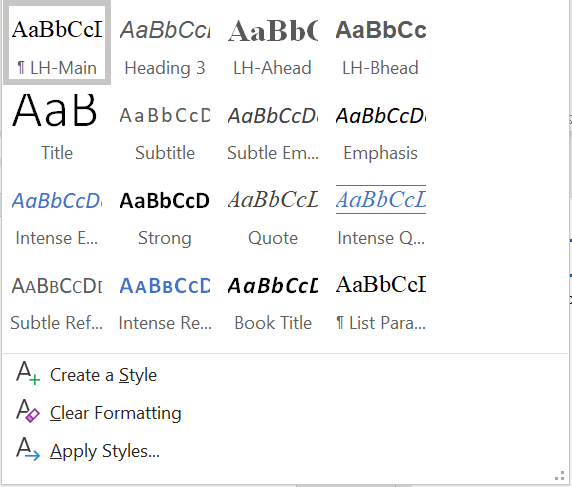
On smaller screens, less of the Styles gallery will be visible. To access the previews of all the styles in your gallery, click on the MORE arrow (circled). 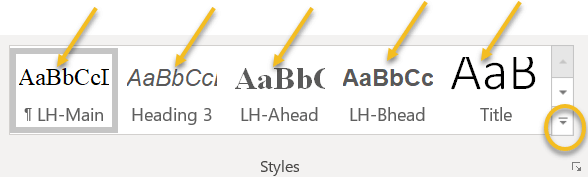
A new window will appear containing the full gallery.
Why you should format with styles
Using styles gives you control over design, consistency and formatting time. Time is money, so when you do the job instead of asking other professionals to do it, your book budgets goes further. Perhaps you can invest a little more time or money on cover design, sales and marketing, or learning how to improve writing craft. Can you format manually? Of course, but you could be making a lot of unnecessary work for yourself. Scenario 1 You complete the writing, drafting, and editing, and get cracking on designing the layout. Now that there are 85,000 words in place, your thriller’s looking more like a textbook thanks to the font you’ve chosen for your main text: Arial 14. A serif font like Times New Roman would be easier on your reader’s eye. The problem is, you can’t select all the text in the file with CTRL A and change it in one fell swoop because that would affect the chapter headings and the emails your transgressor is sending to the police, all of which are formatted differently. Instead, you have to work through the file, locate the main text elements manually, and change the font. If, however, you’ve assigned a style to your main text, you can modify that font property in just a few clicks. The change will automatically change all the main text, and only that element, to your new font. Further down, I’ll show you how. Scenario 2 You’ve written 12 additional paragraphs for your book but they’re in another document. You copy and paste the writing into your book file. Now you have to manually format the new sections so that they match the existing work. If you’ve assigned styles, however, it’s as simple as cut, paste and left-click. Job done. How to create a style There are several ways to create a style in Word:
1A. Manual method Open the styles pane and left-click on the A+ button in the bottom-left-hand corner. 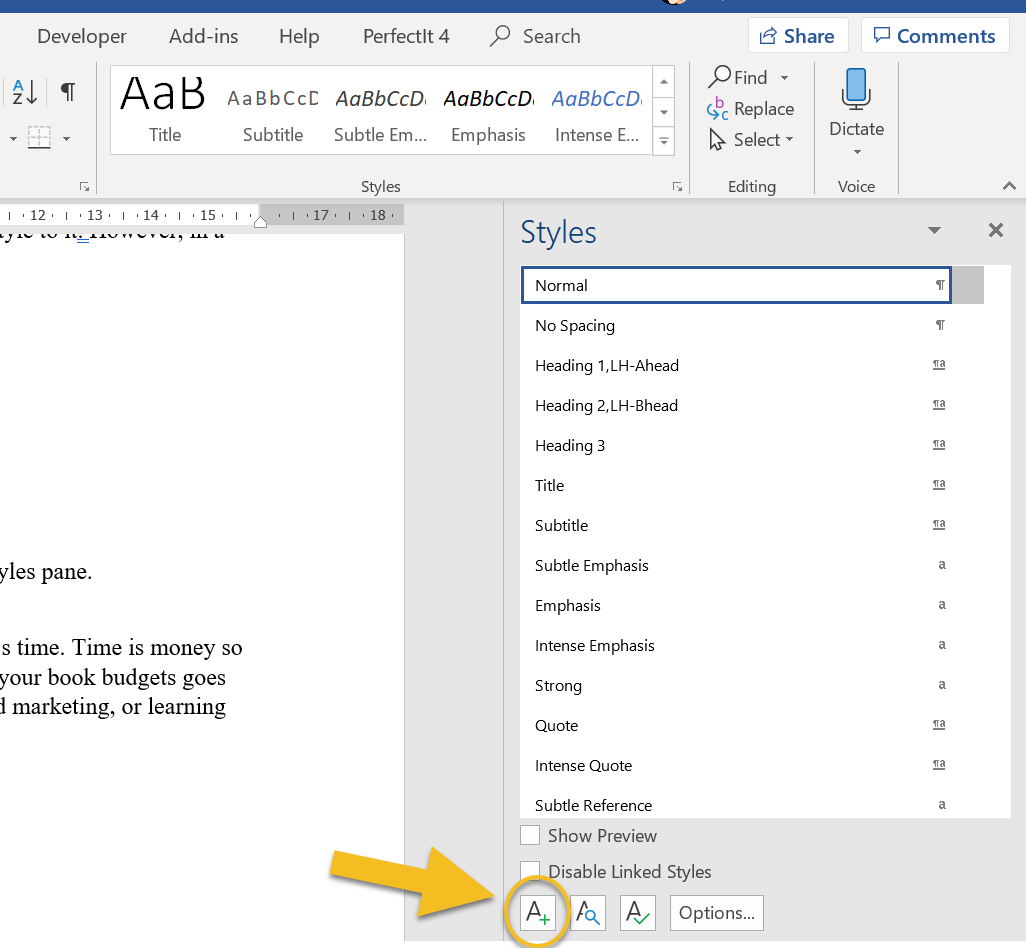
A new window will open (CREATE NEW STYLE FROM FORMATTING). Now you can give your style a name (1) and assign properties to the font, paragraph spacing and page flow (2 and 3).
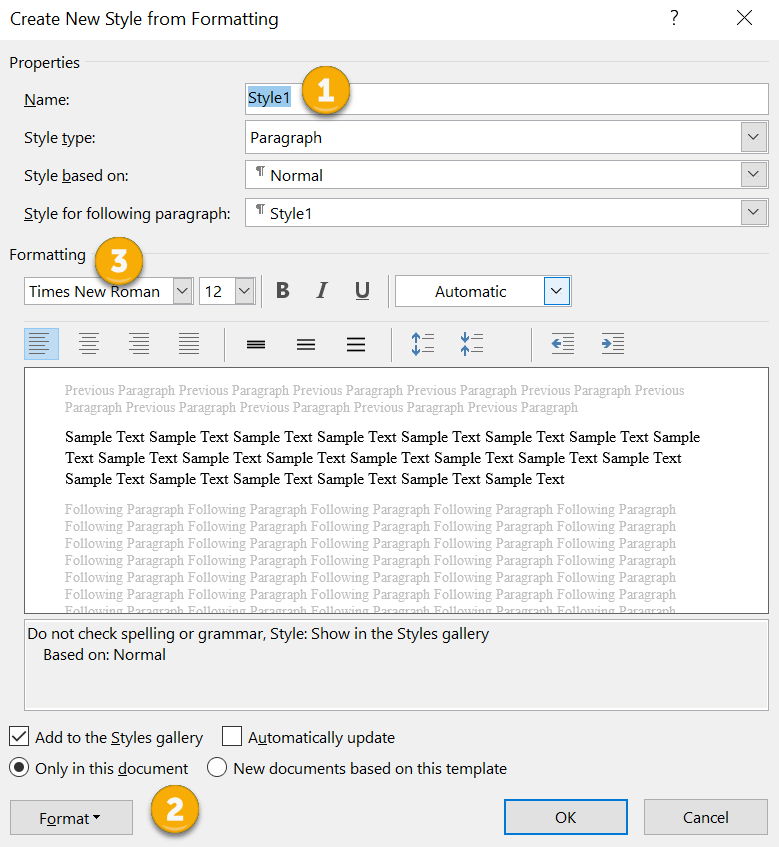
1B. Manual method B
Alternatively, right-click on a piece of text that’s already formatted according to your preferences. A mini toolbar will appear. Click on the Styles button. 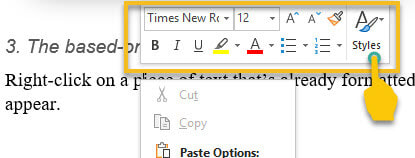
A new window will appear. Left-click on CREATE A STYLE.
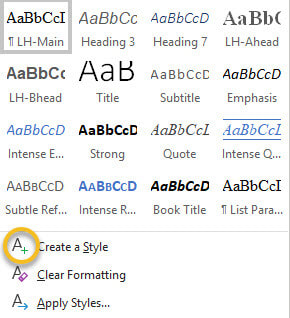
Name your style, modify if you wish, and left-click OK.
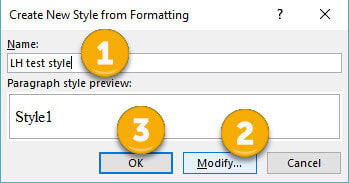
2. Updating method
Select a piece of text that’s already formatted according to your preferences. Now head up to the Styles gallery in the ribbon, or the Styles pane, and right-click on an unused style that you’re happy to update. Hover over UPDATE [STYLE] TO MATCH SELECTION, then left-click. 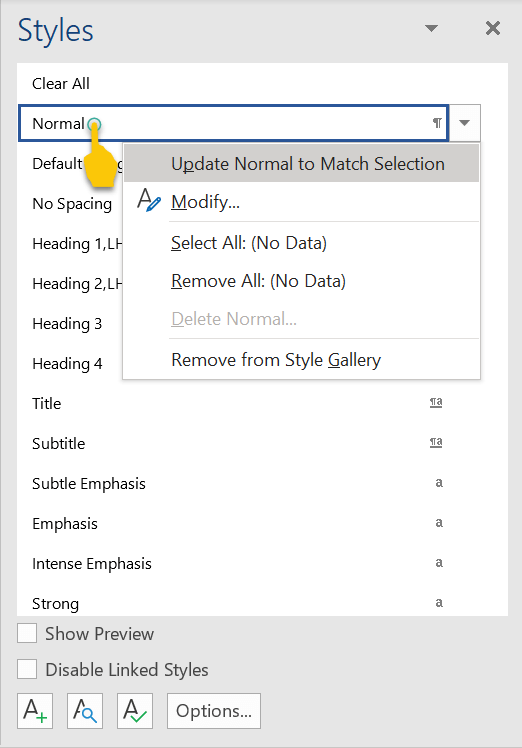
How to modify a style
There are two ways to modify a style in Word:
1. Styles gallery Go to the Styles gallery in the ribbon and right-click on the style you want to modify. 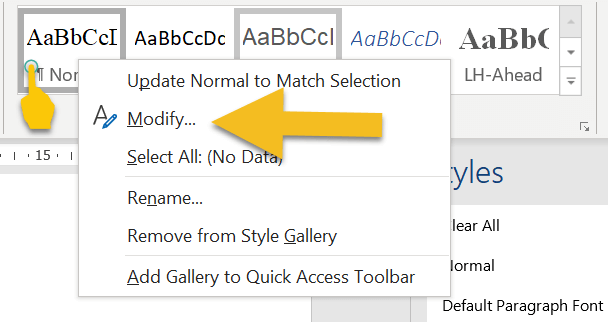
Left-click on MODIFY and amend the properties of your style. Note that this will change every piece of text assigned with that style.
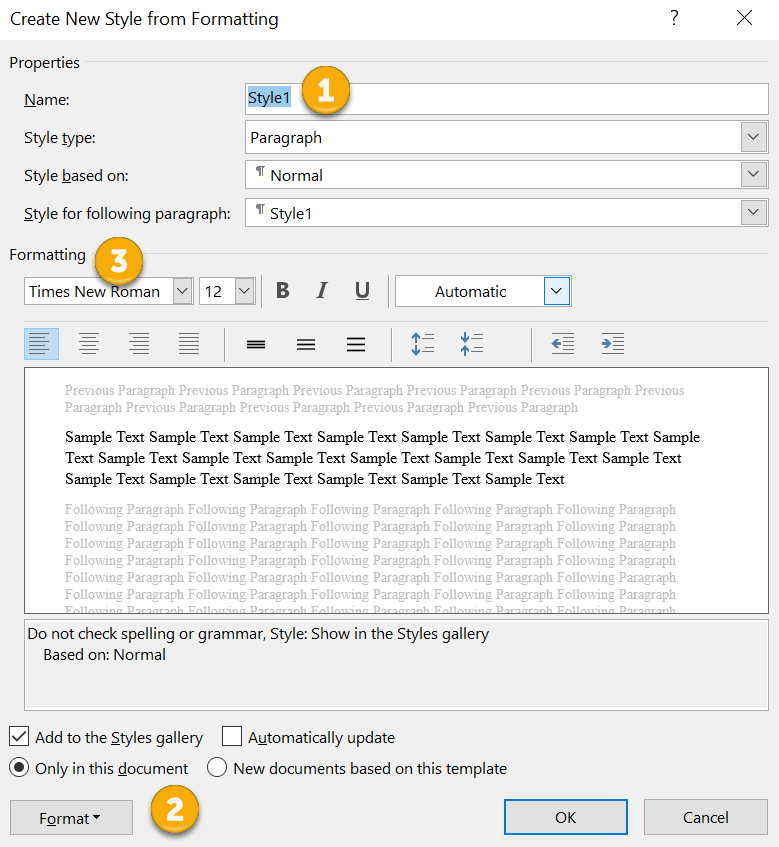
2. Styles pane
Go to the Styles pane on the right-hand side of your screen and right-click on the style you want to modify. 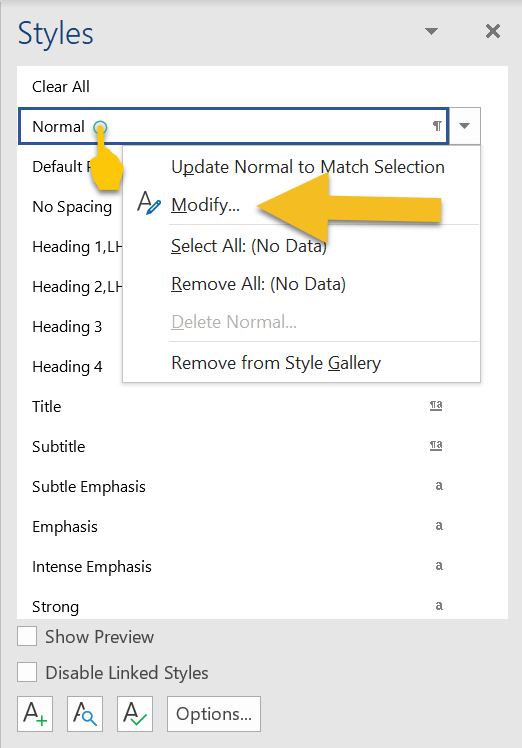
Left-click on MODIFY and amend the properties of your style. Again, bear in mind that this will change every piece of text with that style assigned.
How to assign a style to an element of text If a piece of text isn’t formatted correctly, left-click the cursor on a word or in a paragraph, or select it by double-clicking. Now head up to the Styles gallery in the ribbon, or the Styles pane, and left-click on the preferred style. Your style will be assigned. If you’re working on a smaller screen, you’ll probably find it easier to use the Styles gallery in the ribbon because it takes up less space than the Styles pane. To close the Styles pane and free up some screen real-estate, left-click on the X in the top-right-hand corner. 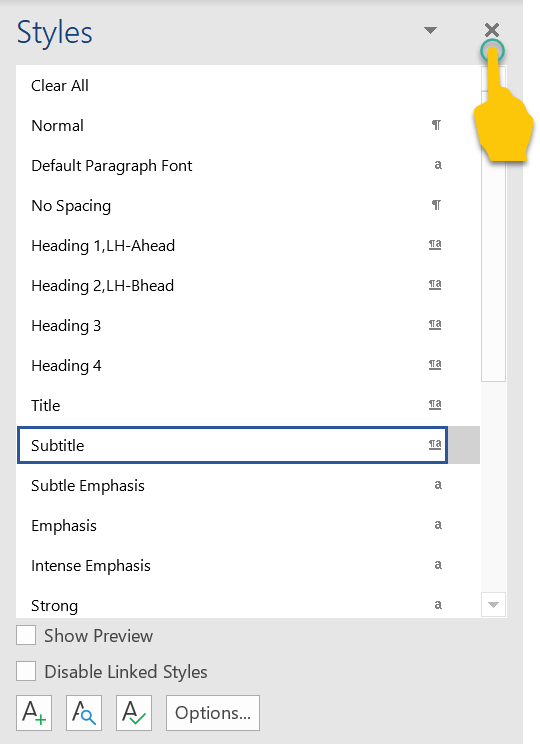
Troubleshooting
Here’s how to fix some of the more common problems that arise when working with styles. 1. Styles gallery or pane isn’t visible If the Styles gallery isn’t visible, make sure you’re in the HOME tab in the ribbon. 
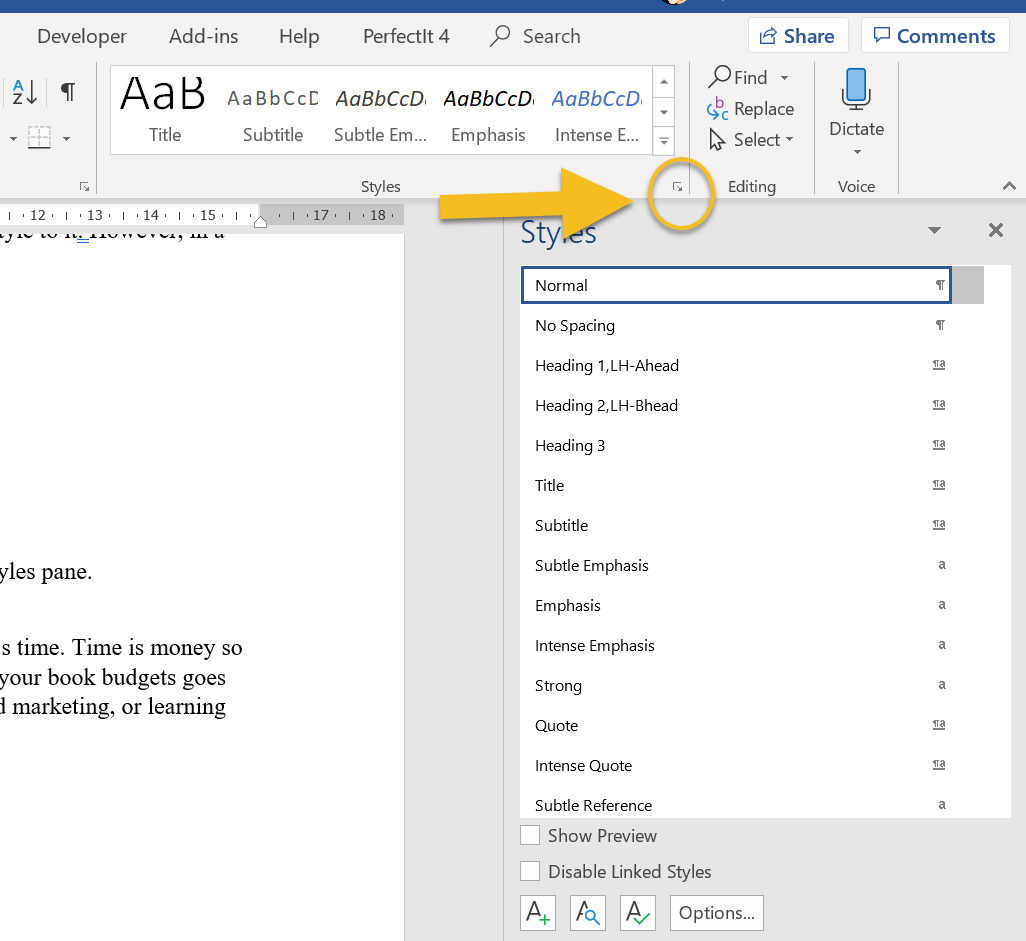
If the Styles pane isn’t visible, left-click on the small arrow in the Styles gallery.
2. Style not showing in gallery
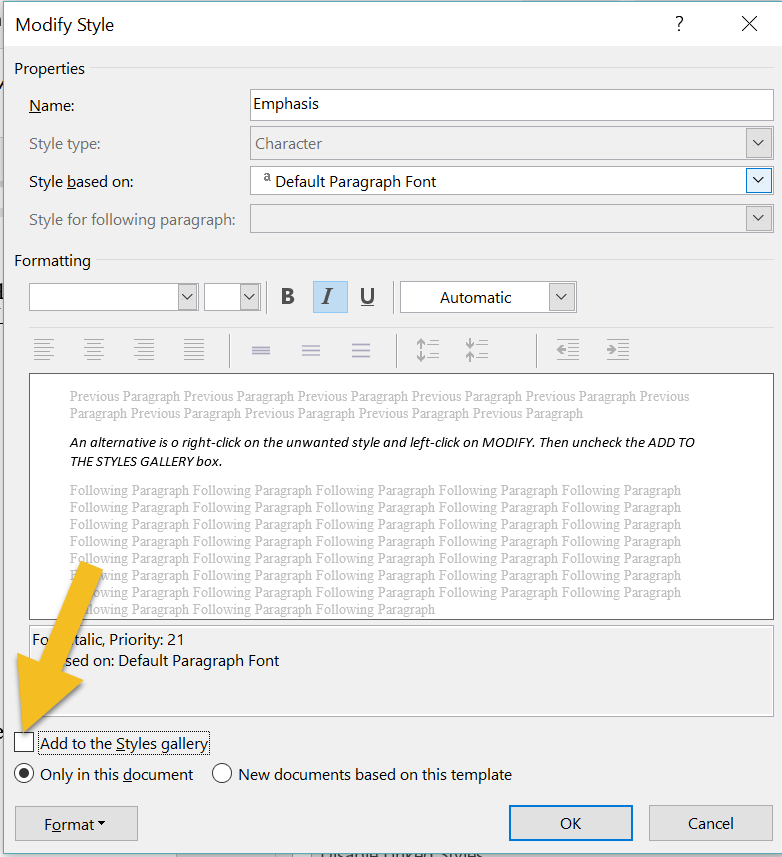
If you’ve created a style and it’s not showing in gallery, head to the Styles pane and right-click on the missing style. This opens the MODIFY pane. Make sure that the ADD TO THE STYLES GALLERY box is checked. 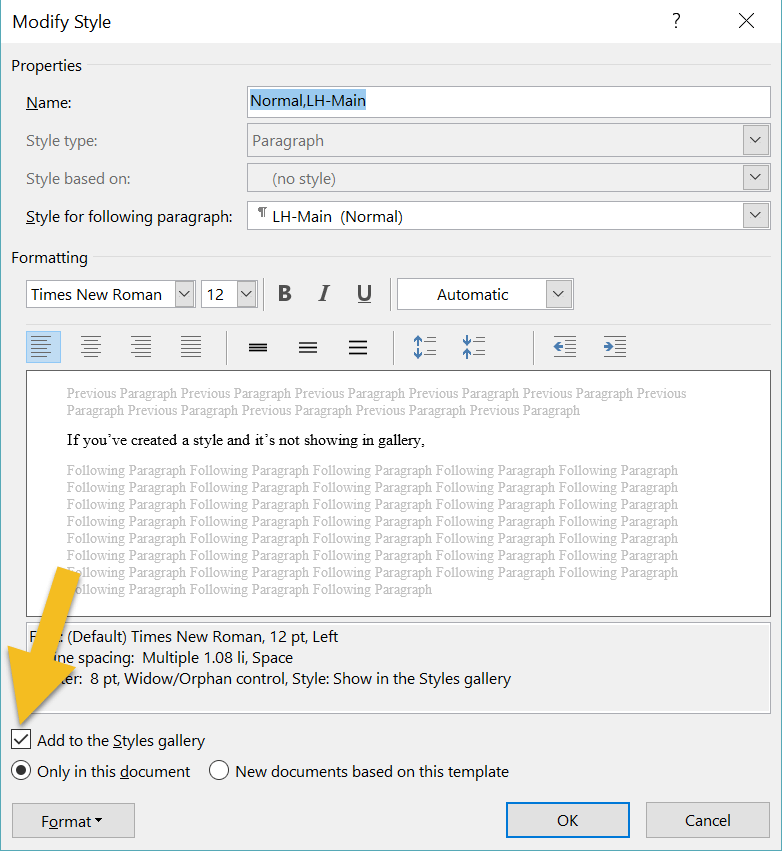
3. The gallery is cluttered with unused styles
If your gallery is busy with styles you don’t need to access, there are two ways to remove them. The quickest method is to right-click on an unwanted style, then left-click on REMOVE FROM STYLE GALLERY. 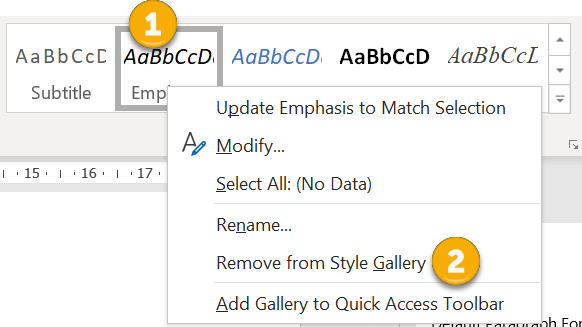
An alternative is to right-click on the unwanted style and left-click on MODIFY. Then uncheck the ADD TO THE STYLES GALLERY box.
4. You’ve renamed a style but Word’s default name is still displayed in the pane
If you’re using the Styles pane to apply styles, the list might appear cluttered if Word’s default names are displaying, even though you've modified them. To fix, left-click on the OPTIONS button. 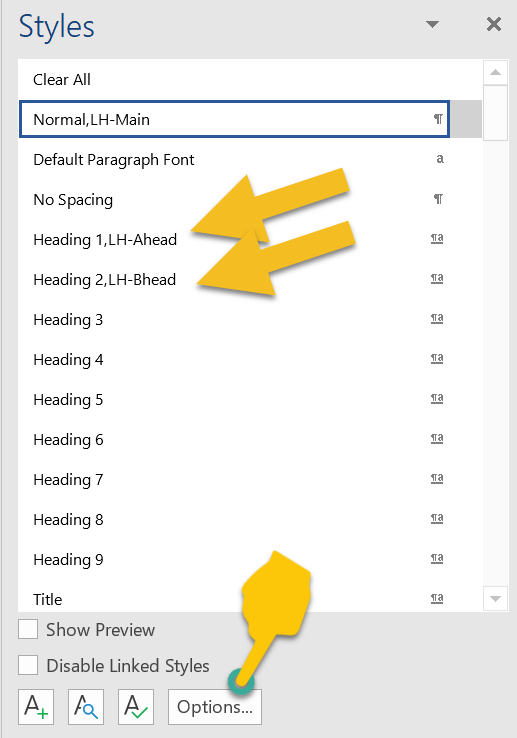
Check the HIDE BUILT-IN NAME WHEN ALTERNATE EXISTS box, then left-click on OK.
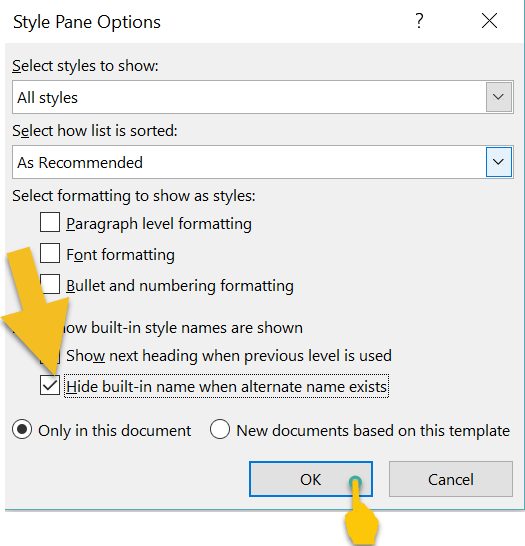
Your list will now display with your modified names.

Heading styles and navigating your Word file
One of the advantages of using the Styles tool for a novel is navigation. To access the Navigation pane, press CTRL F on a PC. Now, left-click on the HEADINGS tab. Any style based on one of the in-built heading styles will show up in the menu. 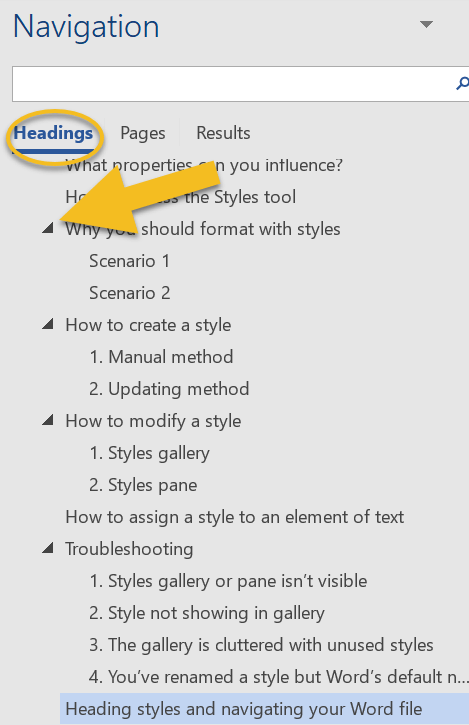
I use this function when I’m editing and want to check that chapter headings (and subheadings) are formatted consistently, assigned the correct level of priority, and numbered chronologically.
Headings with arrows next to them indicate lower-level subheadings. You can expand or collapse subheadings by left-clicking on the arrows. Furthermore, if you want to shift a headed or subheaded section to another position in your document, left-click on the relevant heading and drag up or down the menu. Summing up Styles let you focus on your writing rather than fretting about internal text design. Applying a style to an element of your book file takes a fraction of the time required for manual formatting. And because any style can be tweaked, you get to change your mind as often as you like. If you have any problems with using Word’s Styles gallery and pane, drop me a note in the comments and I’ll do my best to fix the issue. Fancy watching a video tutorial? Visit my YouTube channel and watch: Self-editing Your fiction in Word: How to Use Styles.
Louise Harnby is a line editor, copyeditor and proofreader who specializes in working with crime, mystery, suspense and thriller writers.
She is an Advanced Professional Member of the Chartered Institute of Editing and Proofreading (CIEP), a member of ACES, a Partner Member of The Alliance of Independent Authors (ALLi), and co-hosts The Editing Podcast. Visit her business website at Louise Harnby | Fiction Editor & Proofreader, say hello on Twitter at @LouiseHarnby, connect via Facebook and LinkedIn, and check out her books and courses.
10 Comments
Everyone loves a freebie. Here’s how creating useful digital resources can help you work faster with existing clients and prove your worth to clients-to-be.
Click on the image below to download your free PDF booklet and learn how to create your own digital swag bag! 
Click on the free booklet above to learn how to create your own digital swag bag! Or visit the Resource Library to find more tools to help you develop your business.
Louise Harnby is a line editor, copyeditor and proofreader who specializes in working with crime, mystery, suspense and thriller writers.
She is an Advanced Professional Member of the Chartered Institute of Editing and Proofreading (CIEP), a member of ACES, a Partner Member of The Alliance of Independent Authors (ALLi), and co-hosts The Editing Podcast. FIND OUT MORE > Get in touch: Louise Harnby | Fiction Editor & Proofreader > Connect: Twitter at @LouiseHarnby, Facebook and LinkedIn > Learn: Books and courses > Discover: Resources for authors and editors
Semi-colons are disliked by some, misused by others, and avoided by many. If you want to keep them out of your writing, that’s fine. In this article, I show you how they work conventionally. That way, you can omit them because that’s your preference, not because you daren’t include them!
What is a semi-colon?
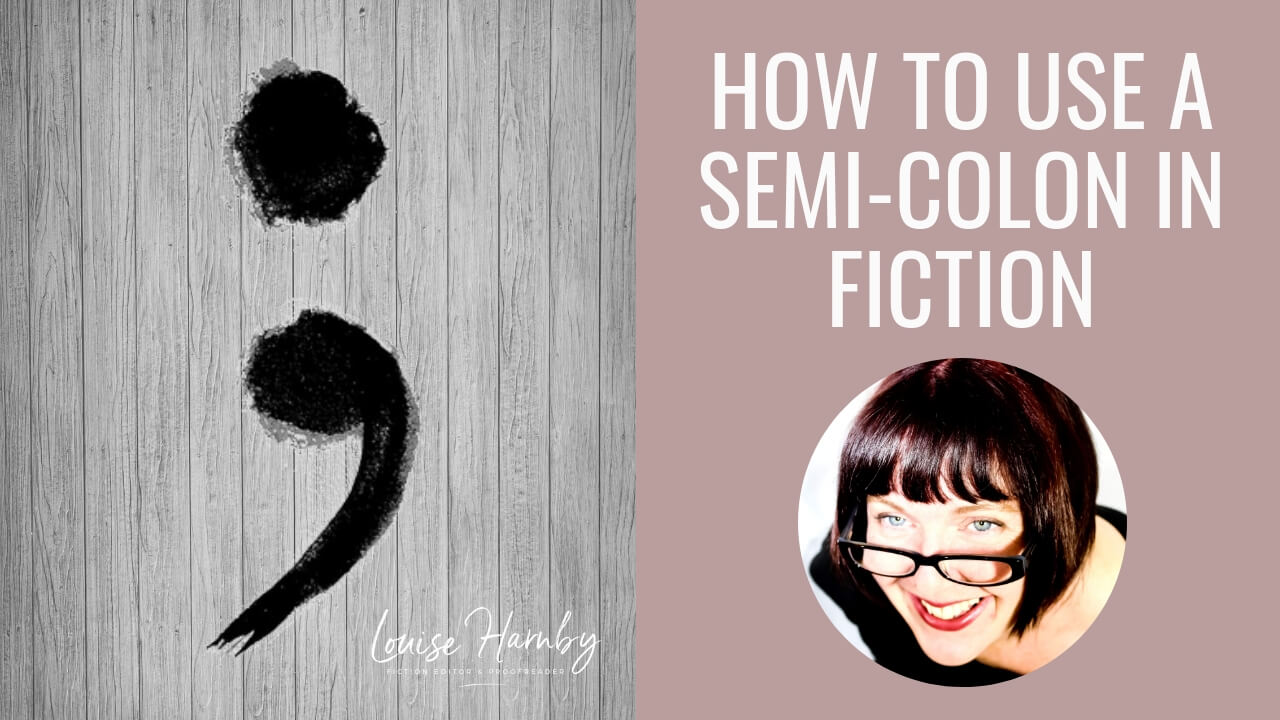
It’s one of these: ;3 ways to use a semi-colon There are 3 situations in which you’re likely to use a semi-colon in fiction:
Here, I focus on parallelism and clarity, but sentence pacing comes into play too – a useful addition to any fiction writer’s toolbox. A little bit of grammar Above, I mentioned independent clauses. An independent clause is a group of words that contains a subject and a predicate. In case you don’t know what they are – and many writers know how to write extremely well without knowing grammar terminology so there’s no shame in that – here’s an overview. Subject A subject is the thing in a sentence that’s doing something or being something. In the examples below, the subject is in bold.
If you’re not sure what the subject of your sentence is, try this trick: change the subject into a question that you can answer yes/no to, as in the examples below.
Predicate
A predicate is the part of a sentence that contains a verb and that tells us something about what the subject’s doing or what they are. In the examples below, the predicate is in bold.
If you’re not sure what the predicate is in a sentence that’s a question, turn it into a statement, as in the example below. The result might be clunky but it’ll show you what’s what. The subject is in bold and the predicate in italic.
Independent clauses
Quick recap: an independent clause is a group of words that contains a subject and a predicate. The subject is in bold, the predicate is in italic, and the full independent clause is in red.
Parallelism and the semi-colon Take a look at these two independent clauses.
The second sentence is related to the first because the gravel that’s digging into the agent’s elbows is what she experiences after falling to the ground. We can therefore use a semi-colon to indicate this relationship, if we wish.
Note that the first word of the clause after the semi-colon does not take an initial capital letter. Could we use a colon? A colon is non-standard because colons introduce additional/qualifying information about the first clause, not new information. Think of the information they introduce as subordinate, if it helps. I recommend avoiding colons to join parts of a sentence that are equally weighted.
Could we use a comma?
A comma is non-standard when joining two independent clauses. Sentences using commas in this way are said to contain comma splices. I recommend avoiding this usage.
Clarity and the semi-colon
Heavily punctuated sentences can be confusing and clunky. For the reader, it can mean limping through your prose rather than moving at a pace dictated by narrative intent. Take a look at this example from Mick Herron’s Dead Lions, p. 88. There are two semi-colons in the original version, but for this example I’m focusing only on the first (see the section in bold).
1. Amended with en dash
He was bald, or mostly bald – a crop of white stubble gilded his ears – and gave off an air of pent-up energy, of emotions kept in check – the same sense Lamb had had watching the video of him, shot eighteen years ago, through a two-way mirror in one of Regent’s Park’s luxury suites. Joke. These were underground, and were where the Service’s more serious debriefings took place; those which it might later prove politic to deny had happened. 2. Amended with comma He was bald, or mostly bald – a crop of white stubble gilded his ears – and gave off an air of pent-up energy, of emotions kept in check, the same sense Lamb had had watching the video of him, shot eighteen years ago, through a two-way mirror in one of Regent’s Park’s luxury suites. Joke. These were underground, and were where the Service’s more serious debriefings took place; those which it might later prove politic to deny had happened. The en dash in the first alternative version looks awkward because we already have two parenthetical en dashes in play. What happens if we introduce a comma instead? The sentence is already comma-heavy. All we’ve done is bring in yet another to muddy the waters. The semi-colon works best. It effectively links the clauses it connects, but in a way that subdivides the sentence clearly. However, pacing comes into place here too. There’s more on pacing below but, for now, compare the original and the version amended with a comma. The creepy voyeurism is starker when set off by the semi-colon. More on pacing and the semi-colon The semi-colon is harder than the comma. It lengthens the pause or increases the distance between two clauses that could have been linked with a comma, making them both stand out. The semi-colon is softer than the full point. It shortens the pause or reduces the distance between two clauses that could have been linked with a full point, indicating a stronger, more intimate relationship. Back to Herron for a closer look at the second semi-colon (see the section in bold) and some alternatives we could try:
Original
He was bald, or mostly bald – a crop of white stubble gilded his ears – and gave off an air of pent-up energy, of emotions kept in check; the same sense Lamb had had watching the video of him, shot eighteen years ago, through a two-way mirror in one of Regent’s Park’s luxury suites. Joke. These were underground, and were where the Service’s more serious debriefings took place; those which it might later prove politic to deny had happened.
1. Amended with comma
He was bald, or mostly bald – a crop of white stubble gilded his ears – and gave off an air of pent-up energy, of emotions kept in check; the same sense Lamb had had watching the video of him, shot eighteen years ago, through a two-way mirror in one of Regent’s Park’s luxury suites. Joke. These were underground, and were where the Service’s more serious debriefings took place, those which it might later prove politic to deny had happened. In the original, the semi-colon acts as a super-comma, subdividing the whole sentence into two more readable chunks. However, more marked is the impact on the pace. The semi-colon forces us to slow down. That’s important because the clause that comes after it is about the denial of interrogations. The semi-colon makes us pause a little longer, which makes the sinister information that follows stand out. Semi-colons and dialogue Some authors resist the use of semi-colons in dialogue, usually on the grounds that the reader can’t hear the punctuation. Does that mean you shouldn’t use them? A novel’s dialogue isn’t real-life speech; it’s a representation of it. Speech, like narrative, has rhythm. The writer’s job is to create speech that’s clear and well paced. If a semi-colon helps you to do that, why wouldn’t you use it? Here’s a great example from David Rosenfelt’s New Tricks, p. 316:
Both versions work but Rosenfelt elects to use a semi-colon because he wants to show the relationship between the two independent clauses. A full point would pull the clauses a little further apart and reduce the intimacy between them. Should you use semi-colons in your fiction? Some authors prefer to omit semi-colons for a variety of reasons: they're deemed pretentious, confusing, interruptive or ugly. But I’m not sure we should judge them so harshly:
Further reading and cited works
Louise Harnby is a line editor, copyeditor and proofreader who specializes in working with crime, mystery, suspense and thriller writers.
She is an Advanced Professional Member of the Chartered Institute of Editing and Proofreading (CIEP), a member of ACES, a Partner Member of The Alliance of Independent Authors (ALLi), and co-hosts The Editing Podcast. Visit her business website at Louise Harnby | Fiction Editor & Proofreader, say hello on Twitter at @LouiseHarnby, connect via Facebook and LinkedIn, and check out her books and courses.
Is your dialogue pushing your novel forward or making the reader feel like they’re eavesdropping on a mundane conversation at the bus stop? Here’s how to ensure your dialogue pops.
What good dialogue isn’t
Good dialogue is the icing on the cake of a well-structured novel. Bad dialogue will mar a well-structured narrative and bury a story that is barely hanging in there. Before we look at what makes great dialogue, let’s look at what dialogue isn’t:
WHAT DIALOGUE IS NOT
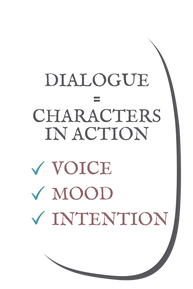
3 components of effective dialogue ‘Dialogue should be the character in action,’ says John Yorke in his must-read Into the Woods (p. 151). Yorke’s talking about the art of screenwriting but the advice is just as pertinent for novelists. I recommend you read it even if you have no intention of writing for the screen because it’s a masterclass in storytelling, whatever the medium. When we stop thinking about dialogue as words spoken – as conversations – and instead frame it in terms of characters, we create something that’s fit for a novel. What does your dialogue tell readers about who your characters are, how they’re feeling, and what their motivations are?
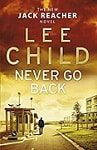
Unreliable dialogue What a character expresses through dialogue need not match their true voice, mood or intent. Unreliable dialogue is powerful precisely because it jars the reader by masking the truth (which the characters themselves may even have buried). Imagine this scenario: John has been kidnapped by Jane. They met in a club where she spiked his drink. He started to feel unwell and she offered him a ride to the Tube station. He never made it. He’s been held captive for several days, during which time he’s been physically abused and deprived of food. He’s frightened out of his wits, and weak to boot. The dialogue between John and Jane could go as follows: John raves and rants, telling Jane her behaviour is monstrous, that Jane’s going to pay for her actions and that he’s going straight to the police as soon as he’s escaped. Jane responds in fury, telling John he deserves it all and how there’s no way he’ll ever escape. Or the dialogue could be unreliable. John might be polite, sycophantic even, as he thanks her for the water she provided, compliments her on her appearance, or asks her about her life. Through that speech, we are shown his desperation. It’s about keeping her on side and calm in order to save himself. And Jane’s verbal response might be chipper, seductive even. Through that dialogue, we are shown her psychosis. The result is a sinister verbal exchange that allows us to explore the inner workings of the characters’ minds without it being forced down our throats via an all-to-obvious narrative that’s centred around the viewpoint character. Breaking free of viewpoint limitations Most novelists opt to hold third- or first-person narrative viewpoints. That means the story in a chapter plays out through one person’s perspective. When authors drop viewpoint, readers end up playing a game of narrative table tennis in which they bounce from one character’s head to another. We know who everyone is (voice), what everyone’s feeling (mood), and what everyone wants (intention) all of the time. Readers become disengaged because they don’t have time to immerse themselves in any one character’s experience. Good dialogue allows writers and readers to break free without head-hopping. Through dialogue, readers can intuit the voice, mood and intention of multiple characters, yet the singular narrative viewpoint remains true throughout. That keeps the reader engaged and the writing taut. Purposeful dialogue in action Here’s an excerpt from Lee Child’s Never Go Back (pp. 457–8). I chose it because I’ve also seen the movie, which allowed me to compare my experience of the screen dialogue (and the advice Yorke gives) with the novel’s, and because there are no action beats, only two speech tags and no narrative. It’s just dialogue between a teenage girl and Jack Reacher.
‘Am I in trouble?’
Reacher said, ‘No you’re not in trouble. We’re just checking a couple of things. What’s your mom’s name?’ ‘Is she in trouble?’ ‘No one’s in trouble. Not on your street, anyway. This is about the other guy.’ ‘Does he know my mom? Oh my God, is it us you’re watching? You’re waiting for him to come see my mom?’ ‘One step at a time,’ Reacher said. ‘What’s your mom’s name? And, yes, I know about the Colt Python.’ ‘My mom’s name is Candice Dayton.’ ‘In that case I would like to meet her.’ ‘Why? Is she a suspect?’ ‘No, this would be personal.’ ‘How could it be?’ ‘I’m the guy they’re looking for. They think I know your mother.’ ‘You?’ ‘Yes, me.’ ‘You don’t know my mother.’ ‘They think face to face I might recognize her, or she might recognize me.’ ‘She wouldn’t. And you wouldn’t.’ ‘It’s hard to say for sure, without actually trying it.’ ‘Trust me.’ ‘I would like to.’ ‘Mister, I can tell you quite categorically you don’t know my mom and she doesn’t know you.’ ‘Because you never saw me before? We’re talking a number of years here, maybe back before you were born.’ ‘How well are you supposed to have known her?’ ‘Well enough that we might recognize each other.’ ‘Then you didn’t know her.’ ‘What do you mean?’ ‘Why do you think I always eat in here?’ ‘Because you like it?’ ‘Because I get it for free. Because my mom works here. She’s right over there. She’s the blonde. You walked past her two times already and you didn’t bat an eye. And neither did she. You two never knew each other.’ WHAT WE LEARN
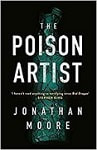
This is characters in action, expressed through speech. Child makes every line count towards the chapter denouement. If he was tempted to introduce narrative and action beats that ensured we’d get it, it doesn’t show. In fact, they would have been interruptions and slowed the pace. Instead, he trusts us to do the work because the dialogue gives us everything we need. Here’s an excerpt from The Poison Artist by Jonathan Moore (pp. 244–5). I chose this because of the contrast between Kennon and Emmeline’s speech.
“Don’t move,” Kennon said.
This time, his voice wasn’t much more than a whisper. [...] “Inspector, you’ll hit somebody,” Emmeline said. [...] “You look sick, Inspector,” Emmeline said. “I could get you something to drink. A glass of water, maybe? Something a little stronger?” Kennon fired again and Emmeline didn’t even flinch. The bullet missed her by ten feet, punching a hole in the back of the building. “Stop—” “You should be more careful what you touch,” Emmeline said. “Some things can go right through the skin.” WHAT WE LEARN
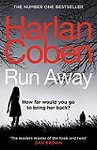
This, too, is characters in action, expressed through speech. Moore draws us deep into the transgressor’s mind – even though she’s not the viewpoint character. Her dialogue, juxtaposed with Kennon’s exhausted near-silence, generates a powerful scene that oozes with sickly tension. Here’s a third example from Harlan Coben’s Run Away (pp. 68–9):
“The murder,” Simon said. “It was gruesome.”
Ingrid wore a long thin coat. She dug her hands into her pockets. “Go on.” “Aaron was mutilated.” “How?” “Do you really need the details?” he asked. [...] “According to Hester’s source, the killer slit Aaron’s throat, though she said that’s a tame way of putting it. The knife went deep into his neck. Almost took off his head. They sliced off three fingers. They also cut off ...” “Pre- or post-mortem?” Ingrid asked in her physician tone. “The amputations. Was he still alive for them?” “I don’t know,” Simon said. “Does it matter?” WHAT WE LEARN
Again, through speech we see the characters in action. The contrasting voices and moods show us Simon and Ingrid’s different intentions. There’s no need for more than a peppering of supporting narrative. Summing up
Free dialogue enrichment tool To help you think about your characters' voices, moods and intentions, and how these will enrich your dialogue, download this tool. It's a fillable PDF with ready-made examples and space for you to record your own decisions. 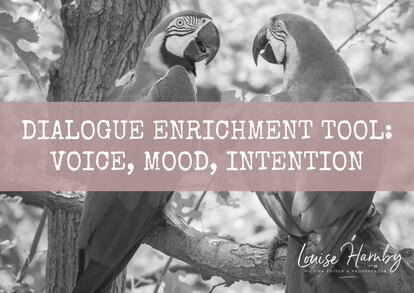
CLICK TO DOWNLOAD YOUR FREE PDF
Louise Harnby is a line editor, copyeditor and proofreader who specializes in working with crime, mystery, suspense and thriller writers.
She is an Advanced Professional Member of the Chartered Institute of Editing and Proofreading (CIEP), a member of ACES, a Partner Member of The Alliance of Independent Authors (ALLi), and co-hosts The Editing Podcast. Visit her business website at Louise Harnby | Fiction Editor & Proofreader, say hello on Twitter at @LouiseHarnby, connect via Facebook and LinkedIn, and check out her books and courses. |
PDF MARKUP
AUTHOR RESOURCES
EDITOR RESOURCES
TESTIMONIALSDare Rogers'Louise uses her expertise to hone a story until it's razor sharp, while still allowing the author’s voice to remain dominant.'Jeff Carson'I wholeheartedly recommend her services ... Just don’t hire her when I need her.'J B Turner'Sincere thanks for a beautiful and elegant piece of work. First class.'Ayshe Gemedzhy'What makes her stand out and shine is her ability to immerse herself in your story.'Salt Publishing'A million thanks – your mark-up is perfect, as always.'CATEGORIES
All
ARCHIVES
July 2024
|

 RSS Feed
 |

|

|

|

|
|
|
|

© 2011–2024 Louise Harnby