Louise Harnby | Fiction Editor & Proofreader
  • Home
  • Resource library
  • Services
  • Courses
  • Books
  • Podcast
  • Blog
  • Training login
  • Contact
The Editing Blog: for Editors, Proofreaders and Writers

FOR EDITORS, PROOFREADERS AND WRITERS

Show Me the Way to the Water Cooler – On Editorial Freelancing and Working Alone

30/1/2012

18 Comments

 
Picture
Solitude vivifies; isolation kills.
Joseph Roux (nineteenth-century priest and poet)


I worked in an office for nearly fifteen years before I went freelance. I’d stop and chat with friends and colleagues by the water cooler or coffee machine. There was always someone to talk to; sometimes it was difficult to knuckle down to the job, so social was the environment.

Now that I’m freelance, I work from home. I don’t have colleagues in the traditional sense. I’m on my own from 9 a.m. until 3 p.m. Non-freelancers have frequently asked me how I deal with the isolation and are often surprised when I reply, “I don’t feel isolated.”
The experience is certainly different from that of my prior office life and it requires a different mindset, but need it be isolating? Or was Roux onto something when he reminds us of the different ways of being alone? I asked some of my freelance editorial colleagues about how they manage a life of working from home.

The following is a summary of our collective wisdom on how to generate your very own freelance water cooler when you need it, and bathe in the quietness when you don’t. 

The challenges​​
Many of us become freelance because it suits our needs – moving house, moving country, redundancy, parenting, disability, and caring for dependents are just some of the reasons why people move their work base from the office to the home. These changes can bring rewards but also challenges, forcing us to withdraw from the traditional and easily accessible friendship and professional groups that we’d previously relied on.

Some of the contributors to this article highlighted  how having young children has provided them with much-needed human contact at the school gates. 

But many of us still miss the “office banter”, the “colleague” element – Jo Allen summed it up well, referring to “those people who do the same or similar jobs so you can swap and share ideas: the manager who always supports your ideas; the people who are there to confirm your decisions; the security of responsibilities understood; and the confidence of knowing how to do the job”.

Online networking
Our discussions highlighted one thing above all else: Facebook. Yes, editorial association-based discussion lists, LinkedIn boards, Twitter and Google+ all came up as recommended spaces for connecting with like-minded colleagues in similar working environments, but Facebook stood out as the place to go to meet, chat, share ideas, and let off steam. Facebook is the ultimate freelance water cooler.

Several people actually wondered how they ever coped without it, and one person commented that he’s not sure he’d still be freelance were it not for Facebook. I particularly like the fact that it’s so easy to differentiate one’s public image from the more personal posts that might be limited to friends, down to the private messaging options for the one-on-one chat. Using online networking forums means you don't ever have to feel like you’re working on our own even if there's no one else in the room.

Face-to-face networking
The other favoured resource for combating feelings of loneliness was the good old-fashioned face-to-face meet. It requires a lot more effort than dipping into your Twitter account, but the rewards are huge.

Several contributors commented on the benefits reaped from regular attendance at their local society chapter, and Eva Blaskovic lamented the fact that she didn’t have as much time as she’d like to take advantage of more workshops and functions. If there isn't a local group near to you, you could always follow the lead of Helen Stevens and set one up!  

Joining your national editorial freelancing society may be a critical first step in accessing colleagues who face the same professional and personal challenges as you, as well as providing excellent social and learning opportunities. To find your local, regional or national freelance editorial group, visit the Editing & Proofreading Societies page. See also the Networking section of the Copyeditors’ Knowledge Base, curated by Katharine O’Moore-Klopf – a hugely comprehensive resource for freelancers.

Of course, you needn’t limit yourself to editorial groups. “I’m also looking into various local small business networking groups – there seem to be quite a few nearby that are specifically for women or mothers,” commented Abi Saffrey. And another colleague is pursuing an MA, which gives her valuable face-to-face time with adults. Sara Peacock emphasized the value of joining hobby-based groups, such as a choir or knitting group, and Wendy Toole explained how, prior to the internet era, she took a series of minor part-time jobs, which gave her both additional income and social contact with other people.

​Cafe culture
“Scope out a decent coffee shop – having the odd couple of hours working in a different environment with people around makes you feel a lot less isolated and a lot more like you're just your own boss,” was a sound piece of advice from Gaz Haman. That got the thumbs-up from many of the discussants. It’s all about a change of scenery.

Even if you’re not directly interacting with other people in a particular  place, time spent outside your usual work space is an effective refresher. You can even incorporate your java time with your work – the cafe may not be the best place in which to do editorial tasks that require deep concentration, but it may be a space where you can catch up on emails, invoicing or any of your more general house-keeping tasks.
​

Co-working
One of the most innovative solutions was highlighted by both Sally Fildes-Moss and Kristine Hunt. Co-working is “where freelancers meet up to work alongside each other in places such as cafes” , enabling them “to feel less isolated, pick each other's brains, bounce ideas off one another and so on – or just to work in a less solitary environment”.

​Sally emphasized the fact that there is less pressure to market oneself in these situations, providing  instead “a bit more of an office atmosphere than a networking atmosphere”. For an interesting case study of co-working, she recommends the following article: 
Co-working Could Bring Inspiration. Kristine points us towards Meetup, an online resource that helps you to join or create relevant local community groups – absolutely worth a gander if you’re feeling that isolation is getting on top of you and you’re stuck for ideas of how to move forward.

Pet paradise
I’m not joking – having a dog can be a sure-fire way to combat feelings of isolation. No, they won’t be able to bounce business ideas around with you and they won’t be able to advise you on how to deal with the frustrated author of the book you’re editing, but pets still make wonderful companions. My trusty Lab is always ready with a tail wag whenever I’m stressed by a deadline or tackling a particularly demanding proofreading job. And as Wendy Toole reminded us, dog walkers are usually sociable and you get work on your health – keeping you work fit and body fit. They keep your feet warm in winter, too.


Other options​
If you don’t fancy any of the above, consider the following:
  • Turn on the radio for a while – listen to a talk show or music. 
  • Pop outside for a few minutes for some fresh air and get some natural light on your face – things always seem a little rosier afterwards.
  • Phone a friend, partner or family member and a have a chat or arrange a meet. 
  • And if all else fails, Corbett Brown (with tongue firmly in cheek) reminds us that there’s always online war gaming … so wake up your avatar and grab your lightsaber. Different strokes for different folks, as the saying goes.​

​Is it isolation or solitude?
​The first question my colleague Kristine Hunt asked during our discussion is: “Why assume isolation is bad? I don't miss the office politics, formal clothing, jockeying for time off, etc. I'm not so much antisocial as one who enjoys quiet time alone, so freelancing at home is ideal in that regard.” Many of us felt the same way. Freelancing from home does require a different mindset, but once you’re in it, it can be quite hard to revert to old ways of working. 

Others commented that the solitude that homeworking brings allows you to work at your own pace. “I can get so much work done just focusing at home and taking breaks only when I need – or don't
need – them,” noted Eva Blaskovic. And Hester Higton remarked, “I love being able to shut myself away from the world and have my own space where I can beaver away at my own pace.”

To round off, Sarah Wright points to an illuminating article from Susan Cain in the New York Times Sunday Review, The Rise of the New Groupthink, in which she reminds us that being alone, and enjoying the attendant privacy and freedom from interruption, can be an intensely creative and rewarding experience.

Many of us do need our water coolers, online or off, but we can also enjoy the solitude that our freelance homeworking status brings us.   

Do you work on your own? Do you have a set of tips or tricks to combat feelings of isolation? Or do you revel in the solitude you derive from home-based freelancing? Please feel free to share your experiences in the Comments section.

​Contributors: Many thanks to my generous editorial colleagues who took the time share their thoughts and experiences:  Abi Saffrey, Corbett Brown, Eva Blaskovic, Gaz Haman, Helen Stevens, Hester Higton, Jo Allen, Kristine Hunt, Sally Fildes-Moss, Sara Peacock, Sarah Wright, and Wendy Toole.
Louise Harnby is a line editor, copyeditor and proofreader who specializes in working with crime, mystery, suspense and thriller writers.

She is an Advanced Professional Member of the Chartered Institute of Editing and Proofreading (CIEP), a member of ACES, a Partner Member of The Alliance of Independent Authors (ALLi), and co-hosts The Editing Podcast.

Visit her business website at Louise Harnby | Fiction Editor & Proofreader, say hello on Twitter at @LouiseHarnby, connect via Facebook and LinkedIn, and check out her books and courses.

18 Comments

Free Downloadable PDF Proofreading Stamps

8/1/2012

59 Comments

 
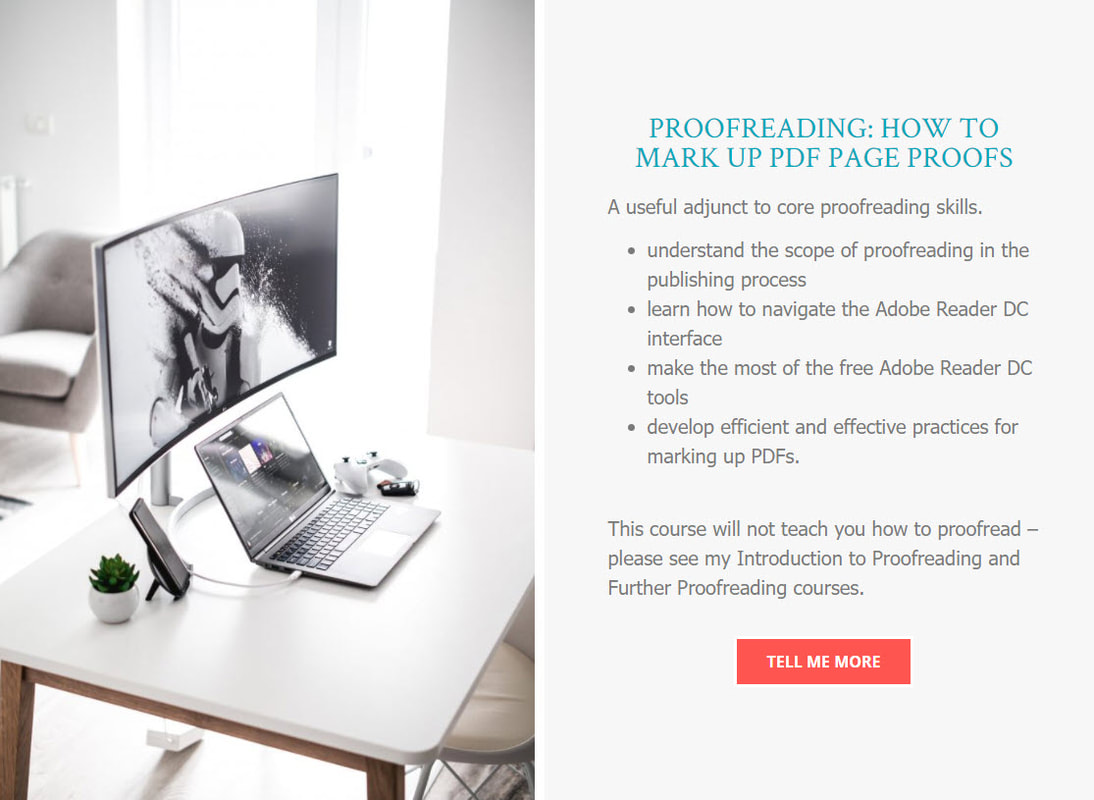
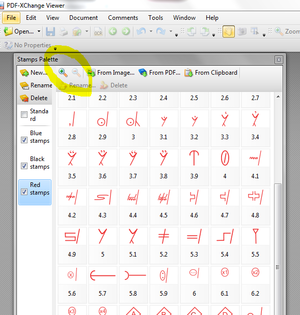
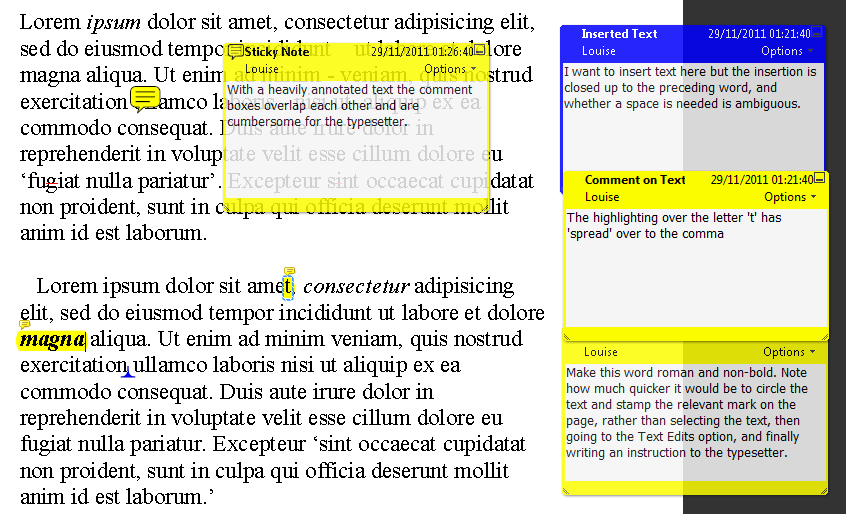
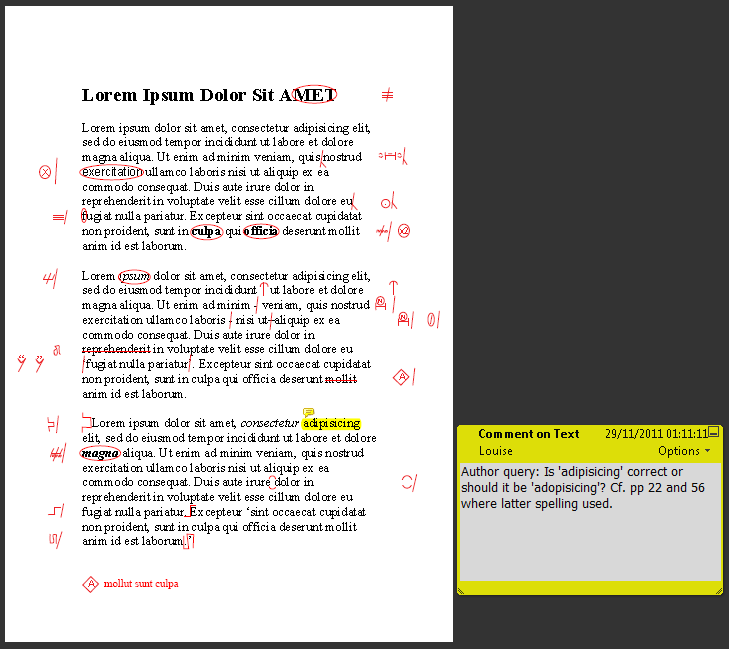
Want to annotate a PDF with digital proofreading marks? Below are my free proofreading stamps files in red, blue and black. ​They conform to British Standard BS 5261-2 (2005).
PDF proofreading stamps
Picture
You will not have to resize these stamps – I've designed them to work with the font size that most book files use. Simply upload them into your PDF editor and you’re ready to go!

  • For installation instructions, see my article Installation Instructions for Proofreading Stamps.
  • If you wish to create your own stamps, or you want to see samples of what a marked-up PDF looks like, see my article PDF Editing – Making the Most of the Stamps Tool.
  • Check the Stamps archive to see other articles about using stamps with free PDF viewers/readers.
  • For a list of American proofreading stamps, visit KOK Edit’s Copyeditors' Knowledge Base and scroll down to "PDF editing stamps". 


​What users are saying ...

Stamps
A sample of just a few of my proofreading stamps
  • This looks brilliant! I wish I had had these for my last job.
  • These are fantastic! I'd never thought of using stamps in this way until I saw how you did it.
  • Thanks, these look great! They would have been useful for the job I've just finished.
  • This is an excellent solution.
  • Having followed Louise's clear instructions, these proofreading stamps are ingenious!
  • I am really delighted with this set because they are the perfect size for most of my work without any tweaking.

Click on the buttons below to download the PDFs files containing the stamps, then head over to the installation instructions. 


​New stamps with transparent backgrounds

UPDATE 5 JUNE 2020. All the stamps now have transparent backgrounds, which means they can be placed on top of greyscale and colour pages and boxes, and squeezed between text without blocking out the elements.
RED STAMPS
BLUE STAMPS
BLACK STAMPS

Learn about how to mark up PDFs like a pro

Want to learn how to mark up page proofs with my stamps and other markup tools? Check out Denise Cowle’s course, Proofreading: How to Mark Up PDF Page Proofs.
Picture
Louise Harnby is a line editor, copyeditor and proofreader who specializes in working with crime, mystery, suspense and thriller writers.

She is an Advanced Professional Member of the Chartered Institute of Editing and Proofreading (CIEP), a member of ACES, a Partner Member of The Alliance of Independent Authors (ALLi), and co-hosts The Editing Podcast.

  • Get in touch: Louise Harnby | Fiction Editor & Proofreader
  • Connect: Twitter at @LouiseHarnby, Facebook and LinkedIn
  • Learn: Books and courses
  • Discover: Resources for authors and editors
59 Comments

Installation instructions for proofreading stamps

8/1/2012

72 Comments

 
This article contains installation instructions for most versions of Acrobat and PDF-XChange. Scroll down the page to find the set appropriate for the platform you're working with. 
PDF proofreading stamps
Picture
NOTE: Rest assured that you don't need advanced technical knowledge to install the stamps. In fact, you don't need any technical knowledge at all! You simply need to be able to follow the instructions as they are given. 

Use the right instructions!

I've updated this post several times since it was first written in 2012 as new versions of software have been released.

P
lease follow my instructions to the letter. I've provided installation support to a number of users in recent years. On every occasion, problems occurred for one of the following reasons:
​
  • the user hadn't actually followed the instructions at all but had carried out what he or she thought were the logical steps
  • the user had only partially implemented the instructions (perhaps skimming the written instructions or video tutorial, or paying attention only to the early steps in the process) and then made incorrect assumptions about the later steps
  • the user tried to install the stamps using the wrong set of instructions (e.g. a set that relates to a different PDF editor or version thereof). Scroll down the article to find the relevant set.

Again, please ensure that you follow the instructions step by step before you contact me to report that you're having problems. If you do need to contact me, please tell me the following:
 
  • Which operating system you’re using
  • Which PDF editor you’re using
  • Which instructions you followed from those offered in this article
  • Where you came unstuck
NOTE: The first step is to DOWNLOAD THE STAMPS, whichever set of instructions your are using.
DOWNLOAD STAMPS


​PDF-XChange Editor 8.0

Instructions correct as of 4 January 2020 and apply to Windows 10, Office 365
  1. Download the stamps collection (red, blue and black are available) and save anywhere you like. 
  2. Open PDF-Xchange Editor.
  3. Type “stamp” into the search box at the top of the screen and select STAMPS PALETTE from the drop-down menu.
  4. Select ADD NEW.
  5. Select ADD NEW STAMP FROM FILE. This will open up a new window.
  6. Now select the PDF of the stamps collection you just downloaded (e.g. red).
  7. To add the collection, scroll down and click on the ADD NEW button located on the right of the Target Collection box).
  8. Give the collection a name (e.g. Red Stamps).
  9. Click OK.
  10. Now explore the Stamps Palette window above – your new collection should be visible. Use ZOOM IN and ZOOM OUT buttons to get the layout you want.
  11. Right-click on an individual stamp to rename it. I recommend using numbers (read this article on reorganizing your stamps palette).

​PDF-XChange Editor 6.0

​My colleague Helen Mortimor has kindly provided the following installation instructions for use with Editor 6.0:
  1. Download the stamps Open Roundup: PDF Proofreading Stamps (quick-access links) to your This PC > Documents folder. Make a note of which file is which colour.
  2. Download Editor 6.0 here.
  3. Open any PDF.
  4. Go into Tools > Comment and Markup Tools > Stamp Tool > Stamps Palette.
  5. Click on the 'Add New Stamp from File' icon, which looks like an open folder.
  6. Click on the folder icon to the right of the 'Name' field and select a stamp folder from your documents folder.
  7. Click on 'All pages'.
  8. Give the stamps a title in ‘New title’ (I think this is where you could select a page at a time and re-name each stamp with numbers).
  9. Click the 'Add New' button at bottom right, and give the new collection a name (e.g. 'Red Proofreading Stamps').
  10. Click OK.
  11. Your stamps should install. Repeat from Step 3 for the rest of the collection.

PDF-XChange Editor 3.0

​My colleague Steve Hammatt has kindly provided the following installation instructions for use with Editor 3.0:
  1. Go into Tools > Comment and Markup Tools > Stamps Palette.
  2. Click on the 'Add New Stamp from File' icon, which looks like an open folder.
  3. Click on the folder icon to the right of the 'Name' field and select any PDF from your computer.
  4. Click the 'Add New' button at bottom right, and give the new collection a name (e.g. 'Red Proofreading Stamps'). Doing this will have automatically created the folder you will need. In Windows XP this should be: C:\Documents and Settings\<user>\Application Data\Tracker Software\PDFXEditor\3.0\Stamps. In Windows 8, 7 and Vista it should be: C:\Users\<user>\AppData\Roaming\Tracker Software\PDFXEditor\3.0\Stamps.
  5. Navigate to that folder; delete the file to leave the folder empty.
  6. a) Open Roundup: PDF Proofreading Stamps (quick-access links). b) Scroll through and click on, and open, the version of the XChange stamps file you want. (Don't worry if you can only see one stamp on the front page. This is as it should be.) Save the downloaded file in the folder you have just created.  
  7. Close Editor and re-open it. You should see a full set of stamps available for use in the Stamps Palette.
  8. For each separate file you choose (different colour options or additional sets of stamps) you will need to repeat Step 6b.

PDF-XChange Pro and the free Viewer 2.0

​One of the main benefits of using PDF-XChange Viewer is that you can import all my stamps in one go. Video tutorial. For those of you who'd like to watch a tutorial of the steps outlined below, here's a video demonstration in which I talk you through the process, step by step, while actually downloading a set of stamps onto my own computer.

NB: This is the squeaky-chair edit, a limited-edition version created especially to provide the feel-good factor for editorial freelancers whose home offices benefit from well-oiled swivel-seating arrangements!

 Written instructions 
  1. Download PDF-XChange and install it on your computer.
  2. Create a special folder for your stamps. To do this:
    a) Open PDF-XChange, select Tools from the top menu, then Comment And Markup Tools, then Show Stamps Palette.
    b) Click on 'New ...' to create a New Collection.
    c) Then click on 'From PDF ...' and use this to copy any PDF you like from anywhere you like in your computer.
    You should now see a New Collection with that PDF in it. Doing this will have automatically created the folder you will need. In Windows XP this should be: C:\Documents and Settings\<user>\Application Data\Tracker Software\PDF- XChange Viewer\2.0\Stamps. In Windows 10, 8, 7 and Vista it should be: C:\Users\<user>\AppData\Roaming\Tracker Software\PDF-XChange  Viewer\2.0\Stamps.
  3. Navigate to that folder,* select the copied PDF (it will have a weird number – don't worry) and delete it, leaving the folder empty. 
  4. a) Open Roundup: PDF Proofreading Stamps (quick-access links).
    b) Scroll through and click on, and open, the version of the XChange stamps file you want. (Don't worry if you can only see one stamp on the front page. This is as it should be.) Save the downloaded file in the folder you have just created.  
  5. Close PDF-XChange and re-open it. You should see a full set of stamps available for use in the Stamps Palette.
  6. For each separate file you choose (different colour options or additional sets of stamps) you will need to repeat Step 4b.

* Can't find the AppData folder?
If you can't find the folder, the most likely reason is that the Application Data (or AppData) folder (a hidden folder) is invisible on your computer. 
  • To show it in Windows XP, go to Start, Control Panel, Folder Options, View, Show Hidden files and folders. 
  • For Windows 7 and Vista, go to the Windows icon in the bottom left-hand corner of your screen and search for 'show hidden files and folders'. Click on this and look down for the Hidden Files and Folders icon. Then check the button labelled 'Show hidden files, folders and drives'. Select OK. Now you should be able to save the XChange files in the correct place, enabling them to appear in the palette.
  • For Windows 8, follow the instructions in this tutorial from bleepingcomputer.com: How to see hidden files in Windows 8.

Acrobat 9 (Standard and the free Reader)

  1. Open any PDF.
  2. Select the stamp icon from the Comment and Markup Toolbar (this ribbon should show up at the top of the page) and click on the drop-down menu.
  3. Select Create Custom Stamp.
  4. Click on the Browse button and select the location of the PDF stamps file (e.g. Red Stamps).
  5. Each stamp will appear on a separate page. Use the scroll bar to select the stamp you wish to upload.   
  6. Click Import.
  7. Click OK.

The first time you do this you’ll have to write in a category (e.g. Red Stamps). When you import a second stamp you can simply select this option. You can also name the stamp if you wish but I didn’t bother, choosing instead to leave the default New Stamp.

When you have uploaded all your stamps and are ready to start marking up your document, select Show Stamps Palette from the stamp icon in the ribbon menu and a box will appear. If you have different categories (e.g. Blue Stamps) you can select these from here.

Acrobat <9 (Standard and the free Reader)

  1. Open any PDF (If the stamp icon isn't on display in the toolbar select the Commenting Toolbar by choosing View, Toolbars, Commenting from the menu).
  2. Go to the stamp icon on the top ribbon menu and click on the drop-down menu.
  3. Select Create Custom Stamp.
  4. Click on the Select button and then the Browse button to select the location of the PDF stamps file (e.g. Red Stamps). 
  5. Each stamp should appear on a separate page. Use the scroll bar to select the stamp you wish to create.
  6. Click OK.

The first time you do this you’ll have to type in a category (e.g. Red Stamps). When you import a second stamp you can simply select this option. You can also name the stamp.

When you have downloaded all your stamps and are ready to start marking up your document, select the drop-down menu from the stamp icon in the ribbon menu, and the categories you have created will be listed along with the defaults. You can then select the stamp from the category you require.

Acrobat X

​My colleague Jenny Macgregor has very kindly put together some instructions for downloading my proofreading stamps into Acrobat X. Here's her advice...
  1. Download the stamps from this website, whichever colours you use, and save somewhere convenient. At this point I recommend making a list on paper of the number of each stamp, and what it is (it varies between colours). This is worth the few minutes it takes, and is invaluable later on in the process.
  2. Open the PDF you are proofreading. In the bar across the top, click on Comment, as you would normally do to start marking up, then open Annotations, if it is not already open.
  3. Click on the stamp icon (it takes a few seconds for a grey box to open), then click on Custom Stamps and, from the box which pops up next to it, Create Custom Stamps.
  4. The Select Image for Custom Stamp window will open with a browse facility. Use that to find the stamps you have saved earlier, starting with whichever colour you are likely to use most.
  5. At this stage you will need the paper you have marked all the symbols on: use it to choose which you are most likely to need, and then use the number and the slider on the right-hand side of the box to locate the first symbol you want to install. You need the number because the images in the box are too small to distinguish easily. Click OK.
  6. A new box opens; in the category box, type in the colour, i.e. red stamps/black stamps/blue stamps. I haven’t found any benefit in giving a name to each stamp, so just leave it as New Stamp. Then click OK. The box disappears.
  7. Repeat this with any other symbols you are certain to need, and any other colours. After the first one in each category, the category name (red stamps, etc.)  appears in a drop-down box to be selected, which saves time.
  8. Once you start the proofread, if you want to add a stamp to the PDF, click on the stamp symbol, and the grey box opens as before, but now it will have the categories of stamps you have installed, i.e. red stamps, black stamps, etc. Click on the colour you want to use and another grey box will open with the symbols in it. Click on the symbol you want to use, and it will ‘ghost’ onto the PDF you are proofing. Move it to where you want it and then click, which will attach it to the PDF. That’s it!
  9. The last stamp you used can be added to/removed from a favourites list – favourites appear in the first grey box to open, and can be selected from it, which saves some time.
  10. At any time during the proofread, if you find you need a stamp you haven’t already installed, repeat steps 3–6, using your paper list to find the appropriate stamp number.
  11. To keep the stamps palette open, click on the stamp symbol, and when the grey box opens click on Show Stamps Palette.

Adobe Acrobat Reader DC

Instructions correct as of 5 December 2021
  1. Open any PDF.
  2. Click on the Tools tab in the ribbon.
  3. Click on the Stamps icon. The Custom Stamps icon will now appear in the ribbon.
  4. Select Create from the Custom Stamps drop-down menu.
  5. Click on the Browse button to select the location of the PDF stamps file (e.g. Red Stamps). 
  6. Each stamp should appear on a separate page. Use the scroll bar to select the stamp you wish to create.
  7. Fill in the Category (e.g. Red stamps). You can re-use this for the second stamp you add.
  8. Give the stamp a name (e.g. '1' or 'delete').
  9. Click on OK.
  10. Use the Stamps Palette icon in the ribbon to access your symbols (remember to select the relevant category).

Tips

Here are a few tips to bear in mind when using stamps. Search the Stamps archive for other useful articles and resources.
  • Remember to keep your stamps palette open when you are working in both Acrobat or XChange; it will save you time when selecting each stamp you want to use.
  • In XChange you can minimize the size of the symbols as they appear in the palette. This enables you to see a greater number of stamps while you are working without having to scroll up and down the palette (see the highlighted circle on the screenshot below).
  • In XChange, number similar stamps sequentially so that they appear in a logical order. This will make it easier to find the stamp you need, particularly if each palette contains a lot of symbols (see screenshot below).
  • It's useful to keep your palettes of different-coloured stamps separate so that the palettes don't become overly cluttered. Again, this will enable you to locate the stamp you need more efficiently. 
Stamps palette
PDF-XChange Viewer: screenshot of minimizing tool and stamps palette.
Louise Harnby is a line editor, copyeditor and proofreader who specializes in working with crime, mystery, suspense and thriller writers.

She is an Advanced Professional Member of the Chartered Institute of Editing and Proofreading (CIEP), a member of ACES, a Partner Member of The Alliance of Independent Authors (ALLi), and co-hosts The Editing Podcast.

  • Get in touch: Louise Harnby | Fiction Editor & Proofreader
  • Connect: Twitter at @LouiseHarnby, Facebook and LinkedIn
  • Learn: Books and courses
  • Discover: Resources for authors and editors
72 Comments

PDF Editing – Making the Most of the Stamps Tool

1/1/2012

69 Comments

 
Tips for proofreading PDFs
These days, it's not uncommon to be asked to edit and proofread onscreen. If you're editing in Word, all well and good; you can amend the text directly. If you're tackling designed page proofs, you'll probably be working on a PDF. 
PDF proofreading and editing tools
Picture
The PDF editor's onboard markup tool is one option. Using custom stamps is another, and that's what I'll be exploring today.

​
Why use customized stamps?
Even in the standard versions of most PDF editors (as opposed to their freely available readers), the tools can be restrictive. For me, punctuation errors are a major problem – I feel that insertion and deletion tools for punctuation marks (and even single letters) are often ambiguous, with the highlight or strike-out line appearing to ‘spread’ further on the page than would be the case on a paper mark-up.

About the stamps …
I created a set of customized stamps that can be imported into my PDF editing software (I have both PDF-XChange and Acrobat).

The stamps are based on the current BSI proofreading symbols and once downloaded can be imprinted onto the page, giving the proof the appearance of its paper cousin.

No more clunky comments and digital sticky notes, and say goodbye to ambiguous highlighting. Now you can keep the comment boxes in reserve for queries to your author or in-house editor.

​The following is a sample of just a few of my stamps.
Sample of proofreading stamps
Which software is compatible?
I’ve tested the stamps on Adobe Acrobat (standard version) and PDF-XChange and can confirm that they can be imported (other PDF editors that have stamping functions, such as Foxit and PDFill, may also be compatible, though I’ve yet to verify this – comments welcome!).

What if you only have a free reader/viewer?
No problem – you don't need to have the full paid-for versions of Acrobat or XChange in order to use the stamps.

You can use your free Acrobat Reader as long as you ask the person who has created the PDF to 'enable comments'.

With PDF XChange Viewer, you don't even need to worry about enabling comments – the stamps will work on your PDF as soon as you have uploaded them. An additional benefit of Viewer is that you can import all the stamps in one go.

Can you use the stamps with a Mac?
One of the first questions asked after I posted this article was whether the stamps files would work for Mac users.

I work on a PC but since the stamps files are PDFs it doesn't make any difference whether you're working on a PC or a Mac. Rather, the most important thing is that you have the Mac version of your PDF editor, e.g. Acrobat for Mac.

What does the marked-up proof look like?
I’ve been delighted with the results, as have many of my clients. The marked-up proofs using the stamps are much clearer to read, as the two examples show.

There are only four amendments in Example 1, the comment-box version. Imagine how much time it would have taken to select the text, choose the relevant option from the Text Edits menu and write the instruction to the typesetter if all the amendments in Example 2 had been made without using stamps.

​And if the typesetter opened up all these comments boxes, what a mess it would have been.
PDF markup: comment boxes
Example 1: Using the comment box only.
PDF markup: stamps
Example 2: Using customized stamps.
Creating stamps
Creating the stamps is the fiddly part and the most time-consuming.

Getting the correct size, so that you don’t have to resize each stamp when you’re working on a set of proofs, takes a little time and, of course, creating each individual stamp can seem painstaking.

However, the job only has to be done once and I’ve been using mine for a couple of years now. It’s worth spending some time playing around with your designs early on in order to make life easier for yourself later.

I’ve created stamps in red, blue and black because my clients have different requirements.

I used Publisher to create the stamps, but you could use any software with a drawing tool. Set up each stamp on a separate page. Once you’ve drawn all your stamps convert the file into a PDF.

Want to use the stamps that I've already created?
I’m happy to share with colleagues who have the same commitment as I do to improving skills and supporting our industry’s professional standards.

To access your copies of my stamps, click here – there's no charge. If you're using PDF-XChange (I'd recommend you do so), make sure you select the stamps labelled "XChange".

Note: Please note that my stamps are based on proofreading symbols as defined by BS 5261-2 (2005). If you are working outside the UK, not all of the symbols may conform to those you are used to working with.

For a set of stamps that use US proofreading marks, take a look at KOK Edit's excellent Copyeditors' Knowledge Base – scroll down to 'PDF'.
 

Importing customized stamps
For installation instructions, and some useful tips, see my article Installation Instructions for Proofreading Stamps.

Future updates
Periodically, I create new or modified stamps to deal with an amendment that's cropping up frequently in a job I'm working on. I'll place these additions in the Stamps archive located on the blog sidebar. Drop by now and then to see if there's anything new that's of use to you. I'll name the post with a description of the stamp and I'll include a picture and downloadable file in case you want to add it.

Which PDF editor do you use?
Do you use customized stamps in PDF editors/readers other than Acrobat and PDF-XChange? Please let us know in the Comments section so that others can see which software is compatible.

UPDATE:
  • For installation instructions see my article Installation Instructions for Proofreading Stamps.
  • For quick-access links to all of the PDF proofreading stamps files, including the original full set updated in February 2013, see Roundup: PDF Proofreading Stamps (quick-access links).
  • For a list of American proofreading stamps visit KOK Edit’s Copyeditors' Knowledge Base and scroll down to "PDF editing stamps".
Louise Harnby is a line editor, copyeditor and proofreader who specializes in working with crime, mystery, suspense and thriller writers.

She is an Advanced Professional Member of the Chartered Institute of Editing and Proofreading (CIEP), a member of ACES, a Partner Member of The Alliance of Independent Authors (ALLi), and co-hosts The Editing Podcast.

Visit her business website at Louise Harnby | Fiction Editor & Proofreader, say hello on Twitter at @LouiseHarnby, connect via Facebook and LinkedIn, and check out her books and courses.
69 Comments

    BLOG ALERTS

    If you'd like me to email you when a new blog post is available, sign up for blog alerts!
    Proofreading stamps
    ALERT ME!

    WHAT DO YOU NEED?

    • Training courses
    • ​Books and guides
    • Editor resources
    • Author resources
    • ​Monthly newsletter
    Picture
    SIGN ME UP

    PDF MARKUP

    Proofreading stamps

    AUTHOR RESOURCES

    Proofreading stamps

    EDITOR RESOURCES

    Proofreading stamps

    BOOKS FOR EDITORS AND WRITERS

    Picture
    Picture
    Picture
    Picture
    MORE BOOKS

    TRAINING COURSES FOR EDITORS

    Picture
    Picture
    Picture
    Blogging for Business Growth course
    MORE COURSES

    TESTIMONIALS


    Dare Rogers

    'Louise uses her expertise to hone a story until it's razor sharp, while still allowing the author’s voice to remain dominant.'

    Jeff Carson

    'I wholeheartedly recommend her services ... Just don’t hire her when I need her.'

    J B Turner

    'Sincere thanks for a beautiful and elegant piece of work. First class.'

    Ayshe Gemedzhy

    'What makes her stand out and shine is her ability to immerse herself in your story.'

    Salt Publishing

    'A million thanks – your mark-up is perfect, as always.'