

|
In this article, I show you how to create your own digital proofreading stamps for PDF proofreading and editing.  A caveat I’m based in the UK so I’ll be referring to the British Standards Institution’s (BSI) BS 5261C:2005 'Marks for Copy Preparation and Proof Correction' throughout this article (readers can buy a hard-copy list of these marks from the Society for Editors and Proofreaders). You might be used to seeing different symbols to indicate the same instructions. That’s because, depending on where you live, different standards may apply. Compare, e.g., the Canadian Translation Bureau and BSI marks for a selection of instructions: 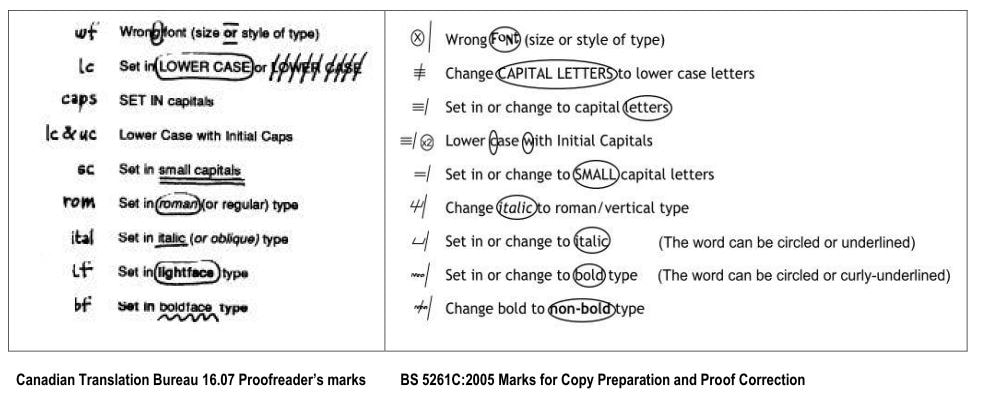 What matters is not which proof-correction language you use, but what your client requires. Recap of existing digital resources If you want to use the BS 5261C:2005 proof-correction marks to annotate a PDF, visit Roundup: PDF Proofreading Stamps (quick-access links). This provides the access links to a full set of downloadable PDF proofreading stamps in black, blue, and red, as well as the installation instructions. US stamps files are available via the Copyediting-L site, under the Resources tab. Scroll down to 'Diana Stirling’s (2008) editing marks for PDF documents (Zip documents)'. Finally, search the Editing Tools section of Katharine O’Moore-Klopf’s Copyeditors’ Knowledge Base using the key words 'PDF Editing Stamps'. This will bring up a number of other useful resources. Why might I need to make my own stamps? You might wish to create your own stamps for three reasons:
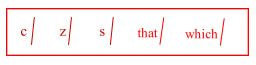
 When we modify standard stamps in this way, we save time – every second we save stamping only one symbol rather than two adds up to significant increases in productivity. Creating your own stamps There are two ways to go about creating your own customized stamps. First method You can using a free snipping tool to copy a mark that you’ve drawn, typed, or found online. If I want to create a new stamp – for example, the 'change is to are' instruction mentioned above – I can use my PDF editor’s comment-and-markup tools to type the word 'are' and stamp a Replace symbol after it. Then I simply click on my snipping tool, select 'New', and drag the cursor over the marks I’ve made. I then save this as a PNG, GIF, or JPEG. The image is now available for upload into my PDF Editor’s stamps palette. In Windows 10, the snipping tool looks like this: 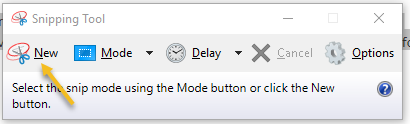 Where your snipping tool is located will depend on which version of Windows you’re using. The advantage of using a snipping tool is that it’s very efficient. I’ve pinned my onboard Windows snipping tool to the task bar at the bottom of my screen, so it’s always accessible. If you are using an operating system that doesn’t include a snipping tool, there are of alternatives available online. There are disadvantages to using this method:
Using the snipping tool to create stamps is recommended if you need a quick solution and you don’t think you’ll need to use the new symbol in future jobs. If you do think you’ll use your new symbol time and time again, it might be worth considering the second method. Second method You can use a DTP program such as Microsoft Publisher, Adobe InDesign, and QuarkXPress, or a graphics program like CorelDraw and Adobe Illustrator. I use MS Publisher because it’s included in my MS Office bundle. I’ve also found it quite easy to use – this is partly because it’s entry-level DTP software and partly because it’s an MS product so the functionality is quite similar to that of MS Word. Once you’ve drawn your new symbol in your DTP program, you need to save the document as a PDF. This can usually be done very simply, using the 'Save as' function. The image will then be ready for upload into your PDF editor’s stamps palette. The disadvantage of using this method is that it requires greater investment in time in the short run. I’d only recommend it if you are creating a stamp that you think will be useful for many jobs to come. The advantages of going down the DTP route are:
Using a DTP/graphics program is more time consuming but gives a more professional finish and is worth it if you think you’ll use the new symbol in multiple jobs. Saving and installing your new stamps If you have used the snipping tool to create a new GIF, JPEG, or PNG stamp, you can save it wherever you wish. I usually choose the Downloads folder. Then open your PDF editor and upload the stamp. Installing snipped images to PDF-XChange
Installing snipped images to Adobe Acrobat (v. 9)
Installing snipped images to Adobe Reader (v. XI) I haven’t found a way to import snipped stamps into Reader; the only option is to upload stamps that have been saved as a PDF, which isn’t possible with the Windows snipping tool at least. Given that PDF-XChange is still a very affordable editor, with outstanding functionality, I’d recommend trying it as an alternative to the free Adobe Reader and the rather more expensive Acrobat Professional. Saving and installing DTP-created images If you have used DTP software and saved your stamps in PDF format, you may need to save into a specific folder. The installation process is a little more complicated and will depend on the PDF editor you are using. If you are using PDF-XChange, Adobe Acrobat Professional, or Adobe Reader, carefully read the installation instructions I’ve provided on The Editing Blog. Related reading … If you are new to PDF proofreading, you might find the following links of interest:
Louise Harnby is a line editor, copyeditor and proofreader who specializes in working with crime, mystery, suspense and thriller writers. She is an Advanced Professional Member of the Chartered Institute of Editing and Proofreading (CIEP), a member of ACES, a Partner Member of The Alliance of Independent Authors (ALLi), and co-hosts The Editing Podcast. Visit her business website at Louise Harnby | Fiction Editor & Proofreader, say hello on Twitter at @LouiseHarnby, connect via Facebook and LinkedIn, and check out her books and courses.
0 Comments
If you proofread or copyedit fiction or non-fiction, or you're self-editing your own books, here's a macro that will highlight potential inconsistencies in proper-noun usage.
I've been meaning to review some of my favourite proofreading macros for a while now and ProperNounAlyse deserves its first place in the queue (only because it performed so brilliantly on a recent proofreading project!).
ProperNounAlyse is just one tool among many, of course. Those of us who use macros on a regular basis have a whole suite of them that we run during the process of a proofread or a copy-edit. ProperNounAlyse was created by my colleague Paul Beverley, and it’s just one of a huge number of macros available in his free book, Computer Tools for Editors (available on his website at Archive Publications). I've written this post for the person who doesn't use macros and is nervous about trying. I think it’s such a shame when a fear of tech leads to lost opportunities for those who want to increase productivity (which is great for the editorial pro) and improve quality (which is great for the client). Why bother? Three reasons
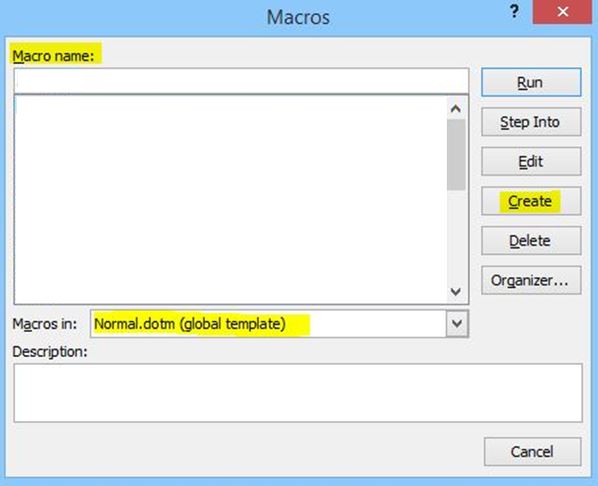
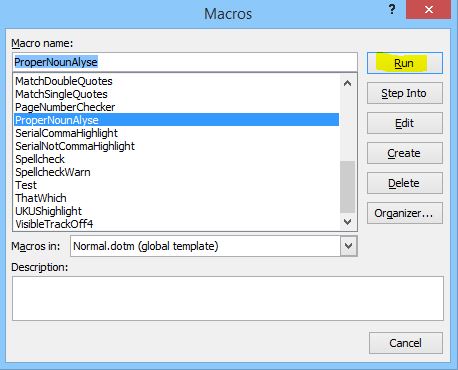
Go to Paul’s website and download Computer Tools for Editors. Save the zipped folder to your computer and extract three files: One is an overview of the macros – what they are, what they do, how to store them and so on – plus all the programs themselves; another contains just the actual macro programs; and the final file is a style sheet. The file you need to open in Word is “The Macros”. Use Word’s navigation menu (or Ctrl F on a PC) to open the Find function. Type “Sub ProperNounAlyse” into the search field and hit Return. That will take you to the start of the relevant script. Select and copy the script from “Sub ProperNounAlyse()” down to “End Sub”. Paul’s helped us out by highlighting the name of each new macro. Still with Word open, open the “View” tab and click on the “Macros” icon on the ribbon. 
This will open up a new window.
If you don’t have any macros already loaded:
If you have macros loaded (your TEST macro or any other):
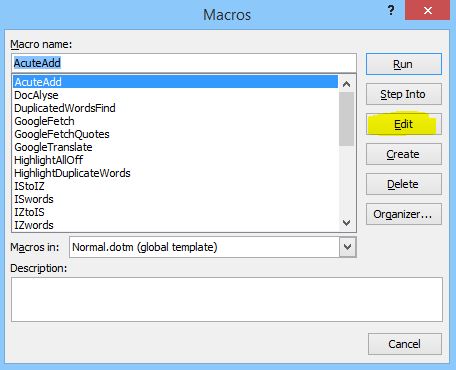
This will open up another window:
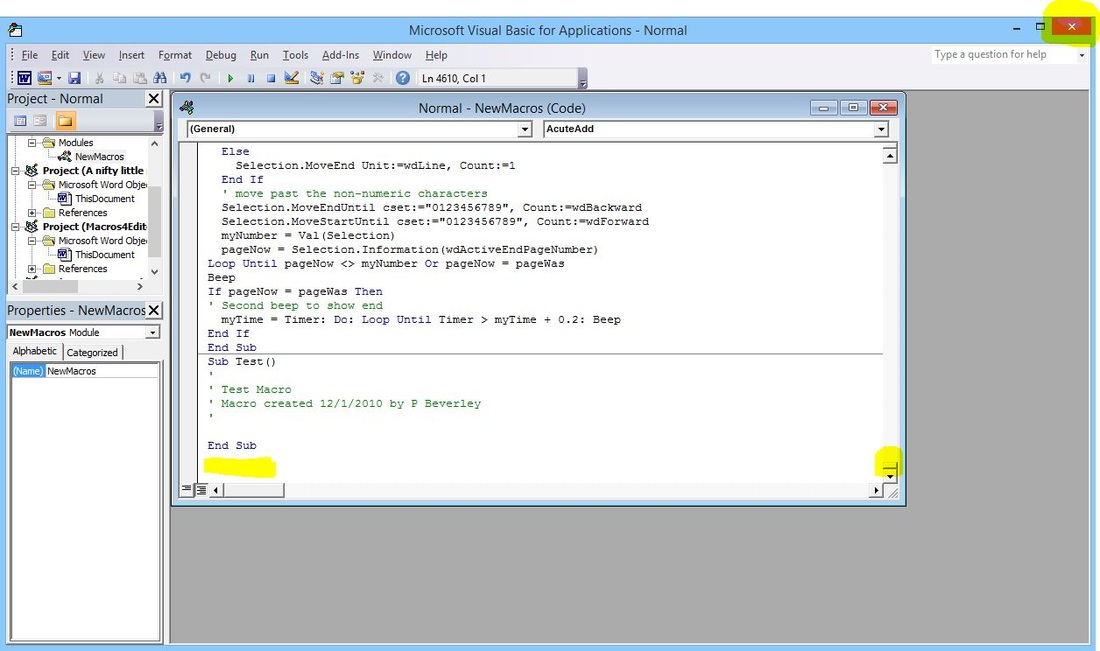
Running ProperNounAlyse
A fictive sample
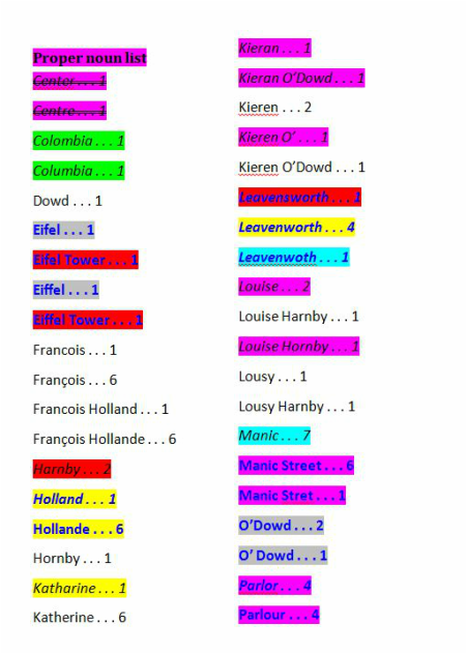
Below is a simple word list of proper nouns with lots of inconsistencies – differences in accent use, apostrophe use and spelling. 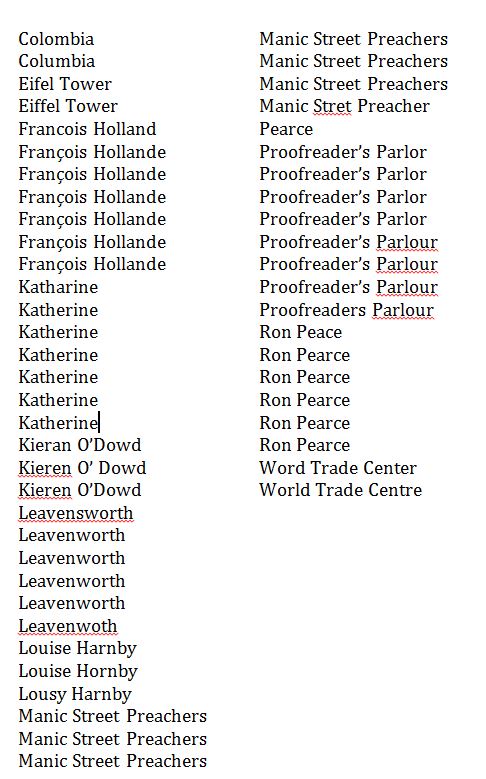
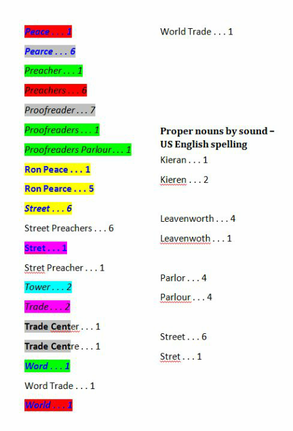
I run ProperNounAlyse on the document. It analyses the text and then creates a new Word file with the following results:
I’m provided with an at-a-glance summary of potential problems that I need to check. It may be that the differences identified are not mistakes, but I know what to look for.
“I don’t need to use techie tools … my eyes are good enough” Macros don’t get tired. Macros don’t get distracted. I don’t believe any proofreader who claims they can do as good a job with their eyes alone as they can do with their eyes and some electronic assistance. It’s a case of using these kinds of tools as well as, not instead of, the eyes and brain. I could have relied on my eyes to find all of the above problems, and in a small file I would hope to have hit the mark 100%. But if I’d been working on 100,000 words of text, and there were twenty key characters, a plethora of grammatical glitches, two major plot holes, numerous layout problems, and a mixture of hundreds of other inconsistencies regarding hyphenation, capitalization, punctuation and regional spelling variation, there would have been a lot of problems to solve; I want to utilize every tool available to help me do that. Yes, my eyes and brain are two of those tools. But using macros like ProperNounAlyse and others (PerfectIt, for example, just because it’s another favourite!) speeds me up, pure and simple, and massively reduces the chance of a miss. I ran ProperNounAlyse on a recent fiction proofread for an independent author who is a phenomenally good writer – great plot, excellent pacing, engaging characters. But he was so busy crafting the 95,000 words it took to build a fantastic story that he’d introduced a lot of proper-noun inconsistencies. That’s fine – it’s not his job to deal with these; it’s mine. It took me minutes, rather than hours, to locate them and deal with them. And I know I found them – every one of them. What will the client remember? If you’re still reluctant to try out ProperNounAlyse (or any other editorial tool for that matter), consider this: What will the client remember? The three hundred mistakes that you spotted or the three howlers you missed? When it comes to proper nouns, especially in large volumes of character-based editorial work, it’s too easy to miss a discrepancy. And character names stand out to readers. Taking just a few minutes to run a simple-to-use macro might determine whether your client thinks your work was pretty good or outstanding. Which of those is likely to gain you a repeat booking or a referral to another potential client?
Louise Harnby is a line editor, copyeditor and proofreader who specializes in working with crime, mystery, suspense and thriller writers.
She is an Advanced Professional Member of the Chartered Institute of Editing and Proofreading (CIEP), a member of ACES, a Partner Member of The Alliance of Independent Authors (ALLi), and co-hosts The Editing Podcast. Visit her business website at Louise Harnby | Fiction Editor & Proofreader, say hello on Twitter at @LouiseHarnby, connect via Facebook and LinkedIn, and check out her books and courses. I’m delighted to welcome my colleague Sophie Playle back to the Parlour. Sophie has been doing lots of interesting things with her editorial business so a catch-up is long overdue! I first featured her back in 2013. I was interested in learning more about the manuscript-critique service she offers because that’s a service that, as I pointed out at the time, is “about as far away from proofreading on the editorial freelancing spectrum as one can get”. You can read the original post here: Manuscript critiquing: The inside story. Since then, Sophie has rebranded her business, branching out from editing into offering online courses. I couldn’t wait to get the low-down on these latest exciting developments, and jumped at the chance to interview her. Sophie and I met and became friends through the Norfolk chapter of the Society for Editors and Proofreaders. I mention this because it’s a great reminder of the benefits of meeting up on a regular basis with editorial colleagues. Many of us wear very different hats, which means there’s always something new to learn. Prior to meeting Sophie, I could wax lyrical for hours about proofreading, marketing and freelance business development; as for manuscript critique and training … well, that was quite another matter. So, hearing about these latest developments has been an education, and I’m chuffed to bits to be able to share our conversation with you … Louise Harnby: Sophie, what made you rebrand your business? Sophie Playle: What used to be Playle Editorial Services is now Liminal Pages. I wanted a brand that could reflect my personality and my chosen niche (speculative fiction editing) a little more. Mostly, though, I wanted to start running online courses, so the ‘Editorial Services’ bit of the original name didn’t work. It was a little scary changing so much, but the new brand is much more aligned with my business intentions, so I felt it was the right thing to do. To me, a brand is something that should be always evolving. LH: Tell us a bit about your first online course.  SP: Conquer Your Novel is a tutored 8-week online course designed to help writers tame their manuscripts into publishable final drafts. (Before professional editing, of course.) There are lots of generic creative writing courses available online, so I wanted to offer something a little different. I knew from the outset that I would create a tutored course with weekly personal feedback. I also didn’t want the course to be too basic – there are plenty of beginner courses already on the market. So I created an intermediate-level course aimed specifically at novelists. I ran it in beta in the spring, and revamped it based on the feedback. LH: What topics do you cover? SP: I had to think very carefully about this because I didn’t want to recreate what’s already out there. I find courses that simply run through the main elements of novel writing (character, plot, dialogue, setting, etc.) a little uninspired. The thing is, no one writes a novel thinking about these components in isolation. They don’t work in isolation. Plot is driven by character, and setting is based around plot, and description is filtered through viewpoint character, which is determined by narrative style … and so on. But to learn about these things, you have to start somewhere. I considered which topics were most important, which needed to go together, and what the most logical order would be. I’ve top and tailed the more traditional topics with practical discussions around the psychology and methodology of novel writing. The first module looks at the most common reasons writers fail to complete novels, and I talk a lot about different writing personalities and approaches to the novel writing process. The last module looks at the redrafting process in detail, and also how to read analytically. A writing course on its own won’t help someone become a great writer if they don’t know how to read well! LH: Where do you get your students? SP: So far, my students have come largely from my mailing list – which includes past clients, writers who signed up for the freebies on my website, and other editors curious in what I do – don’t think I can’t see you, guys! This time around, I’m also planning to run a Facebook ad and write a few guest posts … like this one. My past students are also happy to help promote the course, which is awesome. Love those guys. I’d originally hoped the course would also be useful to editorial professionals wanting to get into fiction editing – the idea being they’d learn about the components that went into writing a good novel. One proofreader took the course when I ran it in beta and really loved it. But after refining the materials, I think the course is more useful to writers than editors. LH: What are the logistics of running the course? How do you administer the materials? SP: Every week, I email a PDF module with a writing assignment. Students complete the assignment by the deadline, and I provide them with feedback. There’s also a Workbook for students to fill out as they progress through the course. By the end of the course, this acts as an overview of the most important decisions they’ve made about the novel – such as the narrative question, the viewpoint characters, the main plot points, etc. The Workbook is just a simple Word document set up as a form so students can only type in specified areas. On top of that, I’ve created a separate private forum – or, at least, I will have by the time this interview is published! Writing can be a lonely business, and I know from experience that peer feedback and discussion is an incredibly valuable part of a writer’s development. Originally, I used a Facebook group to host the community, but a forum more easily allows students to share their work, and I think it feels a bit more special than a Facebook group. LH: Do you provide individual feedback, template answers, or a mixture of both? SP: It’s all individual, personalised feedback. Students have told me that my feedback is what makes the course so valuable to them. For each assignment, I use the comments feature of Word to provide specific suggestions relating to the text, then I write a couple of paragraphs at the end of the extract. My feedback is largely based on the topic we’re discussing that week, but I also point out anything else I think could help the writer improve. But that’s not all. At the end of the course, I provide each writer with a written summary of the best ways I think they can improve their writing in general. This, along with their Workbook and a final exercise, helps them come up with their own personalised plan of action for completing their novels after the course has come to an end. LH: How much time does it take to administrate the course? The most time-consuming part the course was creating the materials. It would take me approximately two days to write each module from scratch, and it took me a further three weeks or so to refine the materials since I ran it in beta. Now I’ve created the course, I’ll spend most of my time providing student feedback. During the first running of the course, I discovered that marking time varies week to week, though I would normally spent 30–90 minutes on each assignment. I’ve decided to take on a maximum of 20 students so I can plan how to manage my time during the running of the course. LH: Are you planning to create any more online courses? SP: Definitely. So far, I’ve really enjoyed creating and running this one! And I have lots of ideas for new ones, but I haven’t decided which idea to go with next. LH: What would you advise other editorial professionals considering offering online courses? SP: Offering online courses can be a great way to add some variation to your work. It also enables you to help a larger number of clients and offer something at a different price point. I’d recommend taking the following into consideration:
Want to earn a referral fee? Email me ([email protected]) the names of the people you refer, and for every person who signs up and remains on the course after the two-week trial period, I will send you £25 as a thank you. Sophie Playle is a Professional Member of the SfEP, writing teacher and steampunk airship pilot. (One of those things may be a lie.) She has an English Literature BA from UEA and a Creative Writing MA from Royal Holloway, University of London. She’s also a published writer and was shortlisted for the 2012 Escalator Literary Prize for Fiction. |
PDF MARKUP
AUTHOR RESOURCES
EDITOR RESOURCES
TESTIMONIALSDare Rogers'Louise uses her expertise to hone a story until it's razor sharp, while still allowing the author’s voice to remain dominant.'Jeff Carson'I wholeheartedly recommend her services ... Just don’t hire her when I need her.'J B Turner'Sincere thanks for a beautiful and elegant piece of work. First class.'Ayshe Gemedzhy'What makes her stand out and shine is her ability to immerse herself in your story.'Salt Publishing'A million thanks – your mark-up is perfect, as always.'CATEGORIES
All
ARCHIVES
July 2024
|
 RSS Feed
 |

|

|

|

|
|
|
|
© 2011–2024 Louise Harnby