Louise Harnby | Fiction Editor & Proofreader
  • Home
  • Resource library
  • Services
  • Courses
  • Books
  • Podcast
  • Blog
  • Training login
  • Contact
The Editing Blog: for Editors, Proofreaders and Writers

FOR EDITORS, PROOFREADERS AND WRITERS

Creating your own proofreading stamps for PFD mark-up

13/10/2015

0 Comments

 
In this article, I show you how to create your own digital proofreading stamps for PDF proofreading and editing.
Picture
Picture
A caveat
I’m based in the UK so I’ll be referring to the British Standards Institution’s (BSI) BS 5261C:2005 'Marks for Copy Preparation and Proof Correction' throughout this article (readers can buy a hard-copy list of these marks from the Society for Editors and Proofreaders).

You might be used to seeing different symbols to indicate the same instructions. That’s because, depending on where you live, different standards may apply.
​
Compare, e.g., the Canadian Translation Bureau and BSI marks for a selection of instructions:
Picture
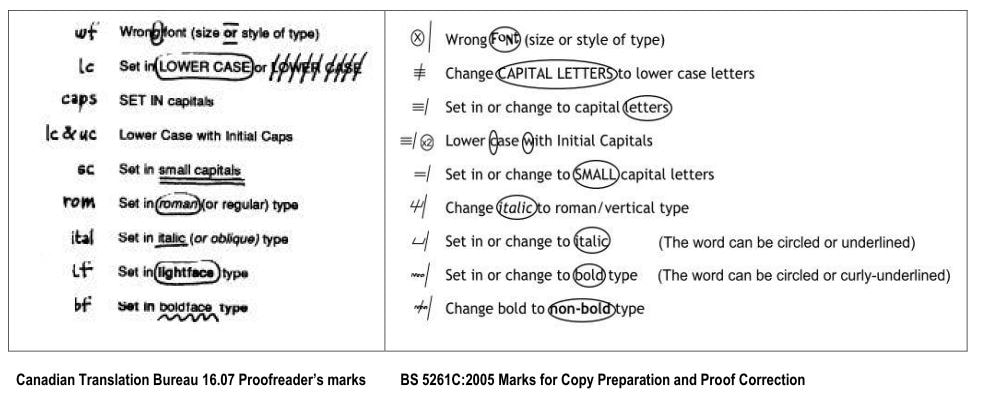
What matters is not which proof-correction language you use, but what your client requires.
 
Recap of existing digital resources
If you want to use the BS 5261C:2005 proof-correction marks to annotate a PDF, visit Roundup: PDF Proofreading Stamps (quick-access links). This provides the access links to a full set of downloadable PDF proofreading stamps in black, blue, and red, as well as the installation instructions.

US stamps files are available via the Copyediting-L site, under the Resources tab. Scroll down to 'Diana Stirling’s (2008) editing marks for PDF documents (Zip documents)'.

Finally, search the Editing Tools section of Katharine O’Moore-Klopf’s Copyeditors’ Knowledge Base using the key words 'PDF Editing Stamps'. This will bring up a number of other useful resources.

Why might I need to make my own stamps?
You might wish to create your own stamps for three reasons:
​
  • The standard symbols required by your client might not be available for use on PDF. Use the resources in the above recap section in order to identify whether the mark-up language you want to work with is available digitally.

  • The existing digital resources might include only the standard symbols developed by the original issuer (BSI, CMOS, CTB, etc.). However, I’ve sometimes found that I’m repeatedly making a particular amendment that isn’t covered by these standards.

    ​For instance, a nonnative-English-speaking author may use the word 'is' when the author means 'are' repeatedly in a file. Rather than annotating the PDF using the typewriter tool for the text, and using the Replace symbol (slash mark) for each correction, it could be more efficient to create a new stamp that incorporates the text and slash mark.

    ​In the stamps files I provide, I’ve created several nonstandard symbols that I thought would be of benefit to users, including:
Picture
  • For the sake of efficiency, you might wish to modify two existing standard digital marks. For example, I often need to change a hyphen to an en rule, and I have to stamp two symbols in the margin – the En-rule mark followed by the Replace mark. I decided to create a single symbol that incorporates both of these marks (this symbol is included in the digital stamps files that I make freely available here on my blog).
Picture
When we modify standard stamps in this way, we save time – every second we save stamping only one symbol rather than two adds up to significant increases in productivity.

Creating your own stamps
There are two ways to go about creating your own customized stamps.

First method
You can using a free snipping tool to copy a mark that you’ve drawn, typed, or found online. If I want to create a new stamp – for example, the 'change is to are' instruction mentioned above – I can use my PDF editor’s comment-and-markup tools to type the word 'are' and stamp a Replace symbol after it.

Then I simply click on my snipping tool, select 'New', and drag the cursor over the marks I’ve made. I then save this as a PNG, GIF, or JPEG. The image is now available for upload into my PDF Editor’s stamps palette.

In Windows 10, the snipping tool looks like this:
Picture
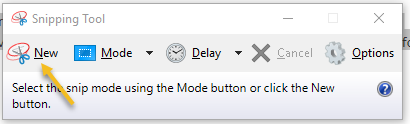
Where your snipping tool is located will depend on which version of Windows you’re using.

The advantage of using a snipping tool is that it’s very efficient. I’ve pinned my onboard Windows snipping tool to the task bar at the bottom of my screen, so it’s always accessible. If you are using an operating system that doesn’t include a snipping tool, there are of alternatives available online.
​
There are disadvantages to using this method:

  • The definition of a snipped stamp is poor in comparison with a symbol drawn in a desktop publishing (DTP) or professional graphics program. The images usually look fuzzy, especially when enlarged.
  • It’s not possible to control the size of the snipped image, so the symbol may have to be resized every time it’s stamped in the margin, which wastes time.
  • Snipped stamps don’t have transparent backgrounds. This can be aesthetically unpleasing when you are stamping onto tinted pages. If you’ve created a stamp that needs to be placed in-text on a PDF, the lack of transparency will cause problems because you’ll be masking content that your client won’t want to be hidden.

Using the snipping tool to create stamps is recommended if you need a quick solution and you don’t think you’ll need to use the new symbol in future jobs. If you do think you’ll use your new symbol time and time again, it might be worth considering the second method.

Second method
You can use a DTP program such as Microsoft Publisher, Adobe InDesign, and QuarkXPress, or a graphics program like CorelDraw and Adobe Illustrator. I use MS Publisher because it’s included in my MS Office bundle. I’ve also found it quite easy to use – this is partly because it’s entry-level DTP software and partly because it’s an MS product so the functionality is quite similar to that of MS Word.

Once you’ve drawn your new symbol in your DTP program, you need to save the document as a PDF. This can usually be done very simply, using the 'Save as' function. The image will then be ready for upload into your PDF editor’s stamps palette.

The disadvantage of using this method is that it requires greater investment in time in the short run. I’d only recommend it if you are creating a stamp that you think will be useful for many jobs to come.

The advantages of going down the DTP route are:

  • The finish of the stamp is more professional – the images are much sharper than the snipped versions.
  • You can draw multiple stamps in a single DTP document – just make sure that each image is drawn on a new page. Then you have to save one document as a PDF from which you’ll upload your new stamps.
  • You can control the size of the stamp. This may take some experimentation, but once you’ve drawn one proof-correction mark that you know produces a stamp that you can universally use on PDFs without having to resize, you can use this as a template for any future stamps you create.
  • You can control the transparency of the stamp. Users of my stamps files will know that some of my symbols don’t have fully transparent backgrounds. This is something I plan to rectify when I have time!

Using a DTP/graphics program is more time consuming but gives a more professional finish and is worth it if you think you’ll use the new symbol in multiple jobs.

Saving and installing your new stamps
If you have used the snipping tool to create a new GIF, JPEG, or PNG stamp, you can save it wherever you wish. I usually choose the Downloads folder. Then open your PDF editor and upload the stamp.

Installing snipped images to PDF-XChange
  • Open the PDF you wish to mark up
  • From Menu: Tools > Comment and Markup Tools > Show Stamps Palette
  • From Stamps Palette: Click on an existing Collection or create a new one (using the New button with a small green cross); select 'From Image'
  • From a browser window: Locate your image from the folder in which you saved it, e.g., Downloads, and choose 'Open'

Installing snipped images to Adobe Acrobat (v. 9)
  • Open the PDF you wish to mark up
  • Click on the stamp tool on the top ribbon
  • Select 'Create Custom Stamp'
  • From browser window: Locate your image from the folder in which you saved it, e.g., Downloads. Note that in Acrobat you will need to choose the relevant file type in order for your symbol to show up. So if you saved your snipped image as a PNG, you’ll need to select this from the drop-down menu under file type; 'Select'; 'OK'
  • You can now name your stamp and assign it to a Category (you can use an existing Category or create a new one, e.g., Proofreading)

Installing snipped images to Adobe Reader (v. XI)
I haven’t found a way to import snipped stamps into Reader; the only option is to upload stamps that have been saved as a PDF, which isn’t possible with the Windows snipping tool at least. Given that PDF-XChange is still a very affordable editor, with outstanding functionality, I’d recommend trying it as an alternative to the free Adobe Reader and the rather more expensive Acrobat Professional.

​Saving and installing DTP-created images
If you have used DTP software and saved your stamps in PDF format, you may need to save into a specific folder. The installation process is a little more complicated and will depend on the PDF editor you are using. If you are using PDF-XChange, Adobe Acrobat Professional, or Adobe Reader, carefully read the installation instructions I’ve provided on The Editing Blog.

Related reading …
If you are new to PDF proofreading, you might find the following links of interest:
​
  • PDF Editing – Making the most of the stamps tool
  • Using the Stamping Tool for PDF Proofreading Mark-up
  • Roundup: PDF proofreading stamps (quick-access links). This includes a link to my installation instructions; for PDF-XChange users, there’s a video tutorial as well as written instructions.
  • Onscreen proofreading tips: Reorganizing your stamps palette in PDF-XChange
  • Six Tips for Ergonomic PDF Proofreading
 
Louise Harnby is a line editor, copyeditor and proofreader who specializes in working with crime, mystery, suspense and thriller writers.

She is an Advanced Professional Member of the Chartered Institute of Editing and Proofreading (CIEP), a member of ACES, a Partner Member of The Alliance of Independent Authors (ALLi), and co-hosts The Editing Podcast.

Visit her business website at Louise Harnby | Fiction Editor & Proofreader, say hello on Twitter at @LouiseHarnby, connect via Facebook and LinkedIn, and check out her books and courses.
0 Comments


Leave a Reply.

    BLOG ALERTS

    If you'd like me to email you when a new blog post is available, sign up for blog alerts!
    Proofreading stamps
    ALERT ME!

    WHAT DO YOU NEED?

    • Training courses
    • ​Books and guides
    • Editor resources
    • Author resources
    • ​Monthly newsletter
    Picture
    SIGN ME UP

    PDF MARKUP

    Proofreading stamps

    AUTHOR RESOURCES

    Proofreading stamps

    EDITOR RESOURCES

    Proofreading stamps

    BOOKS FOR EDITORS AND WRITERS

    Picture
    Picture
    Picture
    Picture
    MORE BOOKS

    TRAINING COURSES FOR EDITORS

    Picture
    Picture
    Picture
    Blogging for Business Growth course
    MORE COURSES

    TESTIMONIALS


    Dare Rogers

    'Louise uses her expertise to hone a story until it's razor sharp, while still allowing the author’s voice to remain dominant.'

    Jeff Carson

    'I wholeheartedly recommend her services ... Just don’t hire her when I need her.'

    J B Turner

    'Sincere thanks for a beautiful and elegant piece of work. First class.'

    Ayshe Gemedzhy

    'What makes her stand out and shine is her ability to immerse herself in your story.'

    Salt Publishing

    'A million thanks – your mark-up is perfect, as always.'
    TESTIMONIALS

    CATEGORIES

    All
    Around The World
    Audio Books
    Author Chat
    Author Interviews
    Author Platform
    Author Resources
    Blogging
    Book Marketing
    Books
    Branding
    Business Tips
    Choosing An Editor
    Client Talk
    Conscious Language
    Core Editorial Skills
    Crime Writing
    Design And Layout
    Dialogue
    Editing
    Editorial Tips
    Editorial Tools
    Editors On The Blog
    Erotica
    Fiction
    Fiction Editing
    Freelancing
    Free Stuff
    Getting Noticed
    Getting Work
    Grammar Links
    Guest Writers
    Indexing
    Indie Authors
    Lean Writing
    Line Craft
    Link Of The Week
    Macro Chat
    Marketing Tips
    Money Talk
    Mood And Rhythm
    More Macros And Add Ins
    Networking
    Online Courses
    PDF Markup
    Podcasting
    POV
    Proofreading
    Proofreading Marks
    Publishing
    Punctuation
    Q&A With Louise
    Resources
    Roundups
    Self Editing
    Self Publishing Authors
    Sentence Editing
    Showing And Telling
    Software
    Stamps
    Starting Out
    Story Craft
    The Editing Podcast
    Training
    Types Of Editing
    Using Word
    Website Tips
    Work Choices
    Working Onscreen
    Working Smart
    Writer Resources
    Writing
    Writing Tips
    Writing Tools

    ARCHIVES

    January 2023
    December 2022
    November 2022
    October 2022
    September 2022
    August 2022
    July 2022
    June 2022
    May 2022
    April 2022
    March 2022
    February 2022
    January 2022
    December 2021
    November 2021
    October 2021
    September 2021
    August 2021
    July 2021
    June 2021
    May 2021
    April 2021
    March 2021
    February 2021
    January 2021
    December 2020
    November 2020
    October 2020
    September 2020
    August 2020
    July 2020
    June 2020
    May 2020
    April 2020
    March 2020
    February 2020
    January 2020
    December 2019
    November 2019
    October 2019
    September 2019
    August 2019
    July 2019
    June 2019
    May 2019
    April 2019
    March 2019
    February 2019
    January 2019
    December 2018
    November 2018
    October 2018
    September 2018
    August 2018
    July 2018
    June 2018
    May 2018
    April 2018
    March 2018
    February 2018
    January 2018
    December 2017
    November 2017
    October 2017
    September 2017
    August 2017
    July 2017
    June 2017
    May 2017
    April 2017
    March 2017
    February 2017
    January 2017
    December 2016
    November 2016
    October 2016
    September 2016
    June 2016
    May 2016
    April 2016
    March 2016
    February 2016
    January 2016
    December 2015
    November 2015
    October 2015
    September 2015
    July 2015
    June 2015
    May 2015
    March 2015
    February 2015
    January 2015
    November 2014
    October 2014
    September 2014
    August 2014
    July 2014
    June 2014
    March 2014
    January 2014
    November 2013
    October 2013
    September 2013
    August 2013
    June 2013
    February 2013
    January 2013
    November 2012
    October 2012
    September 2012
    August 2012
    July 2012
    June 2012
    May 2012
    April 2012
    March 2012
    February 2012
    January 2012
    December 2011

    RSS Feed

Alliance of Independent Authors
Picture
Picture
CIEP Advanced Professional Member
The Publishing Training Centre
INFO ABOUT ME
Privacy policy
Terms and conditions
Contact form
Code of practice
Qualifications
​Portfolio ​ 
​Bio page
Louise's fiction
About Louise
INFO FOR INDIE AUTHORS
Editorial services
Contact form
Can you expect perfection?
Books and guides
Transform Your Fiction series
Free resources
​
Order form for books
Testimonials
Self-editing book

Want to sign up to my monthly newsletter, The Editorial Letter? 
INFO FOR EDITORS
Training courses​
Books and guides
​​Business Skills for Editors series
Transform Your Fiction series
Free resources
1:1 business consultations
Order books and courses
​The Editing Podcast
​The Editing Blog