

|
|
Check out these additional resources that will help you develop your fiction-editing business.
|
|
Louise Harnby is a line editor, copyeditor and proofreader who specializes in working with crime, mystery, suspense and thriller writers.
She is an Advanced Professional Member of the Chartered Institute of Editing and Proofreading (CIEP), a member of ACES, a Partner Member of The Alliance of Independent Authors (ALLi), and co-hosts The Editing Podcast.
She is an Advanced Professional Member of the Chartered Institute of Editing and Proofreading (CIEP), a member of ACES, a Partner Member of The Alliance of Independent Authors (ALLi), and co-hosts The Editing Podcast.
- Get in touch: Louise Harnby | Fiction Editor & Proofreader
- Connect: Twitter at @LouiseHarnby, Facebook and LinkedIn
- Learn: Books and courses
- Discover: Resources for authors and editors
This outline of the proofreading, copyediting and line-editing process is one way of organizing your editorial workflow rather than bowling straight into a project.
What follows is my process – the steps I take and the order in which I take them. That doesn’t mean it’s THE process! You might prefer to organize yourself differently.
Editorial business parameters
My business model might look very different to yours. Here’s what you need to know about me when considering the process I outline below.
- I work on raw-text files in Microsoft Word.
- I work directly with crime fiction, thriller and mystery writers. I might be the only editorial person the author’s worked with.
- I work only on fiction so my editing projects are straight text.
- Most of my projects require line editing rather than proofreading.
- Even when hired to proofread, I tend to work on raw-text files rather than designed PDF or hardcopy page proofs.
- Unless otherwise agreed (and billed for), a project involves a single pass.
Proofreading designed page proofs
I no longer work on designed page proofs (PDF or hardcopy), but at the point in my career when I did, I used the checklist below.
Step 1. Project legalities
I carry out the project legalities as soon as the author and I have agreed to work together and decided on the project's time frame.
This part of the process protects me and my client, and ensures we have a mutual understanding of the project’s terms and conditions.
This part of the process protects me and my client, and ensures we have a mutual understanding of the project’s terms and conditions.
Step 2. File checking and organization
This work takes place as soon as the book file arrives. The checks ensure I can find the material, and that it’s usable when it’s time for the edit to begin.
WHAT I DO
- Create a project folder
- Check the book file can be opened and is readable
- Check the page count to confirm that all the content is available
- Save a copy of the project file with a unique name, eg Smith-LH-Edit-020421-v1
- Place the original and the copy in the project folder
Step 3. Template creation
This part of the process helps me get organized. I do it before the edit begins.
|
WHAT I DO
|
|
Step 4. Technical setup
Next up is some technical setup related to Microsoft Word.
WHAT I DO
- Open the book file and make sure Track Changes is switched on
- Check that the VisibleTrackOff macro is functioning. This ensures I never forget I’ve switched off Track Changes temporarily
- Open Word’s Set Proofing Language function to ensure it’s recognizing the appropriate version of English
- Uncheck the ‘Do not check spelling or grammar’ box
Step 5. Styles
Now it’s time to assess the book file’s styling. Even though an interior formatter might work on the design at a later stage, I want to ensure that the different elements are formatted consistently.
Word’s styles palette is the tool of choice. If I decide to make changes, I can amend the style rather than trawling through the entire book file line by line.
Word’s styles palette is the tool of choice. If I decide to make changes, I can amend the style rather than trawling through the entire book file line by line.
If I’m line editing, the author might have done some or all of this work. If I’m proofreading, another editor might have done it.
After I’ve set up the styles, I apply them to the book file.
Step 6. Chapter sequence check
Now that my chapter headings are styled, I can locate them in Word’s navigation pane and ensure the numbering is correct.
It’s not uncommon for authors to shift chapters around, and that’s where problems slip in.
It’s not uncommon for authors to shift chapters around, and that’s where problems slip in.
WHAT I CHECK
- That the chapters are sequenced correctly
- That there are no chapters with the same number
- That there are no missing chapter numbers
- That the headings, subheadings and first-paragraph indents are styled properly
Step 7. Front-matter check
I like to cast my eye over the front matter separately from the main edit.
The most exciting part of the project for me is the edit itself, so doing mundane but critical technical checks separately ensures my eye’s on the ball and I'm not making assumptions.
The most exciting part of the project for me is the edit itself, so doing mundane but critical technical checks separately ensures my eye’s on the ball and I'm not making assumptions.
|
WHAT I TYPICALLY CHECK
|

|
Step 8. Macro run and style-sheet build
Next, I run a selection of pre-edit macros.
Editors use all sorts of different software and tools to complement their eye depending on the issues they need to check, the material they’re working on, and their clients’ needs.
The macros I've listed below are not what you must use; they’re just my preferences.
Editors use all sorts of different software and tools to complement their eye depending on the issues they need to check, the material they’re working on, and their clients’ needs.
The macros I've listed below are not what you must use; they’re just my preferences.

I use what I learn to start filling in the project’s style sheet.
At this stage I’m making early decisions about spelling, hyphenation, capitalization and proper noun usage, and noting any red flags.
RED FLAGS INCLUDE
- Inconsistent character names
- Characters with similar or the same names
- Inconsistent spelling of place names
- Language that’s prejudicial or misrepresentational
Even if I locate problematic language, I’ll not make any decisions about what needs to be done until the contextual edit begins and I can review it within the wider story arc. At this point, I'll just highlight.
I’ll also record initial observations that are key to the line edit.
INITIAL OBSERVATIONS
- Narration style (e.g. first or third person)
- The novel’s base tense (eg past, present)
- The author’s preferences (expressed via the Author Preferences form or email)
Step 9. The edit
Now it’s time to begin editing. This is the fun bit, what I've been hired for! It's the non-technical part of the job but the most time-consuming.
I work through the book file line by line and edit according to the agreed scope of the project.
I work through the book file line by line and edit according to the agreed scope of the project.
|
WHAT I DO
|

|
Step 10. The part-way PerfectIt check
One third of the way through the line edit, I run PerfectIt again.
That’s because I’ll have made many new style choices that affect, for example, spelling, capitalization and hyphenation, ones that I didn’t pick up during my pre-edit macro run.
That’s because I’ll have made many new style choices that affect, for example, spelling, capitalization and hyphenation, ones that I didn’t pick up during my pre-edit macro run.
BENEFITS
- A part-way PerfectIt check does the heavy lifting, allowing me to locate additional inconsistencies quickly.
- The more mundane technical work the software does, the fewer distractions for me while I’m editing for sense and sensibility.
Step 11. The technical tidy-up
When the edit is complete, I carry out another round of checks for layout, consistency, spelling and grammar – a final technical tidy-up to that ensures everything’s spit spot. A little Mary Poppins never hurt anyone!
|
WHAT I DO
|

|
Step 12. Style sheet check
Next, I review the style sheet to ensure that it’s fit for purpose.
Step 13. Create the editorial report
Now I create my editorial report. I use a detailed template that’s already populated with client-friendly summaries of the theory behind the edits (accessible via my course How to Write the Perfect Fiction Editorial Report).
WHAT THE REPORT INCLUDES

|
|
Step 14. Delivery and invoicing
Finally, I prepare the files for my client. It's time to show them what I've done and why I've done it!
WHAT I INCLUDE
- The edited book file with all tracked changes and comments
- The edited book file with all changes accepted but comments still showing
- The edited book file with all tracked changes accepted and comments removed
- A PDF of the style sheet
- A PDF of the editorial report

After I’ve emailed the files, I issue an invoice for the outstanding fee. Some editors choose to send the files only after all monies have been paid. How you do it is for you to decide.
Wrapping up
So that's my way. I hope it'll help you streamline your process if you're unsure where to start.
Just bear this in mind: There's no one best way. We all work differently, and there are multiple ways to edit efficiently and productively.
Just bear this in mind: There's no one best way. We all work differently, and there are multiple ways to edit efficiently and productively.
Louise Harnby is a line editor, copyeditor and proofreader who specializes in working with crime, mystery, suspense and thriller writers.
She is an Advanced Professional Member of the Chartered Institute of Editing and Proofreading (CIEP), a member of ACES, a Partner Member of The Alliance of Independent Authors (ALLi), and co-hosts The Editing Podcast.
FIND OUT MORE
> Get in touch: Louise Harnby | Fiction Editor & Proofreader
> Connect: Twitter at @LouiseHarnby, Facebook and LinkedIn
> Learn: Books and courses
> Discover: Resources for authors and editors
Writing or editing in Microsoft Word on a PC? Save yourself time by learning these 27 keyboard shortcuts.

If you don’t want to learn 27, learn just the first one: Save!
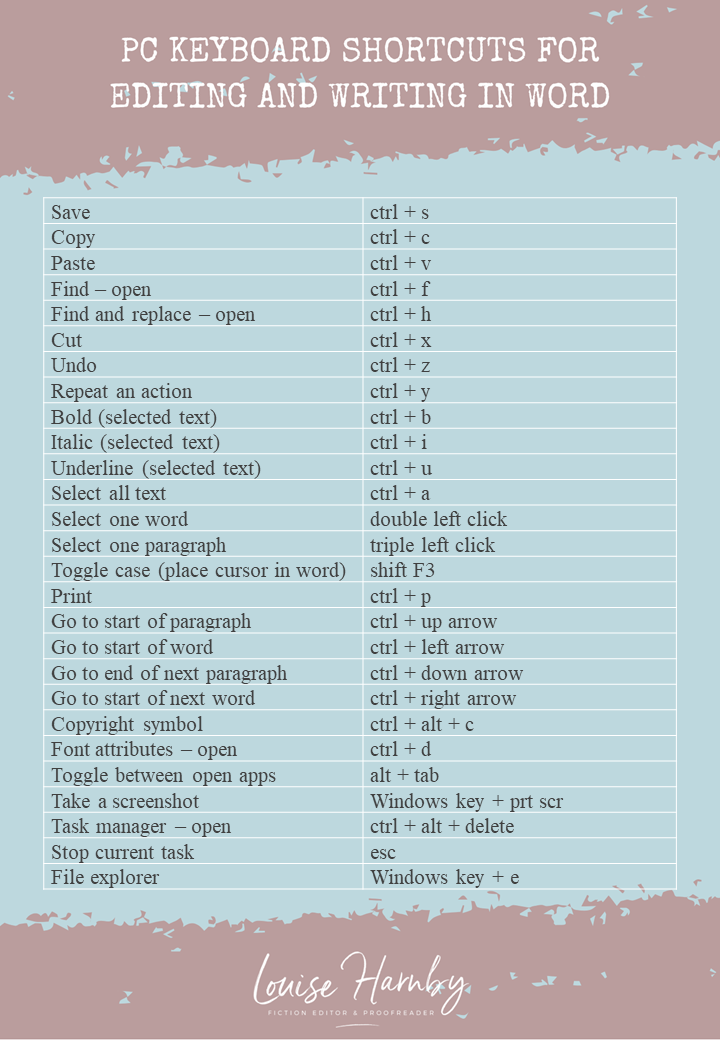
CLICK ON IMAGE TO DOWNLOAD A PDF
Louise Harnby is a line editor, copyeditor and proofreader who specializes in working with crime, mystery, suspense and thriller writers.
She is an Advanced Professional Member of the Chartered Institute of Editing and Proofreading (CIEP), a member of ACES, a Partner Member of The Alliance of Independent Authors (ALLi), and co-hosts The Editing Podcast.
Visit her business website at Louise Harnby | Fiction Editor & Proofreader, say hello on Twitter at @LouiseHarnby, connect via Facebook and LinkedIn, and check out her books and courses.
In this episode of The Editing Podcast, Denise and Louise talk about 10 editing macros that will save you time and improve the quality of your writing.

Click to listen to Season 2, Episode 5
Summary
Listen to find out more about:
Editing bites
Music credit
‘Vivacity’ Kevin MacLeod (incompetech.com). Licensed under Creative Commons: By Attribution 3.0 License.
Listen to find out more about:
- Macros how they work in Word
- CatchPhrase
- CitationLister and CitationListChecker
- CompareWordList
- File Cleaner
- FullPointInDialogue and CommaInDialogue
- MultiSwitch
- PerfectIt
- ProperNounAlyse
- SpellingErrorLister
- VisibleTrack
Editing bites
- ‘Advanced Find and Replace for Microsoft Word’: Available from Jack Lyon
- ‘20-Minute Macro Course’: Available from Tech Tools for Writers
Music credit
‘Vivacity’ Kevin MacLeod (incompetech.com). Licensed under Creative Commons: By Attribution 3.0 License.
Louise Harnby is a line editor, copyeditor and proofreader who specializes in working with crime, mystery, suspense and thriller writers.
She is an Advanced Professional Member of the Chartered Institute of Editing and Proofreading (CIEP), a member of ACES, a Partner Member of The Alliance of Independent Authors (ALLi), and co-hosts The Editing Podcast.
Visit her business website at Louise Harnby | Fiction Editor & Proofreader, say hello on Twitter at @LouiseHarnby, connect via Facebook and LinkedIn, and check out her books and courses.
She is an Advanced Professional Member of the Chartered Institute of Editing and Proofreading (CIEP), a member of ACES, a Partner Member of The Alliance of Independent Authors (ALLi), and co-hosts The Editing Podcast.
Visit her business website at Louise Harnby | Fiction Editor & Proofreader, say hello on Twitter at @LouiseHarnby, connect via Facebook and LinkedIn, and check out her books and courses.
In this episode of The Editing Podcast, Denise and Louise talk with Daniel Heuman, founder of Intelligent Editing and developer of PerfectIt – consistency-checking and style-enforcing software for editors and writers.
Click to listen to Season 2, Episode 3
Summary
Listen to find out more about:
Music credit
‘Vivacity’ Kevin MacLeod (incompetech.com). Licensed under Creative Commons: By Attribution 3.0 License http://creativecommons.org/licenses/by/3.0/
Listen to find out more about:
- What PerfectIt does
- Who uses PerfectIt
- What’s new with PerfectIt 4
- Using the onboard styles
- The PerfectIt 4 interface
- How to access PerfectIt on PC and Mac
- How much a subscription costs and what’s included
- Where to download PerfectIt
Music credit
‘Vivacity’ Kevin MacLeod (incompetech.com). Licensed under Creative Commons: By Attribution 3.0 License http://creativecommons.org/licenses/by/3.0/
Louise Harnby is a line editor, copyeditor and proofreader who specializes in working with crime, mystery, suspense and thriller writers.
She is an Advanced Professional Member of the Chartered Institute of Editing and Proofreading (CIEP), a member of ACES, a Partner Member of The Alliance of Independent Authors (ALLi), and co-hosts The Editing Podcast.
Visit her business website at Louise Harnby | Fiction Editor & Proofreader, say hello on Twitter at @LouiseHarnby, connect via Facebook and LinkedIn, and check out her books and courses.
She is an Advanced Professional Member of the Chartered Institute of Editing and Proofreading (CIEP), a member of ACES, a Partner Member of The Alliance of Independent Authors (ALLi), and co-hosts The Editing Podcast.
Visit her business website at Louise Harnby | Fiction Editor & Proofreader, say hello on Twitter at @LouiseHarnby, connect via Facebook and LinkedIn, and check out her books and courses.
Are you spending too much time on your novel’s text design? Here’s how to use the Styles function in Microsoft Word to ensure the various elements are formatted consistently.
In this article, I’ll walk you through the following:
What is the Styles tool?
The Styles tool allows you to apply design consistency to the various text elements in your book. In a novel, you might want to create different styles for the following:
Microsoft Word has a handy suite of on-board styles, though it’s unlikely they’ll match your specific requirements. Modifying these is still a little quicker than creating fresh styles so take a look at the properties and work out what you’ll retain and what you’ll change.
What properties can you influence?
You can influence every property of your text when you assign a style to it. However, in a novel, you’ll most likely focus on the following:
How to access the Styles tool
There are two ways to access the Styles function onscreen:
- What the Styles tool is
- The properties you can influence
- How to access the Styles tool
- Why it’ll save you time to use styles
- 3 ways to create a style
- 2 ways to modify a style
- How to assign a style to an element of text
- Troubleshooting
- How heading styles help you navigate
What is the Styles tool?
The Styles tool allows you to apply design consistency to the various text elements in your book. In a novel, you might want to create different styles for the following:
- book title
- author
- chapter titles
- subheadings
- indented body text
- full-out paragraphs in new chapters or sections
- displayed matter such as letters, texts, emails, reports
Microsoft Word has a handy suite of on-board styles, though it’s unlikely they’ll match your specific requirements. Modifying these is still a little quicker than creating fresh styles so take a look at the properties and work out what you’ll retain and what you’ll change.
What properties can you influence?
You can influence every property of your text when you assign a style to it. However, in a novel, you’ll most likely focus on the following:
- paragraph indentation
- spacing above and below the text
- font
- size
- colour
- italicization and bolding
- alignment (left, right, centred and justified)
- page flow (widow/orphan control; ensuring headings and corresponding text don’t fall on separate pages; page breaks)
How to access the Styles tool
There are two ways to access the Styles function onscreen:
- the Styles gallery in the ribbon
- the Styles pane
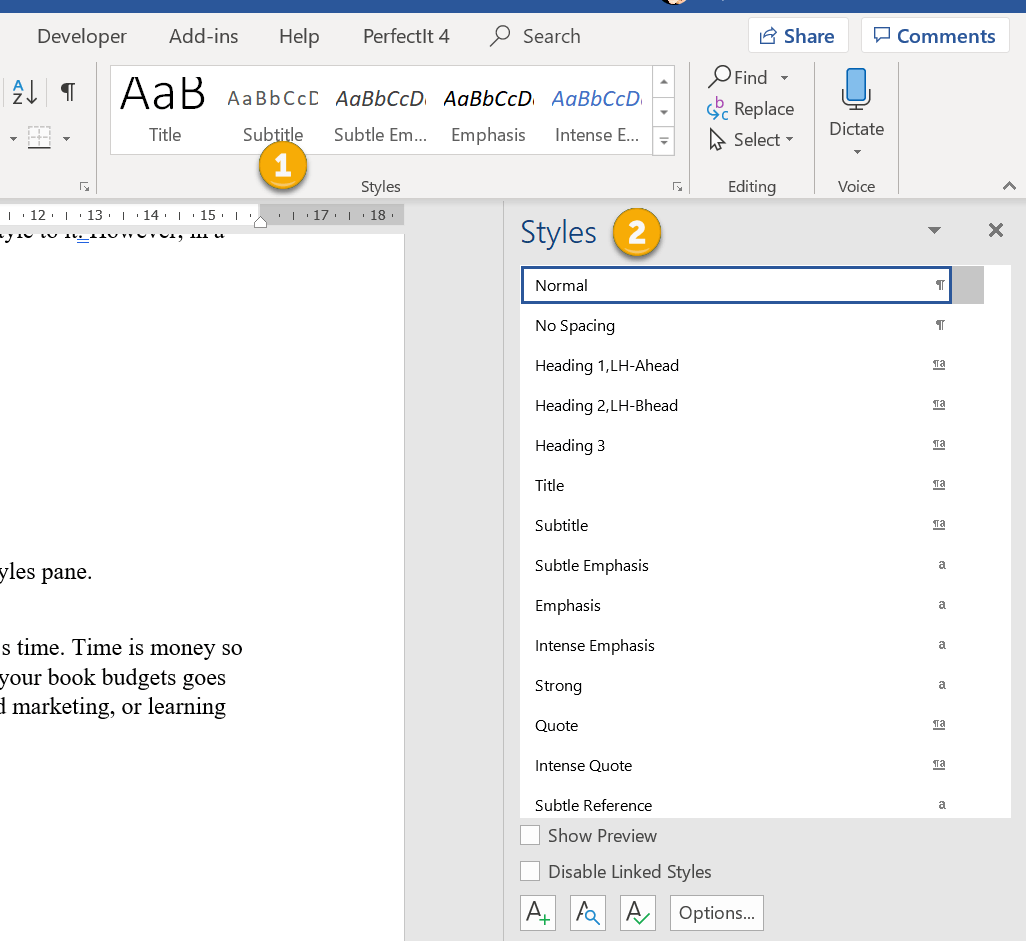
The gallery in the ribbon offers a preview of how the style appears. If I’m working with a lot of different text elements in a document, I find these visual clues useful when I want to locate a style quickly.
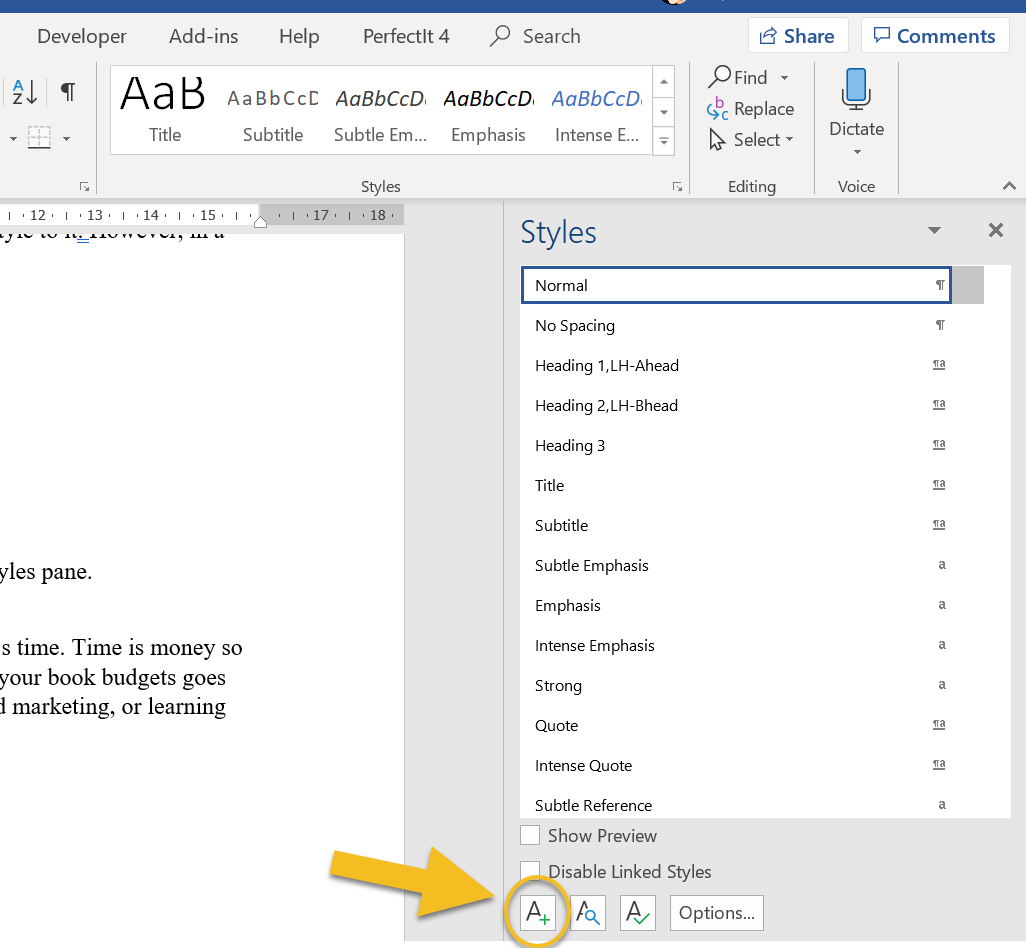
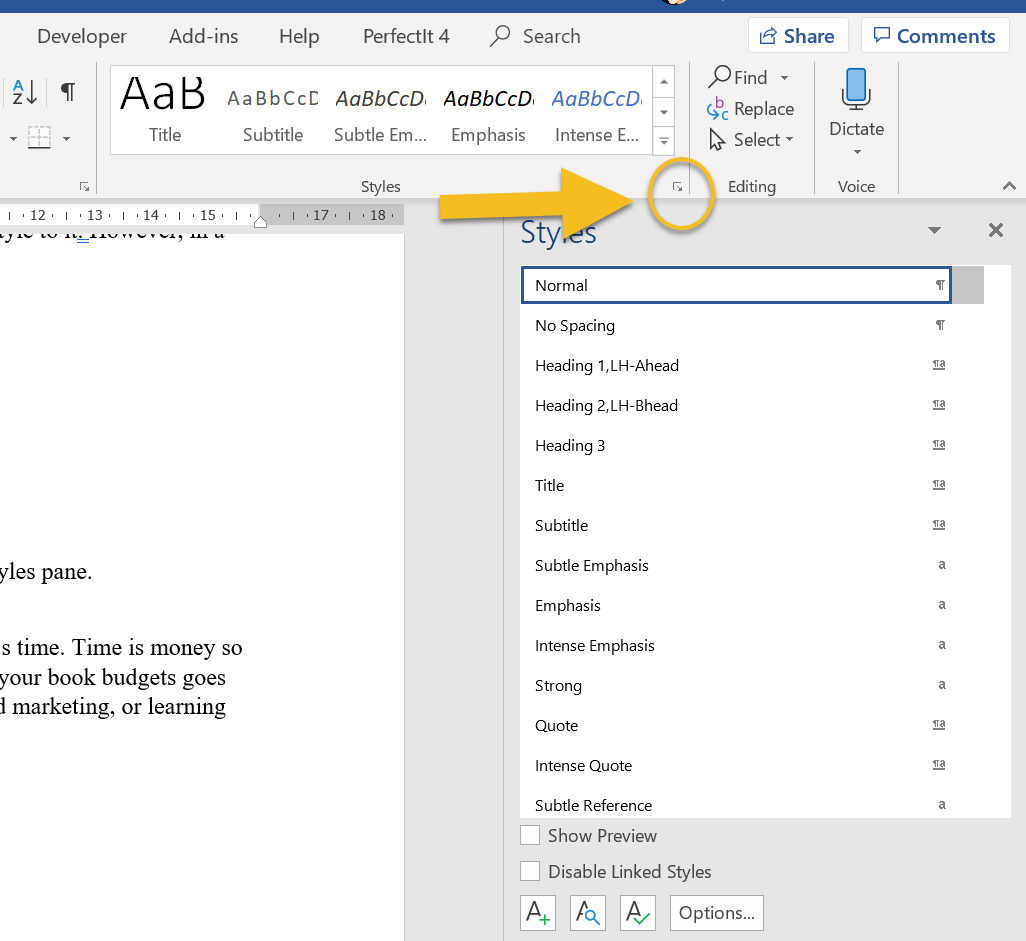
On smaller screens, less of the Styles gallery will be visible. To access the previews of all the styles in your gallery, click on the MORE arrow (circled).
On smaller screens, less of the Styles gallery will be visible. To access the previews of all the styles in your gallery, click on the MORE arrow (circled).
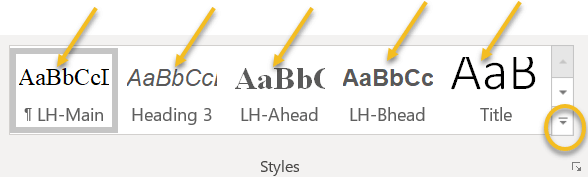
A new window will appear containing the full gallery.

Why you should format with styles
Using styles gives you control over design, consistency and formatting time.
Time is money, so when you do the job instead of asking other professionals to do it, your book budgets goes further. Perhaps you can invest a little more time or money on cover design, sales and marketing, or learning how to improve writing craft.
Can you format manually? Of course, but you could be making a lot of unnecessary work for yourself.
Scenario 1
You complete the writing, drafting, and editing, and get cracking on designing the layout. Now that there are 85,000 words in place, your thriller’s looking more like a textbook thanks to the font you’ve chosen for your main text: Arial 14. A serif font like Times New Roman would be easier on your reader’s eye.
The problem is, you can’t select all the text in the file with CTRL A and change it in one fell swoop because that would affect the chapter headings and the emails your transgressor is sending to the police, all of which are formatted differently. Instead, you have to work through the file, locate the main text elements manually, and change the font.
If, however, you’ve assigned a style to your main text, you can modify that font property in just a few clicks. The change will automatically change all the main text, and only that element, to your new font. Further down, I’ll show you how.
Scenario 2
You’ve written 12 additional paragraphs for your book but they’re in another document. You copy and paste the writing into your book file. Now you have to manually format the new sections so that they match the existing work.
If you’ve assigned styles, however, it’s as simple as cut, paste and left-click. Job done.
How to create a style
There are several ways to create a style in Word:
1A. Manual method
Open the styles pane and left-click on the A+ button in the bottom-left-hand corner.
Using styles gives you control over design, consistency and formatting time.
Time is money, so when you do the job instead of asking other professionals to do it, your book budgets goes further. Perhaps you can invest a little more time or money on cover design, sales and marketing, or learning how to improve writing craft.
Can you format manually? Of course, but you could be making a lot of unnecessary work for yourself.
Scenario 1
You complete the writing, drafting, and editing, and get cracking on designing the layout. Now that there are 85,000 words in place, your thriller’s looking more like a textbook thanks to the font you’ve chosen for your main text: Arial 14. A serif font like Times New Roman would be easier on your reader’s eye.
The problem is, you can’t select all the text in the file with CTRL A and change it in one fell swoop because that would affect the chapter headings and the emails your transgressor is sending to the police, all of which are formatted differently. Instead, you have to work through the file, locate the main text elements manually, and change the font.
If, however, you’ve assigned a style to your main text, you can modify that font property in just a few clicks. The change will automatically change all the main text, and only that element, to your new font. Further down, I’ll show you how.
Scenario 2
You’ve written 12 additional paragraphs for your book but they’re in another document. You copy and paste the writing into your book file. Now you have to manually format the new sections so that they match the existing work.
If you’ve assigned styles, however, it’s as simple as cut, paste and left-click. Job done.
How to create a style
There are several ways to create a style in Word:
- manually – 2 options
- by updating an existing unused style to match a piece of text you’ve selected or clicked within
1A. Manual method
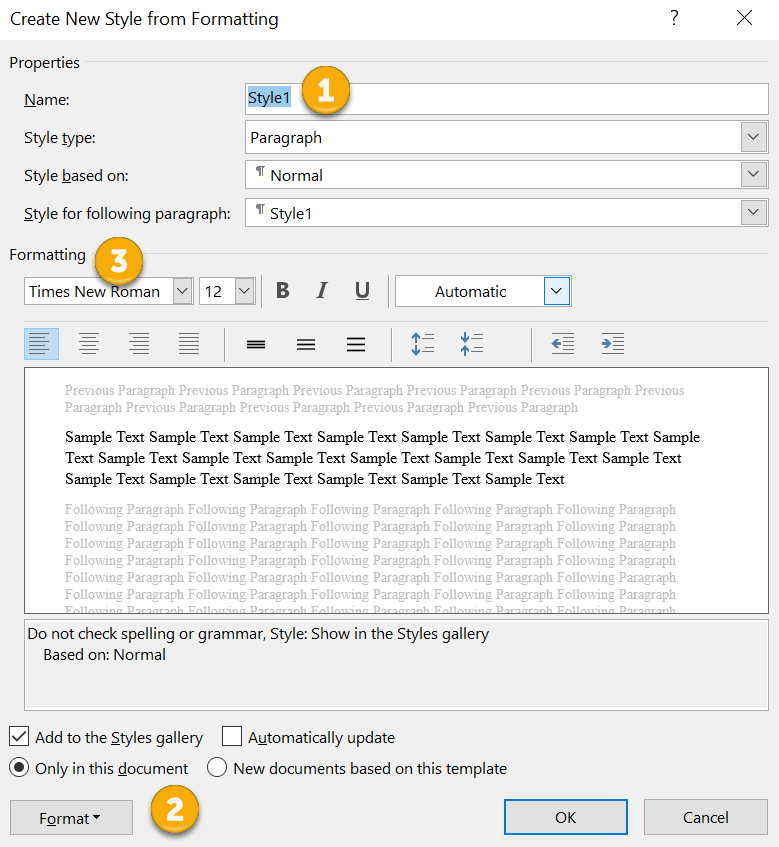
Open the styles pane and left-click on the A+ button in the bottom-left-hand corner.
A new window will open (CREATE NEW STYLE FROM FORMATTING). Now you can give your style a name (1) and assign properties to the font, paragraph spacing and page flow (2 and 3).

1B. Manual method B
Alternatively, right-click on a piece of text that’s already formatted according to your preferences. A mini toolbar will appear. Click on the Styles button.
Alternatively, right-click on a piece of text that’s already formatted according to your preferences. A mini toolbar will appear. Click on the Styles button.

A new window will appear. Left-click on CREATE A STYLE.
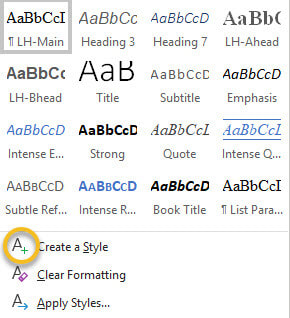
Name your style, modify if you wish, and left-click OK.

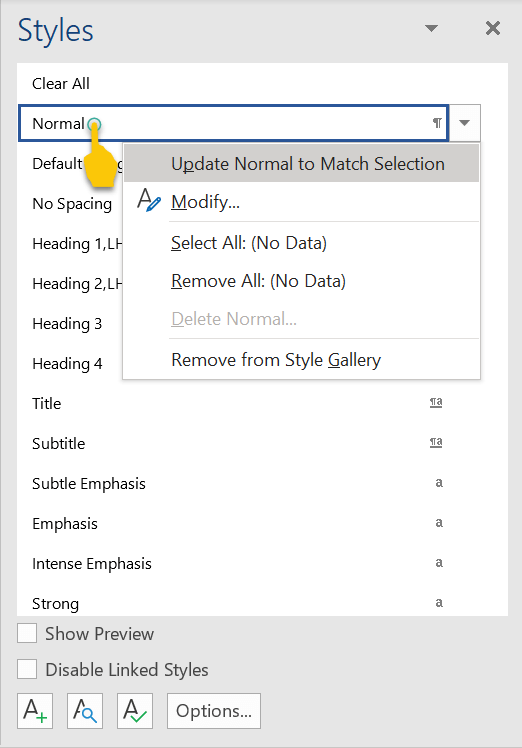
2. Updating method
Select a piece of text that’s already formatted according to your preferences. Now head up to the Styles gallery in the ribbon, or the Styles pane, and right-click on an unused style that you’re happy to update. Hover over UPDATE [STYLE] TO MATCH SELECTION, then left-click.
Select a piece of text that’s already formatted according to your preferences. Now head up to the Styles gallery in the ribbon, or the Styles pane, and right-click on an unused style that you’re happy to update. Hover over UPDATE [STYLE] TO MATCH SELECTION, then left-click.
How to modify a style
There are two ways to modify a style in Word:
1. Styles gallery
Go to the Styles gallery in the ribbon and right-click on the style you want to modify.
There are two ways to modify a style in Word:
- via the Styles gallery in the ribbon
- via the Styles pane
1. Styles gallery
Go to the Styles gallery in the ribbon and right-click on the style you want to modify.
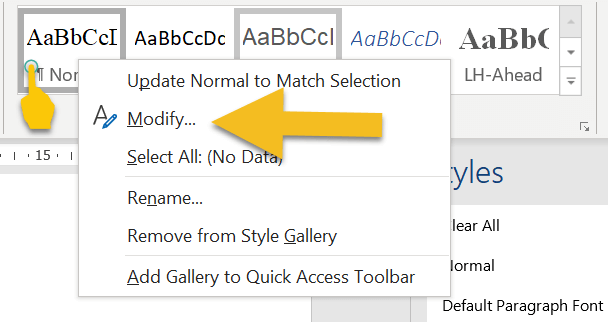
Left-click on MODIFY and amend the properties of your style. Note that this will change every piece of text assigned with that style.
2. Styles pane
Go to the Styles pane on the right-hand side of your screen and right-click on the style you want to modify.
Go to the Styles pane on the right-hand side of your screen and right-click on the style you want to modify.
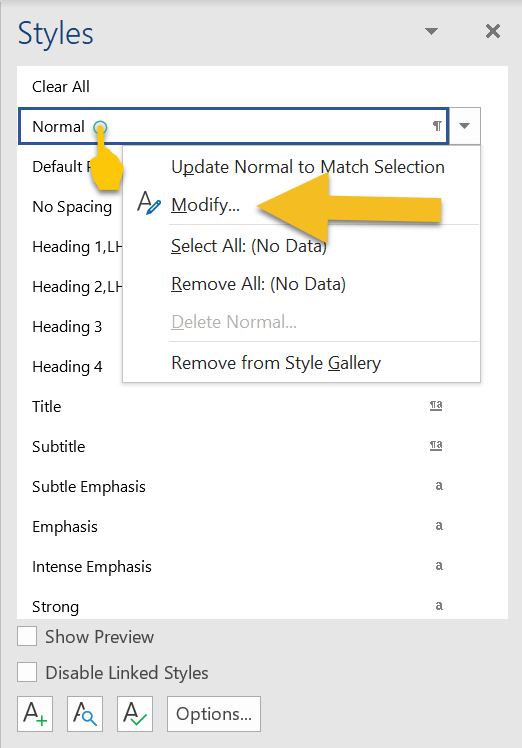
Left-click on MODIFY and amend the properties of your style. Again, bear in mind that this will change every piece of text with that style assigned.
How to assign a style to an element of text
If a piece of text isn’t formatted correctly, left-click the cursor on a word or in a paragraph, or select it by double-clicking.
Now head up to the Styles gallery in the ribbon, or the Styles pane, and left-click on the preferred style. Your style will be assigned.
If you’re working on a smaller screen, you’ll probably find it easier to use the Styles gallery in the ribbon because it takes up less space than the Styles pane.
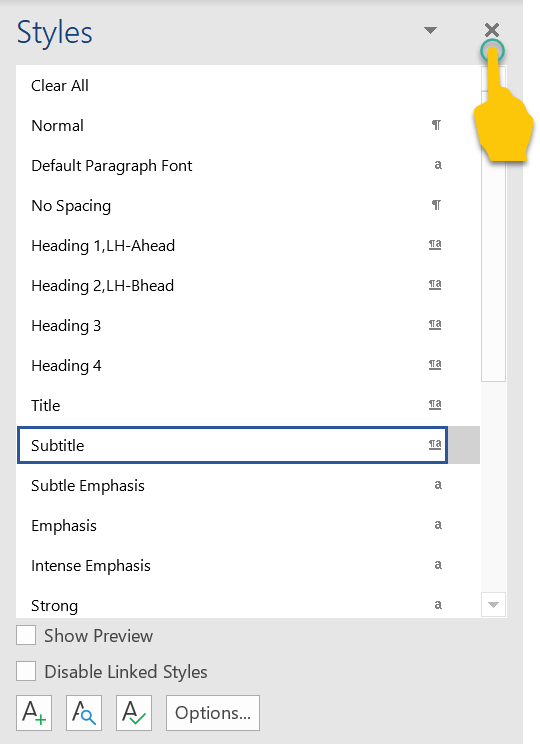
To close the Styles pane and free up some screen real-estate, left-click on the X in the top-right-hand corner.
How to assign a style to an element of text
If a piece of text isn’t formatted correctly, left-click the cursor on a word or in a paragraph, or select it by double-clicking.
Now head up to the Styles gallery in the ribbon, or the Styles pane, and left-click on the preferred style. Your style will be assigned.
If you’re working on a smaller screen, you’ll probably find it easier to use the Styles gallery in the ribbon because it takes up less space than the Styles pane.
To close the Styles pane and free up some screen real-estate, left-click on the X in the top-right-hand corner.
Troubleshooting
Here’s how to fix some of the more common problems that arise when working with styles.
1. Styles gallery or pane isn’t visible
If the Styles gallery isn’t visible, make sure you’re in the HOME tab in the ribbon.
Here’s how to fix some of the more common problems that arise when working with styles.
1. Styles gallery or pane isn’t visible
If the Styles gallery isn’t visible, make sure you’re in the HOME tab in the ribbon.

If the Styles pane isn’t visible, left-click on the small arrow in the Styles gallery.
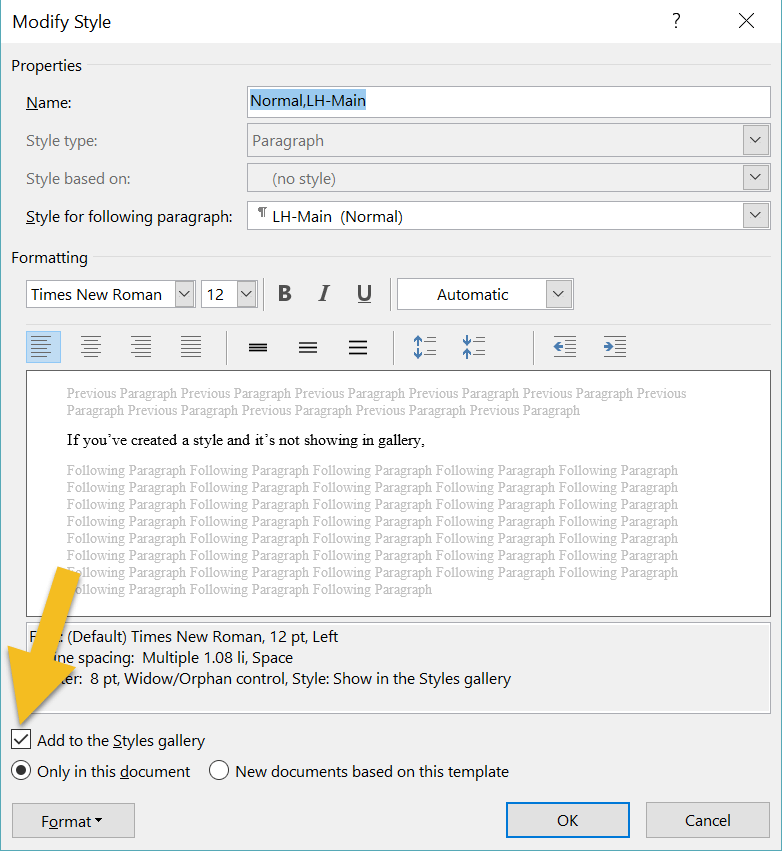
2. Style not showing in gallery
If you’ve created a style and it’s not showing in gallery, head to the Styles pane and right-click on the missing style. This opens the MODIFY pane. Make sure that the ADD TO THE STYLES GALLERY box is checked.
If you’ve created a style and it’s not showing in gallery, head to the Styles pane and right-click on the missing style. This opens the MODIFY pane. Make sure that the ADD TO THE STYLES GALLERY box is checked.
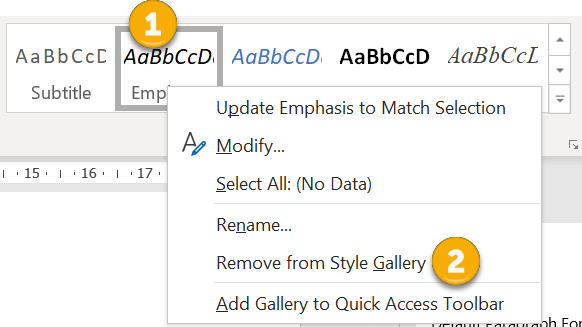
3. The gallery is cluttered with unused styles
If your gallery is busy with styles you don’t need to access, there are two ways to remove them. The quickest method is to right-click on an unwanted style, then left-click on REMOVE FROM STYLE GALLERY.
If your gallery is busy with styles you don’t need to access, there are two ways to remove them. The quickest method is to right-click on an unwanted style, then left-click on REMOVE FROM STYLE GALLERY.
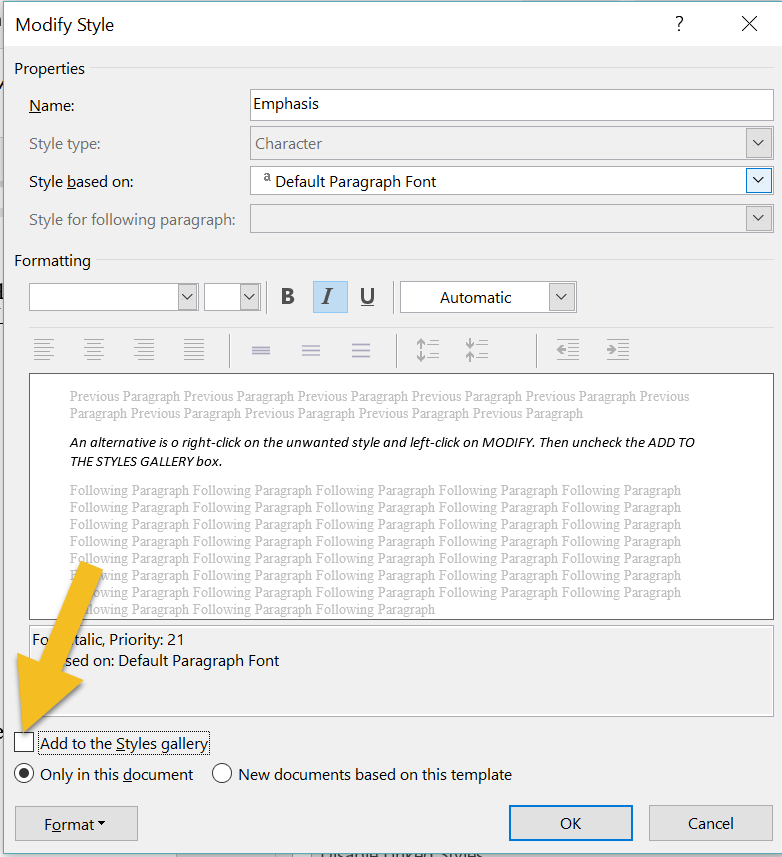
An alternative is to right-click on the unwanted style and left-click on MODIFY. Then uncheck the ADD TO THE STYLES GALLERY box.
4. You’ve renamed a style but Word’s default name is still displayed in the pane
If you’re using the Styles pane to apply styles, the list might appear cluttered if Word’s default names are displaying, even though you've modified them. To fix, left-click on the OPTIONS button.
If you’re using the Styles pane to apply styles, the list might appear cluttered if Word’s default names are displaying, even though you've modified them. To fix, left-click on the OPTIONS button.
Check the HIDE BUILT-IN NAME WHEN ALTERNATE EXISTS box, then left-click on OK.
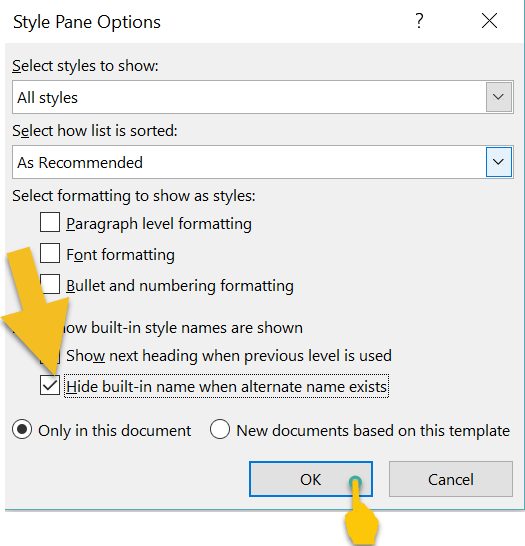
Your list will now display with your modified names.

Heading styles and navigating your Word file
One of the advantages of using the Styles tool for a novel is navigation.
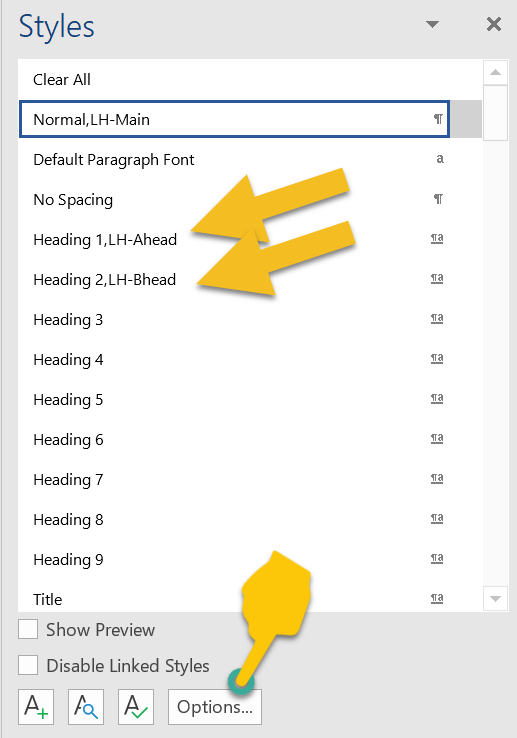
To access the Navigation pane, press CTRL F on a PC. Now, left-click on the HEADINGS tab. Any style based on one of the in-built heading styles will show up in the menu.
One of the advantages of using the Styles tool for a novel is navigation.
To access the Navigation pane, press CTRL F on a PC. Now, left-click on the HEADINGS tab. Any style based on one of the in-built heading styles will show up in the menu.
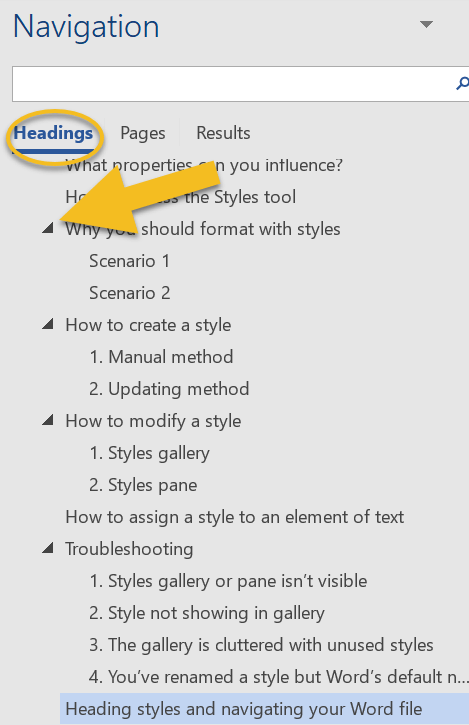
I use this function when I’m editing and want to check that chapter headings (and subheadings) are formatted consistently, assigned the correct level of priority, and numbered chronologically.
Headings with arrows next to them indicate lower-level subheadings. You can expand or collapse subheadings by left-clicking on the arrows.
Furthermore, if you want to shift a headed or subheaded section to another position in your document, left-click on the relevant heading and drag up or down the menu.
Summing up
Styles let you focus on your writing rather than fretting about internal text design.
Applying a style to an element of your book file takes a fraction of the time required for manual formatting. And because any style can be tweaked, you get to change your mind as often as you like.
If you have any problems with using Word’s Styles gallery and pane, drop me a note in the comments and I’ll do my best to fix the issue.
Fancy watching a video tutorial? Visit my YouTube channel and watch: Self-editing Your fiction in Word: How to Use Styles.
Louise Harnby is a line editor, copyeditor and proofreader who specializes in working with crime, mystery, suspense and thriller writers.
She is an Advanced Professional Member of the Chartered Institute of Editing and Proofreading (CIEP), a member of ACES, a Partner Member of The Alliance of Independent Authors (ALLi), and co-hosts The Editing Podcast.
Visit her business website at Louise Harnby | Fiction Editor & Proofreader, say hello on Twitter at @LouiseHarnby, connect via Facebook and LinkedIn, and check out her books and courses.
She is an Advanced Professional Member of the Chartered Institute of Editing and Proofreading (CIEP), a member of ACES, a Partner Member of The Alliance of Independent Authors (ALLi), and co-hosts The Editing Podcast.
Visit her business website at Louise Harnby | Fiction Editor & Proofreader, say hello on Twitter at @LouiseHarnby, connect via Facebook and LinkedIn, and check out her books and courses.
Good proofreading practice means acknowledging that changing one word, or moving one line, can have unintended and damaging consequences throughout the rest of the book if we aren’t careful.

If we want to proofread for publishers, packagers and project-management agencies, or if we're checking self-publishers' print-on-demand books, we need to be comfortable with working on page proofs.
What are page proofs?
The proofreader will usually be asked to work on page proofs. What are they?
What are page proofs?
The proofreader will usually be asked to work on page proofs. What are they?
'Page proofs are so-called because they are laid out as exactly as they will appear in the final printed book. If all has gone well, what the proofreader is looking at will be almost what the reader sees if they were to walk into a bookshop, pull this title off the shelf and browse through the pages.
The layout process has been taken care of by a professional typesetter who designs the text in a way that is pleasing to the eye and in accordance with a publisher’s brief.' (Not all proofreading is the same: Part I – Working with page proofs)
The layout process has been taken care of by a professional typesetter who designs the text in a way that is pleasing to the eye and in accordance with a publisher’s brief.' (Not all proofreading is the same: Part I – Working with page proofs)
In this case, the proofreader does not amend the text directly. They annotate the page proofs.
You might be required to work on both hard-copy page and PDF page proofs – it will depend on the client’s preference. You'll be looking for any final spelling, punctuation, grammatical, and consistency errors that remain in the text. However, you'll also expected to check the appearance of the text.
Checks will include the following:
- the running heads match the chapter title
- the chapter title matches the entry in the contents list
- the design of the various text elements is consistent (e.g. correct font, text size, use of bold/italic, consistent capitalization, correct paragraph indentation, line spacing, etc.)
- the chapter title drops are consistent throughout
- the text on facing rectos and versos (right-hand and left-hand pages) is balanced
- in-text citations are presented according to preferred style and can be located in the book's references or bibliography
- footnote/endnote markers are present and correct in text and correspond to relevant footnotes/endnotes
- odd page numbers always appear on recto pages
- bad word breaks are flagged
- part titles always appear on new recto pages
This isn't a comprehensive list but it gives you an idea of how this type of proofreading goes beyond just checking the text for typos. If your client hasn’t supplied you with a proofreading checklist, you can access this free one when you sign up for The Editorial Letter.
CLICK IMAGE TO ACCESS
What's important here is that every amendment you suggest might have an impact somewhere else. That doesn’t mean you shouldn’t make the amendment; it means, rather, that you need to be mindful of the consequences of your actions – the knock-on effects.
What are knock-on effects?
Professional proofreaders often refer to the indirect consequences of their mark-up as knock-on effects. A useful way of thinking about this is in terms of dominoes because it provides us with the perfect description of what’s at stake.
Imagine you've lined up four dominos: A, B, C, and D. You push over A and it pushes over B. B then knocks over C, which in turn causes D to fall. Domino D’s topple was caused indirectly by Domino A, even though A didn’t touch D.
This process can occur on page proofs and can have serious consequences. The changes we make can, if we’re not careful, impact on the text flow, the pagination, the contents list, and the index.

An example
Here’s an example to illustrate the point. Imagine the publisher’s brief tasks the proofreader with attending to orphans and widows (those stranded single lines at the bottom or top of a page).
Solutions that involve instructing a typesetter to shuffle a line backward to a previous page, or forward to the next page, in order to avoid the widow/orphan might cause one, or all, of the following problems:
In all three cases, the proofreader has prevented one problem but caused others. Consequently, good practice involves more than blindly placing mark-up instruction on any given page.
Thought needs to be given to how the problem can be tackled and the impact managed so that there is no knock-on effect. Spotting an orphaned or widowed line is not enough. We might also have to consider the following:
Summing up
If you’re considering training as a proofreader and want to be fit for the purpose of marking up page proofs, check that your course includes a component about knock-on effects.
Even when we are supplied with detailed briefs about an ideal layout, the publisher client expects us to be mindful of the consequences of our amendments. The proofreader’s job is to find solutions to problems in ways that don’t cause unintended damage.
Here’s an example to illustrate the point. Imagine the publisher’s brief tasks the proofreader with attending to orphans and widows (those stranded single lines at the bottom or top of a page).
Solutions that involve instructing a typesetter to shuffle a line backward to a previous page, or forward to the next page, in order to avoid the widow/orphan might cause one, or all, of the following problems:
- The repositioning of a line onto a different page automatically forces a reflow of text. Things look fine for the next six pages, but on the seventh page after the amendment was made, a new orphaned or widowed line has now appeared. The previous arrangement of the text prevented this.
- Let’s imagine that the seventh page is still widow/orphan-free. But the reflow of text means that this seventh page now contains a line that appeared on the previous page. This line includes a keyword term that is cross-referenced 130 pages later. The cross-reference is now incorrect.
- The index is being created simultaneously by a professional indexer. It’s not uncommon for proofreaders to never see the index, nor to spot check it. The line that’s been repositioned on a different page contains an author citation that is included in the index. The indexer doesn’t know what the proofreader’s done, and the proofreader doesn’t know which terms are being included in the index. Neither of them knows that the index entry now has the wrong page number attached to it.
In all three cases, the proofreader has prevented one problem but caused others. Consequently, good practice involves more than blindly placing mark-up instruction on any given page.
Thought needs to be given to how the problem can be tackled and the impact managed so that there is no knock-on effect. Spotting an orphaned or widowed line is not enough. We might also have to consider the following:
- Providing additional instructions to the typesetter regarding to how to manage the problem by compensating elsewhere on the page (e.g., increasing or reducing line spaces and page depths, new line creation, etc.) so that the impact of moving one line is restricted to the page where the change has been made and its facing recto/verso.
- Telling the project manager about the suggested line move so that the manager can inform the indexer.
- Looking out for obvious key words or citations in lines that have been moved to check whether they are cross-referenced in the text (having a PDF, even when working on hard copy, is a must in these circumstances).
Summing up
If you’re considering training as a proofreader and want to be fit for the purpose of marking up page proofs, check that your course includes a component about knock-on effects.
Even when we are supplied with detailed briefs about an ideal layout, the publisher client expects us to be mindful of the consequences of our amendments. The proofreader’s job is to find solutions to problems in ways that don’t cause unintended damage.
Louise Harnby is a line editor, copyeditor and proofreader who specializes in working with crime, mystery, suspense and thriller writers.
She is an Advanced Professional Member of the Chartered Institute of Editing and Proofreading (CIEP), a member of ACES, a Partner Member of The Alliance of Independent Authors (ALLi), and co-hosts The Editing Podcast.
Visit her business website at Louise Harnby | Fiction Editor & Proofreader, say hello on Twitter at @LouiseHarnby, connect via Facebook and LinkedIn, and check out her books and courses.
She is an Advanced Professional Member of the Chartered Institute of Editing and Proofreading (CIEP), a member of ACES, a Partner Member of The Alliance of Independent Authors (ALLi), and co-hosts The Editing Podcast.
Visit her business website at Louise Harnby | Fiction Editor & Proofreader, say hello on Twitter at @LouiseHarnby, connect via Facebook and LinkedIn, and check out her books and courses.
If you think there's no place for macros in fiction editing, think again. My friend Paul Beverley has collated a core group of macros that will have any fiction line editor, copyeditor or proofreader drooling! Self-publishing authors will love them too!
I don't use all of these (every editor has their preferences) but some of them are staples and save me oodles of time!
I don't use all of these (every editor has their preferences) but some of them are staples and save me oodles of time!
Some of the macros apply when you’re looking at the whole text of a novel, while others are selective ... for use while you’re editing line by line. Bear in mind that they're designed to be used with MS Word files.
Macros that work with the whole text
These macros are ideal near the beginning of the edit, when you’ve put together the whole book in one single file, and you want to look for inconsistencies.
ProperNounAlyse searches the novel for any words that look like proper nouns; it counts their frequency, and then tries to locate, by using a variety of tests, and pairs of names that might possibly be alternative spellings or misspellings, e.g. Jayne/Jane, Beverley/Beverly, Neiman/Nieman, Grosman/Grosmann etc.

FullNameAlyse is similar to ProperNounAlyse, but it searches for multi-part names, Fred Smith, Burt Fry, etc.
ChronologyChecker is aimed at tracing the chronology of a novel. It extracts, into a separate file, all the paragraphs containing appropriate chronology-type words: Monday, Wednesday, Fri, Sat, April, June, 1958, 2017, etc. This file is then more easily searchable to look at the significance of the text for the chronology.
WordsPhrasesInContext tracks the occurrence of specific names through a novel. You give it a list of names/words/phrases, and it searches for any paragraphs in the novel that contain them. It creates a separate file of those paragraphs, with the searched element highlighted in your choice of colour.
CatchPhrase searches your novel for over-used phrases and counts how many times each phrase occurs.
Macros for when editing line by line
FullPoint/Comma/Semicolon/Colon/Dash/QuestionMark/ExclamationMark
These macros change
he said, you know ...
into he said. You know ...
or he said: you know ...
or he said – you know ...
and so on.
FullPointInDialogue and CommaInDialogue
These two macros change
“Blah, blah.” He said.
into “Blah, blah,” he said.
and vice versa.

ProperToPronoun
This macro looks along the line to find the next proper noun, deletes it and types ‘she’. But if you then type Ctrl-Z, it changes it back to ‘he’.
MultiSwitch
You give this macro a list of changes that you might want to implement:
Jane
Jayne
Beverley
Beverly
that
which
which
that
When you click in a word, and run the macro, it finds your alternate and replaces it. It also works with phrases and can also provide a menu of alternates:
he said
he opined
he shouted
he voiced
she said
she opined
she shouted
she voiced
Louise Harnby is a line editor, copyeditor and proofreader who specializes in working with crime, mystery, suspense and thriller writers.
She is an Advanced Professional Member of the Chartered Institute of Editing and Proofreading (CIEP), a member of ACES, a Partner Member of The Alliance of Independent Authors (ALLi), and co-hosts The Editing Podcast.
Visit her business website at Louise Harnby | Fiction Editor & Proofreader, say hello on Twitter at @LouiseHarnby, connect via Facebook and LinkedIn, and check out her books and courses.
She is an Advanced Professional Member of the Chartered Institute of Editing and Proofreading (CIEP), a member of ACES, a Partner Member of The Alliance of Independent Authors (ALLi), and co-hosts The Editing Podcast.
Visit her business website at Louise Harnby | Fiction Editor & Proofreader, say hello on Twitter at @LouiseHarnby, connect via Facebook and LinkedIn, and check out her books and courses.
Anna is training to be a proofreader and plans to set up her own business in the near future. She’s ready to upgrade her kit but wants to make sure her investment is fit for purpose.

Says Anna:
At the moment I am working on an old-ish MacBook Pro but know I need to upgrade very soon. The dilemma is whether to buy an improved laptop or move to a desktop. My preference is for Apple products as I know my way around them better.
I’m tempted to get a better laptop. I like the freedom of being able to move around and I often travel. But I know that a desktop would give me a significantly bigger screen.
What are your thoughts on screen size for proofreading? How important is it to have a large screen, or is it easier to use two screens side by side at times? And if you use a laptop how small a screen would you consider too small?
Hi, Anna!
Great question. In short, I think you should go for what suits your lifestyle best. But let's look at some options.
The greedy option
This is my choice! In my shed, I have a desktop with two large screens. In my house I have a backup 14” notebook.
Great question. In short, I think you should go for what suits your lifestyle best. But let's look at some options.
The greedy option
This is my choice! In my shed, I have a desktop with two large screens. In my house I have a backup 14” notebook.
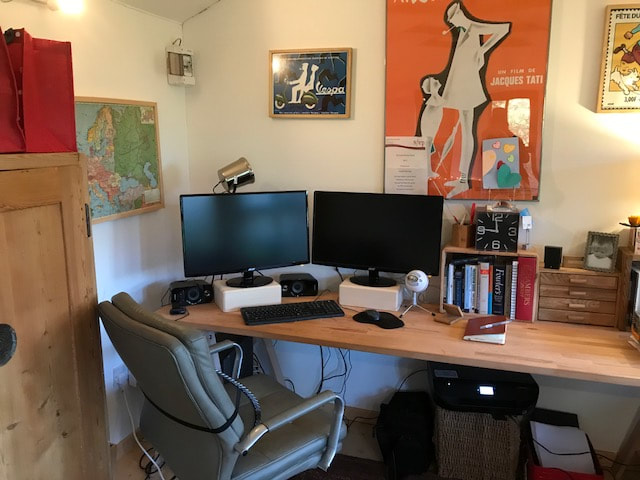
Some of my editing colleagues have three or four large screens rigged up to their desktops. That’s great if your machine can handle it (some can’t) and if you have the space (some don’t).
If I’m honest, until recently I considered it unthinkable to work five hours a day on my HP Pavilion notebook. My desktop and double screenage setup was a necessity! I suspect there's evidence of that thinking somewhere here on the blog!
But that’s hogwash.
In November, a family member became poorly and I had to relocate from my office (at the bottom of my garden) to the dining table in my house.

We’re now past the middle of January and I’m still there, though I’ll be heading back to the shed in a week.
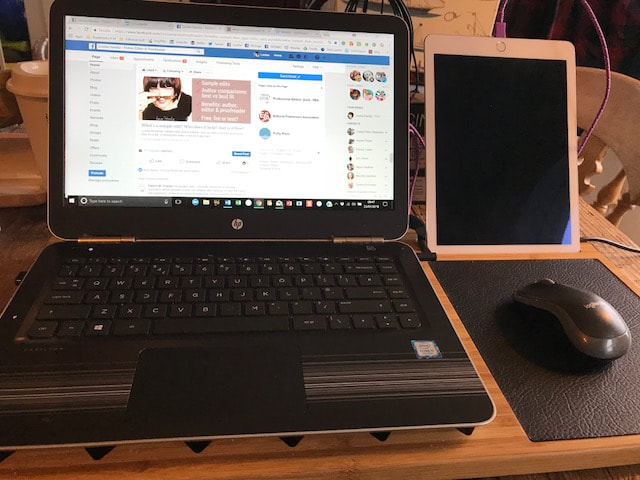
But you know what? It’s been fine ... more than fine. Yes, I've had to toggle a lot more but that’s such a first-world problem!
And I do have a second screen! My pal and fellow editor Kat Trail told me about an app called Duet that allows me to hook up my Windows notebook to an an iPad ... MS to iOS. Who'd have thought?
And she showed off her new lap-desk.
Like a sheep, I bought the whole caboodle! It works like a dream. Thanks, Kat!
The light option
You say you like to travel. Meet Kate Haigh, another editor friend of mine. She’s location independent. She works with a laptop and nothing else. It gives her the flexibility and mobility she needs to travel the world. She’s in Guatemala City as I write!
Once upon a time, she had multiple large monitors, but she adapted. Given your itchy feet, you might like to read her posts about location-independent editing and proofreading (see the Taking Your Proofreading Service on the Road series via For Editors and Proofreaders section on the Kateproof blog). There are lots of tips and tools on offer for editors who want to lighten the load.
One of Kate’s favourite pieces of equipment is the lightweight, foldable Roost laptop stand
If you decide to commit to a new laptop but want an additional largish monitor, hook up your existing MacBook Pro or splash out on an additional monitor especially for home use.
What’s too small?
I’d recommend a screen that's at least big enough to house the full width of one page at a viewing scale that’s readable, with some room in the margins to spare.
That way you can call up a navigation pane in the sidebar without having to scroll across the page. Additional navigation panes could include the Find pane in Word or the Bookmarks pane in a PDF reader.
I can achieve this comfortably with my 14” notebook screen.
Beyond the screen: RAM and processor
I think that screen size is less important than RAM and a decent processor.
The more programs we’re running, the bigger the demands on our kit.
When we’re professionally editing and proofreading, we’ll likely have multiple files open simultaneously. We’ll be running Word and/or PDF readers. We’ll be using additional software (macros, for example) to complement our beady eyes. And there are online tools and resources (e.g. email, dictionary and style manual) that we’ll need to access.
Regardless of whether seeing all that stuff requires a quick keyboard toggle or is viewable on multiple screens, it’s greedy.
Focus on performance first and screen size second. Smaller screens can be adapted to. Poor processor performance and memory can’t – they're just a frustration and will slow you down.
Back to my notebook: the screen is only 14" but it has an Intel Core i5 7th gen processor (not the highest spec but good enough), 8GB of RAM, and a 256GB SSD, all of which means the machine can fire on all cylinders while I'm putting it through its paces.
In a nutshell
You don’t need one large screen to do a pro job. You certainly don’t need three. You might well find them rather marvellous if you have room and are not looking to go anywhere anytime soon.
But if they’re going to clutter up your living space and remain unused much of the time because you’re on the road, they’re a waste of your money.
Invest in the equipment you feel comfortable with and that works hard for you, and you’ll not go far wrong.
Good luck with your training!
Louise Harnby is a line editor, copyeditor and proofreader who specializes in working with crime, mystery, suspense and thriller writers.
She is an Advanced Professional Member of the Chartered Institute of Editing and Proofreading (CIEP), a member of ACES, a Partner Member of The Alliance of Independent Authors (ALLi), and co-hosts The Editing Podcast.
Visit her business website at Louise Harnby | Fiction Editor & Proofreader, say hello on Twitter at @LouiseHarnby, connect via Facebook and LinkedIn, and check out her books and courses.
She is an Advanced Professional Member of the Chartered Institute of Editing and Proofreading (CIEP), a member of ACES, a Partner Member of The Alliance of Independent Authors (ALLi), and co-hosts The Editing Podcast.
Visit her business website at Louise Harnby | Fiction Editor & Proofreader, say hello on Twitter at @LouiseHarnby, connect via Facebook and LinkedIn, and check out her books and courses.
Can you proofread and copyedit professionally without being mouse-dependent? And what if you don't have a degree? Does it matter? A reader asked me. Here's my take.
Andrew says:
I am considering taking introductory courses in proofreading and copyediting; firstly, please could I ask you about the software used. Usually I prefer to use the keyboard to move around the menus, because I find repeatedly using a mouse tiring on my hands and arms. Does (at least some of) the software used in your industry allow keyboard use as an alternative to mouse work?
Secondly, would my lack of a degree hold me back? I have many years' experience in IT system development and programming; would this experience be attractive to publishers? However, I was hoping to not just to work on IT-related material!
Thanks for your question, Andrew.
Let’s deal with the software issue first.
Software
Text editing
When editing raw text, most editors use Microsoft Word. There are several excellent complementary add-on programs. These increase the editor’s productivity because they allow us to do complex tasks more quickly.
One example is PerfectIt, an outstanding consistency checker that can be customized to find and fix problems including hyphenation, capitalization, spelling variance, number style, italics, super/subscript, bullet punctuation, and wildcard searches.
In addition, there are hundreds of free macros available to editors, all of which are designed to complement the editor’s eye. Examples include spell-checkers, proper-noun analysis tools, homonym and homophone identifiers,
Then there are onboard tools in Word such as wildcard search and find/replace to name but two. And let’s not forget Word’s ribbon, which provides quick access to a range of tools, including the Styles palette.
To work efficiently, you’ll need to access these tools. As long as you know (or can learn) how to access the relevant menus via your keyboard, and assign keyboard shortcuts, I see no reason why you should be dependent on a mouse.
Page-proof annotation
If you’re hired to proofread designed page proofs, you’ll likely be working on PDF in Acrobat Pro, PDF-XChange, Adobe Reader or similar.
You’ll need to be able to use the onboard comment-and-markup tools and possibly the stamps palette.
Again, providing you can learn the keyboard shortcuts, you can minimize your mouse usage. There’s a helpful list of Acrobat shortcuts on the Adobe website:
A note of caution: my concern is the impact on your speed. One of the keys to being a successful independent editor is efficiency. If you’re already a seasoned mouse-independent Word and Acrobat user, and are introducing new keyboard shortcuts into your existing knowledge base, I suspect the transition will be comfortable and the impact on your speed minimal. If you’re not familiar with these programs, the tools within them, and the access keys, you’ll need practice to build your speed.
In general, though, given your extensive experience in systems development and programming, I can’t see these issues being obstacles for you, Andrew. You’ve probably forgotten more about how to navigate a computer screen than I’ve ever known!
Is a degree necessary?
If you want to copyedit for specialist scientific editing agencies, you’ll likely need at least a Master’s in a related discipline, even a doctorate.
If you plan to work for publishers or packagers (project-management agencies) with book lists in the social sciences, arts, humanities and technology, they’ll be more interested in your professional editorial training, and your ability to perform successfully in an editorial assessment.
If you wish to copyedit and proofread reports, books, journal articles, theses and dissertations for self-publishers, businesses, academics and students, focus on what you can do to solve their problems.
These days, I work exclusively for self-publishing fiction writers. They’re preparing their novels for a crowded market full of discerning readers with the ability to leave critical reviews on Amazon. My job is to help them overcome some of the problems they’ll encounter on that journey, and my website focuses on that rather than on my politics degree.
Did my politics degree help me when I worked exclusively for social science publishers? Perhaps. But I think my years of in-house publishing experience, marketing social science journals, helped more. When some years later I was proofreading a book for a well-known university press and Loïc Wacquant came up in the references but the diacritic in his first name had been omitted, I spotted it. It was my career experience that showed me the way, not my degree.
You, too, can use your IT background to demonstrate your knowledge and experience to clients. But it will only be part of the story. Ultimately, your message will need to be about them – their problems, their concerns, their challenges … and how you are part of the solution.
If you tell that story in a compelling way, you’ll build a brand identity that inspires trust and engagement, one that makes you stand out against your competitors, regardless what subject you didn’t read at university.
And though you don’t want to work exclusively on IT-related material, don’t shy away from using that as your springboard. It’s what you know, what makes you special. No one’s going to hire me to edit an IT book. Why would they when they can hire someone who speaks the language and knows the subject like the back of his hand – someone like you?
Specialize in what you know first. Diversify as the opportunities arise, and develop your brand identity as required. That way you’re playing to your strengths in the start-up phase.
I hope that helps you on your journey. Good luck!
Louise Harnby is a line editor, copyeditor and proofreader who specializes in working with crime, mystery, suspense and thriller writers.
She is an Advanced Professional Member of the Chartered Institute of Editing and Proofreading (CIEP), a member of ACES, a Partner Member of The Alliance of Independent Authors (ALLi), and co-hosts The Editing Podcast.
Visit her business website at Louise Harnby | Fiction Editor & Proofreader, say hello on Twitter at @LouiseHarnby, connect via Facebook and LinkedIn, and check out her books and courses.
She is an Advanced Professional Member of the Chartered Institute of Editing and Proofreading (CIEP), a member of ACES, a Partner Member of The Alliance of Independent Authors (ALLi), and co-hosts The Editing Podcast.
Visit her business website at Louise Harnby | Fiction Editor & Proofreader, say hello on Twitter at @LouiseHarnby, connect via Facebook and LinkedIn, and check out her books and courses.
This question is from Alison, who’s new to proofreading and still completing her professional training with one of the UK's industry-recognized bodies.
‘I would be very interested to hear your thoughts on the iPad Pro 12.9" with a stylus as a proofreading tool. I am currently using my MacBook Air.’
That’s a great question, Alison. Here’s my take on the situation:
Broadly speaking, I wouldn’t recommend a tablet as a primary professional proofreading tool because I think you’ll struggle to match the functionality available on a laptop or desktop computer.
That doesn’t mean you can’t use it in your home office to increase your screen real estate – perhaps for fact checking, referring to an onscreen style guide, displaying your online dictionary, or checking emails.
Overall, though, I think there are too many limitations for the pro proofreader. Here are some thoughts …
Proofreading and tangled terminology
Your professional training will distinguish between proofreading (annotating designed pages – page proofs) and copyediting (correcting the raw text).
This distinction will match the expectations of many traditional publishing houses, though not all.
I’ve worked for two publishers in my career whose ‘proofreading’ required me to edit raw text. We might call it a light edit, or a proofedit, or just stop beating about the bush and use the term copyedit!
What we’re talking about here is a quality-control check prior to publication. And it’s done in Word.
In this case, you’ll not be scribbling hieroglyphics on your tablet with your stylus; you’ll be directly amending the file.
iPads and Word files
I have an iPad Air. I love it for email, search, messaging, reading, listening to music and audiobooks, social media and gaming. I also like it for writing – drafting anyway. But I wouldn’t use it as a professional proofreading tool if you paid me (unless you paid me a lot to compensate for how much slower I’m going to be!).
The screen size is still too small for one thing. Now, it’s not necessary to have two mammoth screens, but I like mine! I’m happy to work on my 15” laptop when required, but that’s as low as I’ll go. The more I can fit on a screen the less I have to scroll. And that reduces the strain on my wrist.
There is a lot of functionality in the app, but I just don’t think it’s anywhere near as quick or accessible as when one’s working on a laptop or desktop. Making a decent living from professional proofreading means taking advantage of complementary efficiency and productivity tools wherever possible.
Basics like find/replace, wildcard searches, keyboard shortcuts, and the styles palette should speed you up, not slow you down.
But the biggest downside is what you’ll lose from not being able to run a whole suite of gorgeous macros that will make your life easier and improve the quality of your proofread.
You get the point!
Thus, the iPad is not a contender for working in Word for many professionals.
Here's some good news though. PerfectIt for Cloud is now available and works with Windows and iOS, so you can run it on a tablet. I've yet to test it, but it is doable.
That’s a great question, Alison. Here’s my take on the situation:
Broadly speaking, I wouldn’t recommend a tablet as a primary professional proofreading tool because I think you’ll struggle to match the functionality available on a laptop or desktop computer.
That doesn’t mean you can’t use it in your home office to increase your screen real estate – perhaps for fact checking, referring to an onscreen style guide, displaying your online dictionary, or checking emails.
Overall, though, I think there are too many limitations for the pro proofreader. Here are some thoughts …
Proofreading and tangled terminology
Your professional training will distinguish between proofreading (annotating designed pages – page proofs) and copyediting (correcting the raw text).
This distinction will match the expectations of many traditional publishing houses, though not all.
I’ve worked for two publishers in my career whose ‘proofreading’ required me to edit raw text. We might call it a light edit, or a proofedit, or just stop beating about the bush and use the term copyedit!
What we’re talking about here is a quality-control check prior to publication. And it’s done in Word.
In this case, you’ll not be scribbling hieroglyphics on your tablet with your stylus; you’ll be directly amending the file.
iPads and Word files
I have an iPad Air. I love it for email, search, messaging, reading, listening to music and audiobooks, social media and gaming. I also like it for writing – drafting anyway. But I wouldn’t use it as a professional proofreading tool if you paid me (unless you paid me a lot to compensate for how much slower I’m going to be!).
The screen size is still too small for one thing. Now, it’s not necessary to have two mammoth screens, but I like mine! I’m happy to work on my 15” laptop when required, but that’s as low as I’ll go. The more I can fit on a screen the less I have to scroll. And that reduces the strain on my wrist.
There is a lot of functionality in the app, but I just don’t think it’s anywhere near as quick or accessible as when one’s working on a laptop or desktop. Making a decent living from professional proofreading means taking advantage of complementary efficiency and productivity tools wherever possible.
Basics like find/replace, wildcard searches, keyboard shortcuts, and the styles palette should speed you up, not slow you down.
But the biggest downside is what you’ll lose from not being able to run a whole suite of gorgeous macros that will make your life easier and improve the quality of your proofread.
- StyleWriter for iPad. Doesn’t exist.
- EditTools for iPad. Doesn’t exist.
- Macros for Editors (Paul Beverley) … the iPad version. Doesn’t exist
You get the point!
Thus, the iPad is not a contender for working in Word for many professionals.
Here's some good news though. PerfectIt for Cloud is now available and works with Windows and iOS, so you can run it on a tablet. I've yet to test it, but it is doable.
iPads and PDFs
Whom you’re working for will affect things here.
If you proofread for publishers, you’ll likely be asked to work on designed-for-print page proofs. This presents a number of challenges on a tablet.
Even on a larger tablet like the one you’re considering, you won’t get a clear view of a facing recto and verso. And that means you won’t be able to check quickly for unequal page depths.
Then there are the comment and mark-up tools to consider. A stylus is great if you want to use industry-standard proofreading marks, though it’ll need to be a high-quality stylus with a fine nib if your marks are to conform to BSI 5621C.
I’ve experimented with a stylus and it wasn’t as easy as I’d hoped to annotate a PDF to professional standards. I wasted time ensuring each symbol was clear and neat, whereas if I’d been working on paper or on a laptop using digital BSI stamps, I’d have already moved on to the next annotation. Just something to bear in mind – practice will be essential if you experiment with tablet/stylus markup.
Talking of stamps, you can mark up a PDF on a laptop or desktop (Mac or PC) using digital symbols. I provide a free set (see More Resources below).
I want to mention the search function, too. One of the things I like best about marking up a PDF is the ability to do global searches for repeated errors. And while the search tool is quite neat on a tablet, it doesn’t have the range of functionality that you’d find on a laptop or desktop, particularly if you’re using pro versions of Acrobat or PDF-XChange.
And, yes, the comment and markup tools, and the bookmarking are there in the app, and again quite neat if you’re working on a basic file with very little text for a non-publisher client. But for an 80,000-word book in which you might have to make hundreds of changes, I think you’ll struggle.
Overall, the issue is one of speed. There’s a lot you can do on an iPad but I don’t think tablets in general are designed to let you move efficiently around a designed book page in the way a professional proofreader needs to.
I want to be able to see a double-page spread at a glance. Yes, I’ll need to inspect the text word by word, line by line, but I also want to be able to view the page as a whole, including its running heads, its margin and line spacing, the position of all of the various elements and whether they’re aesthetically pleasing.
I want to be able to bounce around on one page, and back and forth between pages via bookmarks, without keyboards and windows popping up all over the place while I’m working! That just slows me down, and in an age when many mainstream publishers are feeling the pinch and increasing their freelance editing rates only marginally each year, smart proofreading is essential. The more efficient you are, the better the hourly rate you’ll earn.
I recommend you stick with your MacBook Air. My friend and colleague John Espirian concurs:
'My iPad is a wonderful writing platform but I wouldn't use it for editing or proofreading in any professional capacity. A MacBook is going to win hands down on that score. I write all of my blog drafts in Byword on my iPad. I use Apple's Smart Keyboard (see More Resources for a review).
And unless you're location-independent and need to carry as little as possible, treat yourself to a second screen.
I wish you good luck with your training, Alison!
More resources
Louise Harnby is a line editor, copyeditor and proofreader who specializes in working with crime, mystery, suspense and thriller writers.
She is an Advanced Professional Member of the Chartered Institute of Editing and Proofreading (CIEP), a member of ACES, a Partner Member of The Alliance of Independent Authors (ALLi), and co-hosts The Editing Podcast.
Visit her business website at Louise Harnby | Fiction Editor & Proofreader, say hello on Twitter at @LouiseHarnby, connect via Facebook and LinkedIn, and check out her books and courses.
She is an Advanced Professional Member of the Chartered Institute of Editing and Proofreading (CIEP), a member of ACES, a Partner Member of The Alliance of Independent Authors (ALLi), and co-hosts The Editing Podcast.
Visit her business website at Louise Harnby | Fiction Editor & Proofreader, say hello on Twitter at @LouiseHarnby, connect via Facebook and LinkedIn, and check out her books and courses.
Can you proofread your own book? Here are some quick tips on formatting your Word file ... final tidy-ups to get your file in shape, and that accord with mainstream publishing standards.
Truly, nothing beats a second pair of eyes on a piece of text, short or long. I know this all too well because I’m a professional proofreader and copyeditor, but I also write – books (yup, I've self-published four times), guides, booklets and blog posts.
And I miss stuff – not because I have a problem with grammar, punctuation or spelling, but because I’m too close to the text. I see my own writing in terms of the ideas I want to convey rather than the text in front of my eyes.
That’s why I hire fellow proofreaders and editors to help make my written materials the best they can be. I don't expect those people to guarantee perfection but I do expect to them to ramp up the quality (and they've never failed me).
Here’s another thing I know – the better shape the file's in, the better the price. Editors and proofreaders are professionals and, though we love what we do, we have bills and mortgages too. So, very broadly speaking, the more intervention needed, the higher the fee.
There are things every writer can do to tidy up a piece of text by themselves, though. I’ve compiled them in one handy resource: The Author’s Proofreading Companion.
The steps in this toolkit won’t replace a rigorous professional developmental edit, line edit/copyedit and final prepublication proofread, but they will help rid your file of some of the nasties!
Here’s what the Companion shows you how to do:
Just click on the image below to get your FREE copy!
And I miss stuff – not because I have a problem with grammar, punctuation or spelling, but because I’m too close to the text. I see my own writing in terms of the ideas I want to convey rather than the text in front of my eyes.
That’s why I hire fellow proofreaders and editors to help make my written materials the best they can be. I don't expect those people to guarantee perfection but I do expect to them to ramp up the quality (and they've never failed me).
Here’s another thing I know – the better shape the file's in, the better the price. Editors and proofreaders are professionals and, though we love what we do, we have bills and mortgages too. So, very broadly speaking, the more intervention needed, the higher the fee.
There are things every writer can do to tidy up a piece of text by themselves, though. I’ve compiled them in one handy resource: The Author’s Proofreading Companion.
The steps in this toolkit won’t replace a rigorous professional developmental edit, line edit/copyedit and final prepublication proofread, but they will help rid your file of some of the nasties!
Here’s what the Companion shows you how to do:
- Remove double spaces
- Remove all rogue spaces at the beginning and end of paragraphs
- Remove double line returns
- Change hyphens used as parentheses to dashes
- Change tabbed paragraph indents to proper line indents (using Word’s ‘Styles’)
- Change a hyphen in a number span
- Find lower-case letters at the beginning of paragraphs
- Find a paragraph that ends with no punctuation
- Find a full point followed by a lower-case letter
- Change date styles with wildcard searches
- Run a confusables macro
- Remove unnecessary spaces before or after punctuation
Just click on the image below to get your FREE copy!
Hope it helps! And come back soon for more handy tips and advice designed especially for beginner writers.
Louise Harnby is a line editor, copyeditor and proofreader who specializes in working with crime, mystery, suspense and thriller writers.
She is an Advanced Professional Member of the Chartered Institute of Editing and Proofreading (CIEP), a member of ACES, a Partner Member of The Alliance of Independent Authors (ALLi), and co-hosts The Editing Podcast.
Visit her business website at Louise Harnby | Fiction Editor & Proofreader, say hello on Twitter at @LouiseHarnby, connect via Facebook and LinkedIn, and check out her books and courses.
She is an Advanced Professional Member of the Chartered Institute of Editing and Proofreading (CIEP), a member of ACES, a Partner Member of The Alliance of Independent Authors (ALLi), and co-hosts The Editing Podcast.
Visit her business website at Louise Harnby | Fiction Editor & Proofreader, say hello on Twitter at @LouiseHarnby, connect via Facebook and LinkedIn, and check out her books and courses.
If you’re an editor or proofreader who’s never once switched off Track Changes (TC) in the middle of an edit and then forgotten to toggle it back on again, congratulations – you’re a rare creature indeed!
I’m not rare. I’ve done it several times. If you’re like me, you know that sinking feeling – that you’re going to have to go back to where you stopped tracking and redo the work. I've come close to weeping when this has happened. It’s a waste of precious, precious time, pure and simple!
Until recently, my solution consisted of frequently double-checking whether TC was on or off. No big deal, you might think. After all, it’s easy enough to take your eye up to the TC button on the Review tab and see whether it’s greyed out – only a tenth of a second. But those tenths add up.
Furthermore, I’m not billing my clients for my attention to the TC button; I’m billing them for proofreading and editing. I should be focusing on the text, not distracting myself with checking that TC is on.
I could work with ‘All Markup’ (or ‘Final Showing Markup’ in earlier versions of Word) showing, but that’s just another distraction. I want my eyes and brain to focus on what my client has written, not what I’ve amended.
Paul Beverley, naturally, has the solution. It’s a macro called VisibleTrackOff4 and it’s amazing!
Even if you don’t like macros, don’t use macros, are wary of macros, this is one macro that you should consider installing anyway. Trust me. It's a lifesaver.
By the end of this article, you’ll know how to ensure you never forget you’ve switched off Track Changes. I’ll show you the following:
How it works
In brief, VisibleTrackOff4 is an alternative TC on/off switch. You run this macro instead of using Word’s TC button.
I work in Windows 10 with Word 2016. On my screen, the TC button is accessible via the ribbon in the Review tab. Your view may be slightly different.
Until recently, my solution consisted of frequently double-checking whether TC was on or off. No big deal, you might think. After all, it’s easy enough to take your eye up to the TC button on the Review tab and see whether it’s greyed out – only a tenth of a second. But those tenths add up.
Furthermore, I’m not billing my clients for my attention to the TC button; I’m billing them for proofreading and editing. I should be focusing on the text, not distracting myself with checking that TC is on.
I could work with ‘All Markup’ (or ‘Final Showing Markup’ in earlier versions of Word) showing, but that’s just another distraction. I want my eyes and brain to focus on what my client has written, not what I’ve amended.
Paul Beverley, naturally, has the solution. It’s a macro called VisibleTrackOff4 and it’s amazing!
Even if you don’t like macros, don’t use macros, are wary of macros, this is one macro that you should consider installing anyway. Trust me. It's a lifesaver.
By the end of this article, you’ll know how to ensure you never forget you’ve switched off Track Changes. I’ll show you the following:
- How it works
- How to install it
- How to run it efficiently
- Alternative versions with different formatting options
How it works
In brief, VisibleTrackOff4 is an alternative TC on/off switch. You run this macro instead of using Word’s TC button.
I work in Windows 10 with Word 2016. On my screen, the TC button is accessible via the ribbon in the Review tab. Your view may be slightly different.

When you use VisibleTrackOff4 (rather than the TC button shown above) to switch on TC, your page appears white, as usual. However, when you use it to switch off TC, your page turns yellow. As you toggle TC on and off, your page colour toggles too. If the page is yellow, you know TC is off. That’s something you can’t miss, and that’s why it’s foolproof.
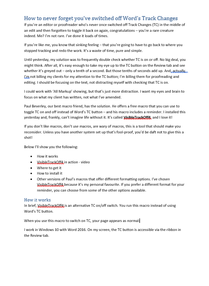
View with Track Changes ON
|
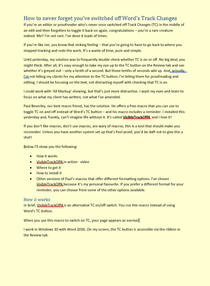
View with Track Changes OFF
|
To use the macro efficiently, you can do one of the following:
How to install it
Here’s how to install the macro:
- Create a shortcut key
- Add the macro to your Quick Access Toolbar
- Create a custom button in your ribbon (Word version 2010 onwards)
How to install it
Here’s how to install the macro:
- Download Paul’s book from his website, Archive Publications
- Open TheMacros.doc
- Search for VisibleTrackOff4
- Select and copy the script, including the title ‘Sub VisibleTrackOff4()’, right down to and including ‘End Sub’
- Open the ‘View’ tab on Word’s ribbon
- Click on the ‘Macros’ button

- A window will open (with the header ‘Macros’). Click on the ‘Step Into’ button
- This will open Visual Basic. In this will be another window (with the header ‘Normal – NewMacros (Code)’. Use the scroll bar on the right to go to the bottom. If you need help installing a macro for the first time, see ‘Another useful proofreading/editing macro: Paul Beverley’s MultiSwitch’
- Click under the last line of text
- Paste the macro script that you copied earlier
- Close Visual Basic using the ‘X’ in the top right-hand corner
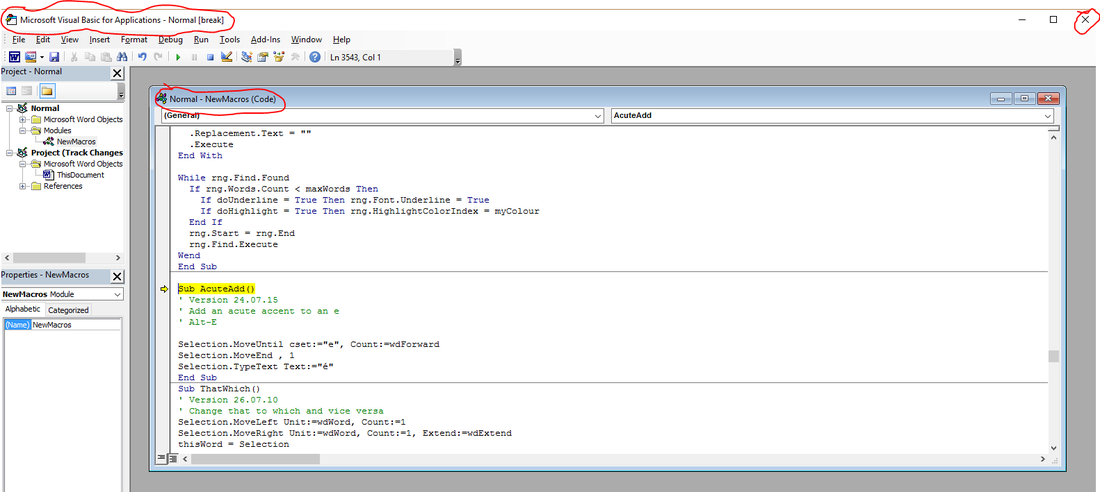
- Click ‘OK’ if you get the message ‘This command will stop the debugger’
How to run it efficiently
To switch TC on and off efficiently using VisibleTrackOff4, you can do one of the following:
- Create a shortcut key
- Add the macro to your Quick Access Toolbar
- Create a custom button in your ribbon (Word version 2010 onwards)
Create a shortcut key
- Right-click anywhere on the ribbon
- Select ‘Customize the Ribbon’, or ‘Customize Quick Access Toolbar’, depending on your software
- Click on the ‘Customize…’ button at the bottom
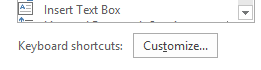
- Under ‘Categories’, select ‘Macros’
- Go to the right-hand ‘Macros’ column. Scroll down and select VisibleTrackOff4
- Type in your preferred shortcut key
- Click on the ‘Assign’ button followed by the ‘Close’ button
Add the macro to your Quick Access Toolbar
- Right-click anywhere on the ribbon
- Select ‘Customize Quick Access Toolbar’
- From the drop-down ‘Choose commands from:’ box, choose ‘Macros’
- Scroll down to find the macro and click on it
- Click on the ‘Add’ button followed by the ‘OK’ button

Create a custom button in your ribbon (Word version 2010 onwards)
- Right-click anywhere on the ribbon
- Select ‘Customize the Ribbon’
- Look to the right-hand column
- Scroll down and click on ‘Review’
- Click on the subentry ‘Tracking’
- Click the ‘New Group’ button
- Now look to the left-hand column
- From the drop-down ‘Choose commands from:’ box, choose ‘Macros’
- Scroll down to find the macro and click on it to select it
- Go back to the right-hand column and click on ‘New Group (Custom)’
- Click the ‘Add’ button followed by the ‘OK’ button
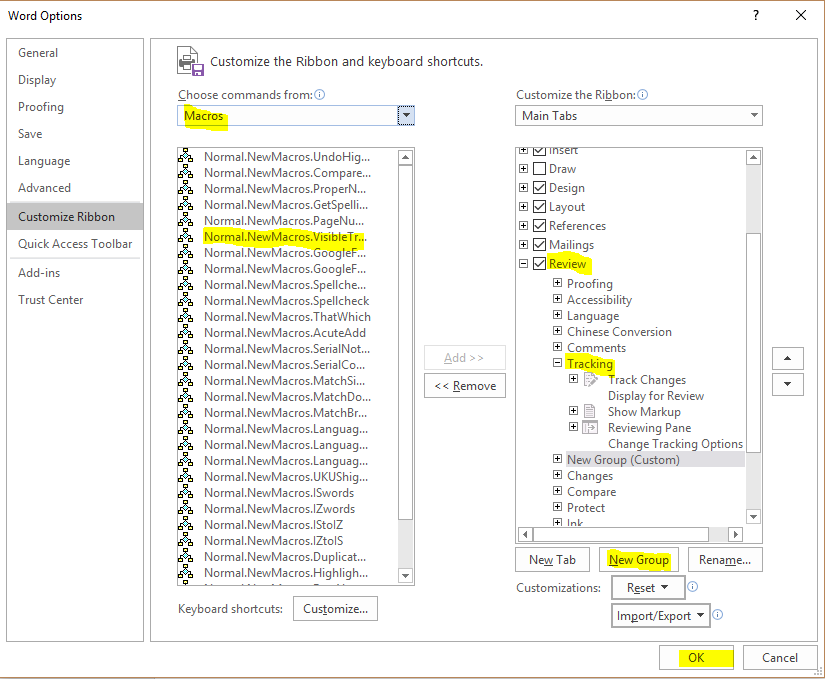
This is what your new button will look like:

Other versions
You don’t have to go for the yellow-page effect. Paul’s provided other options. The installation and quick-access instructions are the same; only the script you’ll need to copy and paste is different:
- VisibleTrackOff – embossed effect
- VisibleTrackOff2 – blue dotted underline
- VisibleTrackOff3 – wiggly lines
- TrackOnOffAudible – beeps
Summing up
I prefer the yellow-page effect because it’s so obvious, and because it doesn’t interfere with my view of the text while I’m amending with TC off.
I also prefer to run the macro with a custom ribbon-based button because it’s right up there alongside Word’s TC button, which is what I’m used to. I’ve created a shortcut key so that I have choice in the matter. This comes in handy when I need regular access to the Styles tab and don’t want to keep switching the tabs on the ribbon.
I urge you to try this macro. Remember, you need never again endure the frustration of having forgotten to switch on Track Changes!
P.S. My colleague Adrienne Montgomerie was single-handedly responsible for showing me how easy it is to customize the ribbon so that you can easily and quickly access any command. Her article ‘Make a Custom Tab on Word’s Ribbon’ is a must-read if you want to increase your onscreen efficiency.
And, as always, thanks to Paul Beverley for creating some brilliant macros, and for giving me permission to bang on about them via my blog!
Louise Harnby is a line editor, copyeditor and proofreader who specializes in working with crime, mystery, suspense and thriller writers.
She is an Advanced Professional Member of the Chartered Institute of Editing and Proofreading (CIEP), a member of ACES, a Partner Member of The Alliance of Independent Authors (ALLi), and co-hosts The Editing Podcast.
Visit her business website at Louise Harnby | Fiction Editor & Proofreader, say hello on Twitter at @LouiseHarnby, connect via Facebook and LinkedIn, and check out her books and courses.
She is an Advanced Professional Member of the Chartered Institute of Editing and Proofreading (CIEP), a member of ACES, a Partner Member of The Alliance of Independent Authors (ALLi), and co-hosts The Editing Podcast.
Visit her business website at Louise Harnby | Fiction Editor & Proofreader, say hello on Twitter at @LouiseHarnby, connect via Facebook and LinkedIn, and check out her books and courses.
MultiSwitch is another gem of created by my colleague Paul Beverley. This useful little macro speeds up onscreen editing and proofreading.
The macro is available in his free book, Computer Tools for Editors. In a nutshell, it allows you to switch around a word (or words) with a single keyboard shortcut. I use it to save time with every single Word-based project I work on.
Imagine that you’re editing or proofreading a Word file in which the author repeatedly uses ‘which’ for restrictive relative clauses. You want to change it to ‘that’. This means carrying out three small actions: select, delete and retype.
Imagine that you’re editing or proofreading a Word file in which the author repeatedly uses ‘which’ for restrictive relative clauses. You want to change it to ‘that’. This means carrying out three small actions: select, delete and retype.
That’s not a problem if the issue occurs twice in a file, but if it occurs tens or hundreds of times, those seconds are going to add up and eat into your hourly rate. And let’s not get started on the ache in your wrist!
Naturally, you might notice that a particular job has a number of similar niggles that you want to attend to, in which case this macro will be even more of a productivity-enhancer.
Give it a whirl!
MultiSwitch in action
To run MultiSwitch, you simply place your cursor before or in the word you want to change (in our example here, ‘which’), and hit your keyboard shortcut (I’ve assigned alt-3, but you can choose whatever you like). Then, bingo, the macro amends ‘which’ to ‘that’.
Here's a teeny-tiny video of me using MultiSwitch. This demo aims merely to show you where to place the cursor prior to hitting your assigned shortcut key command, and what you will see on your screen (a little flickering as the macro makes the switch).
If you don’t know how to assign a keyboard shortcut, don’t worry – I’ll show you how later in the article.
The beauty of MultiSwitch is that you need only one keyboard shortcut for a ton of different word switches. Here are a few examples from my switch list:
- that – which
- which – that
- last – past
- like – such as
- less – fewer
- will not – won't
- is not – isn't
- he is – he's
- they will – they'll
I love this macro for editing fiction because it's so quick to create contractions when I'm helping the author create a more informal narrative, or dialogue that's closer to natural speech.
Further down, I explain how to create your list – it's a doddle. Or, if you'd like to save even more time, grab a free copy of my contraction switch list. You can edit it to include your own word switches.

Installing MultiSwitch
Go to Paul’s website and download Computer Tools for Editors.
Save the zipped folder to your computer and extract three files: one is an overview of the macros – what they are, what they do, how to store them and so on – plus all the programs themselves; another contains just the actual macro programs; a third is called ‘Beginners Start Here’; and the final file is a style sheet. The file you need to open in Word is ‘The Macros’.
Use Word’s navigation menu on a Mac (or Ctrl F on a PC) to open the Find function. Type ‘Sub MultiSwitch’ into the search field and hit ‘Return’ twice. That will take you to the start of the relevant script.
Select and copy the script from ‘Sub MultiSwitch()’ down to ‘End Sub’.
Still working in Word, open the ‘View’ tab and click on the ‘Macros’ icon on the ribbon:

A new window will open.
If you don’t have any macros already loaded:
If you don’t have any macros already loaded:
- Create a test macro that you can delete later.
- First, make sure the ‘Normal.dotm’ template is showing in the ‘Macros in:’ box.
- Type ‘TEST’ into the ‘Macro name:’ box.
- Click on the ‘Create’ button.
- Your TEST macro will now show up. From now on, it’ll be easy as pie to add additional macros.
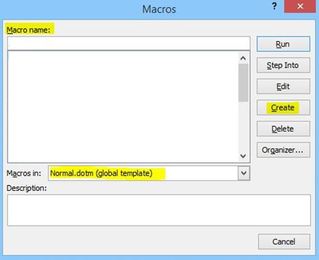
If you already have macros loaded (your TEST macro or any other):
- Click on ‘Edit’.
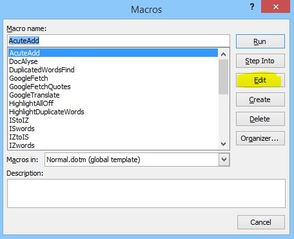
This will open up another window:
This will open up another window:

- If necessary, use the scroll bar to take you to the bottom of the text.
- Paste the MultiSwitch script at the end, under ‘End Sub’.
Don’t close this Visual Basic window quite yet – there’s something else you need to do first!
Creating your MultiSwitch list
Now head over to Word. Open a new document and call it zzSwitchList.
Create your list using the following style:
that
which
which
that
last
past
like
such as
less
fewer
Less
Fewer
it is
it's
Save it somewhere just as meaningful! Mine’s in my Macros folder, but you can save it wherever it suits you. Now close the document.
You can amend this list any time you want to – just add or delete words as you see fit.
Changing the MultiSwitch script
Now you're going to make a small amendment to the macro script so that it's personalized for you, so go back to the window into which you pasted the MultiSwitch script.
At the top of the script, you’ll see the following:
Sub MultiSwitch()
' Version 06.12.17
' Scripted word/phrase switching
maxWords = 8
listName = "zzSwitchList"
myDir = "C:\Users\Louis\Dropbox\Macros\"
' Set min number of chars for an abbreviation
minChars = 2
includeApostrophe = True
useSpike = True
' Version 06.12.17
' Scripted word/phrase switching
maxWords = 8
listName = "zzSwitchList"
myDir = "C:\Users\Louis\Dropbox\Macros\"
' Set min number of chars for an abbreviation
minChars = 2
includeApostrophe = True
useSpike = True
The text in red shows how I’ve customized the script to suit my needs – you need to put in your own location.
Now you can close the window by clicking on the ‘X’ in the top right-hand corner. Do the same with the general Visual Basic window too. Don’t worry if you get a message about a debugger – just press ‘OK’.
Creating the keyboard shortcut for running MultiSwitch
If you don't know how to create keyboard shortcuts, this section's for you. If you do know how to do this, you don't need to read any further!
I'm working in Word 2016 on a PC. If you are too, the instructions are as follows:
- In Word, select ‘File’, ‘Options’, ‘Customize Ribbon’ (1).
- Click on ‘Customize’ (2). A new box will open up entitled ‘Customize Keyboard’.
- In the ‘Categories:’ window (3), scroll down and select ‘Macros’.
- In the ‘Macros’ window (4), select ‘MultiSwitch’.
- Finally, choose your preferred keyboard combination by typing it into the ‘Press New Shortcut Key’ window (5).
- Select ‘Assign’ and ‘Close’.
(If you are working in a different version of Word, see pp. 14–15 of the ‘ComputerTools4Eds’ file in the Macros folder that you've downloaded from Paul’s site in order to install this macro. There, he provides details of the process for different versions of the software.)
The image below shows how I assigned a keyboard shortcut to another macro called ‘UndoHighlight’. The steps are exactly the same.
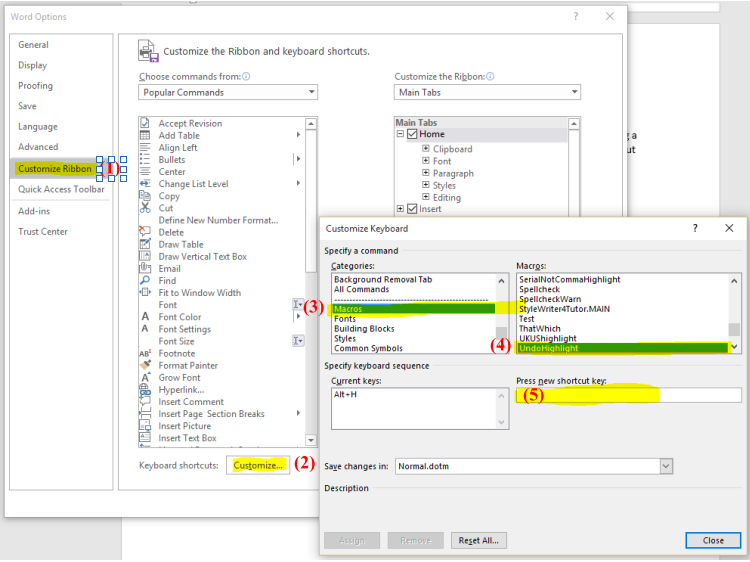
That's it! I hope this macro saves you as much time as it's saving me!
Louise Harnby is a line editor, copyeditor and proofreader who specializes in working with crime, mystery, suspense and thriller writers.
She is an Advanced Professional Member of the Chartered Institute of Editing and Proofreading (CIEP), a member of ACES, a Partner Member of The Alliance of Independent Authors (ALLi), and co-hosts The Editing Podcast.
Visit her business website at Louise Harnby | Fiction Editor & Proofreader, say hello on Twitter at @LouiseHarnby, connect via Facebook and LinkedIn, and check out her books and courses.
She is an Advanced Professional Member of the Chartered Institute of Editing and Proofreading (CIEP), a member of ACES, a Partner Member of The Alliance of Independent Authors (ALLi), and co-hosts The Editing Podcast.
Visit her business website at Louise Harnby | Fiction Editor & Proofreader, say hello on Twitter at @LouiseHarnby, connect via Facebook and LinkedIn, and check out her books and courses.
In this article, I show you how to create your own digital proofreading stamps for PDF proofreading and editing.
A caveat
I’m based in the UK so I’ll be referring to the British Standards Institution’s (BSI) BS 5261C:2005 'Marks for Copy Preparation and Proof Correction' throughout this article (readers can buy a hard-copy list of these marks from the Society for Editors and Proofreaders).
You might be used to seeing different symbols to indicate the same instructions. That’s because, depending on where you live, different standards may apply.
Compare, e.g., the Canadian Translation Bureau and BSI marks for a selection of instructions:
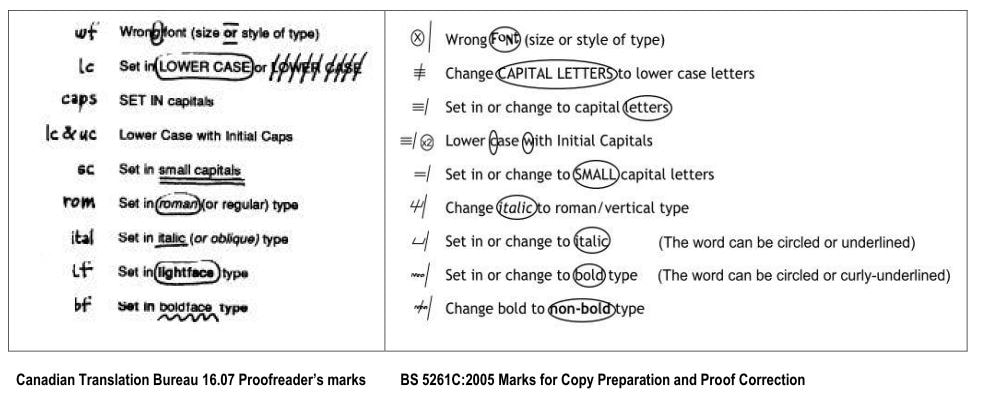
What matters is not which proof-correction language you use, but what your client requires.
Recap of existing digital resources
If you want to use the BS 5261C:2005 proof-correction marks to annotate a PDF, visit Roundup: PDF Proofreading Stamps (quick-access links). This provides the access links to a full set of downloadable PDF proofreading stamps in black, blue, and red, as well as the installation instructions.
US stamps files are available via the Copyediting-L site, under the Resources tab. Scroll down to 'Diana Stirling’s (2008) editing marks for PDF documents (Zip documents)'.
Finally, search the Editing Tools section of Katharine O’Moore-Klopf’s Copyeditors’ Knowledge Base using the key words 'PDF Editing Stamps'. This will bring up a number of other useful resources.
Why might I need to make my own stamps?
You might wish to create your own stamps for three reasons:
- The standard symbols required by your client might not be available for use on PDF. Use the resources in the above recap section in order to identify whether the mark-up language you want to work with is available digitally.
- The existing digital resources might include only the standard symbols developed by the original issuer (BSI, CMOS, CTB, etc.). However, I’ve sometimes found that I’m repeatedly making a particular amendment that isn’t covered by these standards.
For instance, a nonnative-English-speaking author may use the word 'is' when the author means 'are' repeatedly in a file. Rather than annotating the PDF using the typewriter tool for the text, and using the Replace symbol (slash mark) for each correction, it could be more efficient to create a new stamp that incorporates the text and slash mark.
In the stamps files I provide, I’ve created several nonstandard symbols that I thought would be of benefit to users, including:
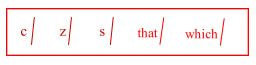
- For the sake of efficiency, you might wish to modify two existing standard digital marks. For example, I often need to change a hyphen to an en rule, and I have to stamp two symbols in the margin – the En-rule mark followed by the Replace mark. I decided to create a single symbol that incorporates both of these marks (this symbol is included in the digital stamps files that I make freely available here on my blog).

When we modify standard stamps in this way, we save time – every second we save stamping only one symbol rather than two adds up to significant increases in productivity.
Creating your own stamps
There are two ways to go about creating your own customized stamps.
First method
You can using a free snipping tool to copy a mark that you’ve drawn, typed, or found online. If I want to create a new stamp – for example, the 'change is to are' instruction mentioned above – I can use my PDF editor’s comment-and-markup tools to type the word 'are' and stamp a Replace symbol after it.
Then I simply click on my snipping tool, select 'New', and drag the cursor over the marks I’ve made. I then save this as a PNG, GIF, or JPEG. The image is now available for upload into my PDF Editor’s stamps palette.
In Windows 10, the snipping tool looks like this:
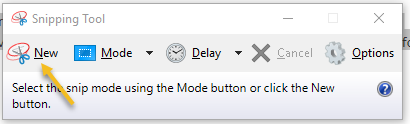
Where your snipping tool is located will depend on which version of Windows you’re using.
The advantage of using a snipping tool is that it’s very efficient. I’ve pinned my onboard Windows snipping tool to the task bar at the bottom of my screen, so it’s always accessible. If you are using an operating system that doesn’t include a snipping tool, there are of alternatives available online.
There are disadvantages to using this method:
Using the snipping tool to create stamps is recommended if you need a quick solution and you don’t think you’ll need to use the new symbol in future jobs. If you do think you’ll use your new symbol time and time again, it might be worth considering the second method.
Second method
You can use a DTP program such as Microsoft Publisher, Adobe InDesign, and QuarkXPress, or a graphics program like CorelDraw and Adobe Illustrator. I use MS Publisher because it’s included in my MS Office bundle. I’ve also found it quite easy to use – this is partly because it’s entry-level DTP software and partly because it’s an MS product so the functionality is quite similar to that of MS Word.
Once you’ve drawn your new symbol in your DTP program, you need to save the document as a PDF. This can usually be done very simply, using the 'Save as' function. The image will then be ready for upload into your PDF editor’s stamps palette.
The disadvantage of using this method is that it requires greater investment in time in the short run. I’d only recommend it if you are creating a stamp that you think will be useful for many jobs to come.
The advantages of going down the DTP route are:
Using a DTP/graphics program is more time consuming but gives a more professional finish and is worth it if you think you’ll use the new symbol in multiple jobs.
Saving and installing your new stamps
If you have used the snipping tool to create a new GIF, JPEG, or PNG stamp, you can save it wherever you wish. I usually choose the Downloads folder. Then open your PDF editor and upload the stamp.
Installing snipped images to PDF-XChange
Installing snipped images to Adobe Acrobat (v. 9)
Installing snipped images to Adobe Reader (v. XI)
I haven’t found a way to import snipped stamps into Reader; the only option is to upload stamps that have been saved as a PDF, which isn’t possible with the Windows snipping tool at least. Given that PDF-XChange is still a very affordable editor, with outstanding functionality, I’d recommend trying it as an alternative to the free Adobe Reader and the rather more expensive Acrobat Professional.
Saving and installing DTP-created images
If you have used DTP software and saved your stamps in PDF format, you may need to save into a specific folder. The installation process is a little more complicated and will depend on the PDF editor you are using. If you are using PDF-XChange, Adobe Acrobat Professional, or Adobe Reader, carefully read the installation instructions I’ve provided on The Editing Blog.
Related reading …
If you are new to PDF proofreading, you might find the following links of interest:
The advantage of using a snipping tool is that it’s very efficient. I’ve pinned my onboard Windows snipping tool to the task bar at the bottom of my screen, so it’s always accessible. If you are using an operating system that doesn’t include a snipping tool, there are of alternatives available online.
There are disadvantages to using this method:
- The definition of a snipped stamp is poor in comparison with a symbol drawn in a desktop publishing (DTP) or professional graphics program. The images usually look fuzzy, especially when enlarged.
- It’s not possible to control the size of the snipped image, so the symbol may have to be resized every time it’s stamped in the margin, which wastes time.
- Snipped stamps don’t have transparent backgrounds. This can be aesthetically unpleasing when you are stamping onto tinted pages. If you’ve created a stamp that needs to be placed in-text on a PDF, the lack of transparency will cause problems because you’ll be masking content that your client won’t want to be hidden.
Using the snipping tool to create stamps is recommended if you need a quick solution and you don’t think you’ll need to use the new symbol in future jobs. If you do think you’ll use your new symbol time and time again, it might be worth considering the second method.
Second method
You can use a DTP program such as Microsoft Publisher, Adobe InDesign, and QuarkXPress, or a graphics program like CorelDraw and Adobe Illustrator. I use MS Publisher because it’s included in my MS Office bundle. I’ve also found it quite easy to use – this is partly because it’s entry-level DTP software and partly because it’s an MS product so the functionality is quite similar to that of MS Word.
Once you’ve drawn your new symbol in your DTP program, you need to save the document as a PDF. This can usually be done very simply, using the 'Save as' function. The image will then be ready for upload into your PDF editor’s stamps palette.
The disadvantage of using this method is that it requires greater investment in time in the short run. I’d only recommend it if you are creating a stamp that you think will be useful for many jobs to come.
The advantages of going down the DTP route are:
- The finish of the stamp is more professional – the images are much sharper than the snipped versions.
- You can draw multiple stamps in a single DTP document – just make sure that each image is drawn on a new page. Then you have to save one document as a PDF from which you’ll upload your new stamps.
- You can control the size of the stamp. This may take some experimentation, but once you’ve drawn one proof-correction mark that you know produces a stamp that you can universally use on PDFs without having to resize, you can use this as a template for any future stamps you create.
- You can control the transparency of the stamp. Users of my stamps files will know that some of my symbols don’t have fully transparent backgrounds. This is something I plan to rectify when I have time!
Using a DTP/graphics program is more time consuming but gives a more professional finish and is worth it if you think you’ll use the new symbol in multiple jobs.
Saving and installing your new stamps
If you have used the snipping tool to create a new GIF, JPEG, or PNG stamp, you can save it wherever you wish. I usually choose the Downloads folder. Then open your PDF editor and upload the stamp.
Installing snipped images to PDF-XChange
- Open the PDF you wish to mark up
- From Menu: Tools > Comment and Markup Tools > Show Stamps Palette
- From Stamps Palette: Click on an existing Collection or create a new one (using the New button with a small green cross); select 'From Image'
- From a browser window: Locate your image from the folder in which you saved it, e.g., Downloads, and choose 'Open'
Installing snipped images to Adobe Acrobat (v. 9)
- Open the PDF you wish to mark up
- Click on the stamp tool on the top ribbon
- Select 'Create Custom Stamp'
- From browser window: Locate your image from the folder in which you saved it, e.g., Downloads. Note that in Acrobat you will need to choose the relevant file type in order for your symbol to show up. So if you saved your snipped image as a PNG, you’ll need to select this from the drop-down menu under file type; 'Select'; 'OK'
- You can now name your stamp and assign it to a Category (you can use an existing Category or create a new one, e.g., Proofreading)
Installing snipped images to Adobe Reader (v. XI)
I haven’t found a way to import snipped stamps into Reader; the only option is to upload stamps that have been saved as a PDF, which isn’t possible with the Windows snipping tool at least. Given that PDF-XChange is still a very affordable editor, with outstanding functionality, I’d recommend trying it as an alternative to the free Adobe Reader and the rather more expensive Acrobat Professional.
Saving and installing DTP-created images
If you have used DTP software and saved your stamps in PDF format, you may need to save into a specific folder. The installation process is a little more complicated and will depend on the PDF editor you are using. If you are using PDF-XChange, Adobe Acrobat Professional, or Adobe Reader, carefully read the installation instructions I’ve provided on The Editing Blog.
Related reading …
If you are new to PDF proofreading, you might find the following links of interest:
- PDF Editing – Making the most of the stamps tool
- Using the Stamping Tool for PDF Proofreading Mark-up
- Roundup: PDF proofreading stamps (quick-access links). This includes a link to my installation instructions; for PDF-XChange users, there’s a video tutorial as well as written instructions.
- Onscreen proofreading tips: Reorganizing your stamps palette in PDF-XChange
- Six Tips for Ergonomic PDF Proofreading
Louise Harnby is a line editor, copyeditor and proofreader who specializes in working with crime, mystery, suspense and thriller writers.
She is an Advanced Professional Member of the Chartered Institute of Editing and Proofreading (CIEP), a member of ACES, a Partner Member of The Alliance of Independent Authors (ALLi), and co-hosts The Editing Podcast.
Visit her business website at Louise Harnby | Fiction Editor & Proofreader, say hello on Twitter at @LouiseHarnby, connect via Facebook and LinkedIn, and check out her books and courses.
She is an Advanced Professional Member of the Chartered Institute of Editing and Proofreading (CIEP), a member of ACES, a Partner Member of The Alliance of Independent Authors (ALLi), and co-hosts The Editing Podcast.
Visit her business website at Louise Harnby | Fiction Editor & Proofreader, say hello on Twitter at @LouiseHarnby, connect via Facebook and LinkedIn, and check out her books and courses.
If you proofread or copyedit fiction or non-fiction, or you're self-editing your own books, here's a macro that will highlight potential inconsistencies in proper-noun usage.
I've been meaning to review some of my favourite proofreading macros for a while now and ProperNounAlyse deserves its first place in the queue (only because it performed so brilliantly on a recent proofreading project!).
ProperNounAlyse is just one tool among many, of course. Those of us who use macros on a regular basis have a whole suite of them that we run during the process of a proofread or a copy-edit.
ProperNounAlyse was created by my colleague Paul Beverley, and it’s just one of a huge number of macros available in his free book, Computer Tools for Editors (available on his website at Archive Publications).
I've written this post for the person who doesn't use macros and is nervous about trying. I think it’s such a shame when a fear of tech leads to lost opportunities for those who want to increase productivity (which is great for the editorial pro) and improve quality (which is great for the client).
Why bother? Three reasons
Go to Paul’s website and download Computer Tools for Editors.
Save the zipped folder to your computer and extract three files: One is an overview of the macros – what they are, what they do, how to store them and so on – plus all the programs themselves; another contains just the actual macro programs; and the final file is a style sheet. The file you need to open in Word is “The Macros”.
Use Word’s navigation menu (or Ctrl F on a PC) to open the Find function. Type “Sub ProperNounAlyse” into the search field and hit Return. That will take you to the start of the relevant script.
Select and copy the script from “Sub ProperNounAlyse()” down to “End Sub”. Paul’s helped us out by highlighting the name of each new macro.
Still with Word open, open the “View” tab and click on the “Macros” icon on the ribbon.
ProperNounAlyse is just one tool among many, of course. Those of us who use macros on a regular basis have a whole suite of them that we run during the process of a proofread or a copy-edit.
ProperNounAlyse was created by my colleague Paul Beverley, and it’s just one of a huge number of macros available in his free book, Computer Tools for Editors (available on his website at Archive Publications).
I've written this post for the person who doesn't use macros and is nervous about trying. I think it’s such a shame when a fear of tech leads to lost opportunities for those who want to increase productivity (which is great for the editorial pro) and improve quality (which is great for the client).
Why bother? Three reasons
- ProperNounAlyse is easy to install, even for those with absolutely no technical savvy, and quick to run.
- It’s great for picking up inconsistencies in proper nouns (even double words, e.g. Louise Harnby vs Louise Hornby) while allowing you to maintain complete control over the text. This is because it’s not changing anything in the document you’re working on; rather, it works through the text in a Word document and provides a summary analysis of what it finds. That leaves you free to identify what needs sorting and what needs leaving well enough alone. I find it particularly useful when I'm proofreading fiction with lots of characters whose names may inadvertently end up being spelled slightly differently. A writer can become so immersed in the story they’re building that these kinds of slippages are easily missed. And even the best professional proofreader is only human, so using a little bit of simple tech to complement the eyes and brain makes good sense.
- While you’ll find it useful for paid work, it’s also a sharp little tool for providing insight into the state of a file you’re being asked to quote for. One of my colleagues routinely runs this in conjunction with another couple of macros in order to get an overview of the author’s consistency. I've taken a leaf out of her book and started using ProperNounAlyse in this way too.
Go to Paul’s website and download Computer Tools for Editors.
Save the zipped folder to your computer and extract three files: One is an overview of the macros – what they are, what they do, how to store them and so on – plus all the programs themselves; another contains just the actual macro programs; and the final file is a style sheet. The file you need to open in Word is “The Macros”.
Use Word’s navigation menu (or Ctrl F on a PC) to open the Find function. Type “Sub ProperNounAlyse” into the search field and hit Return. That will take you to the start of the relevant script.
Select and copy the script from “Sub ProperNounAlyse()” down to “End Sub”. Paul’s helped us out by highlighting the name of each new macro.
Still with Word open, open the “View” tab and click on the “Macros” icon on the ribbon.

This will open up a new window.
If you don’t have any macros already loaded:
If you don’t have any macros already loaded:
- To get you going, create a test macro that you can delete later.
- First, make sure the Normal.dotm template is showing in the "Macros in:” box.
- Type TEST into the “Macro name:” box.
- Click on “Create”. Your TEST macro will now show up. From now on, it’ll be easy as pie to add additional macros.
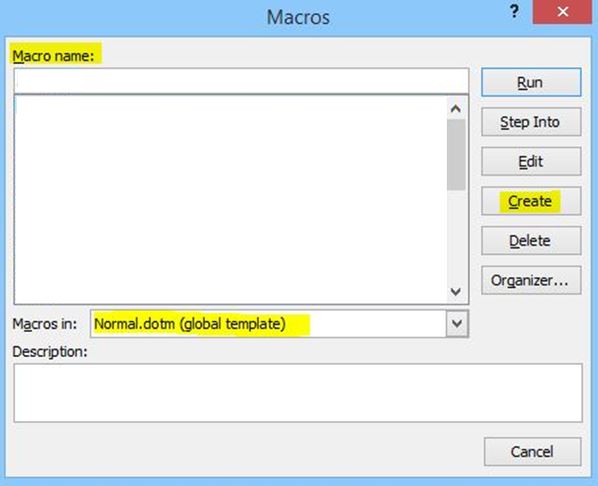
If you have macros loaded (your TEST macro or any other):
- Click on “Edit”.
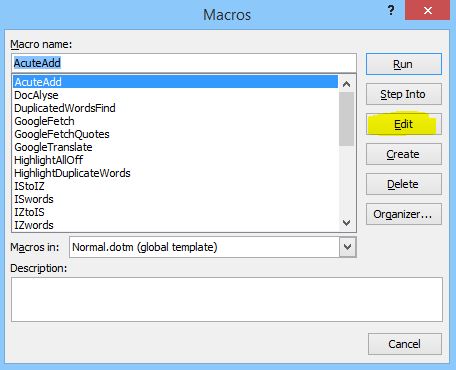
This will open up another window:
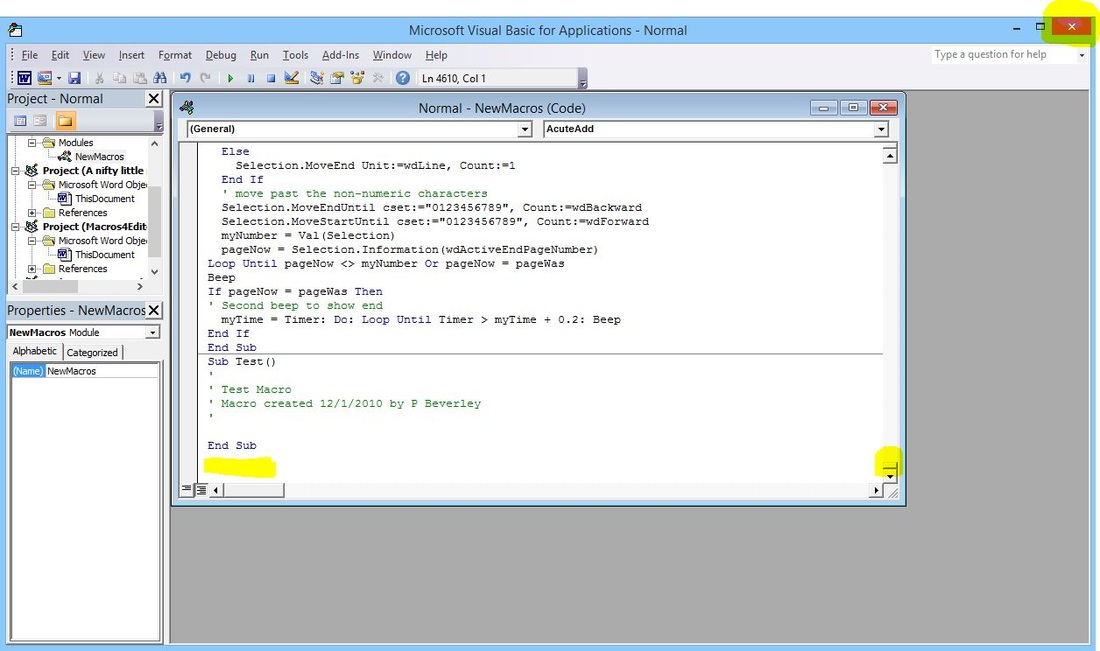
- If necessary, use the scroll bar to take you to the bottom of the text.
- Paste the ProperNounAlyse script at the end, under “End Sub”.
- Close the window using the X in the top right-hand corner.
Running ProperNounAlyse
- Open the Word file you want to analyse.
- Click the “View” tab.
- Click the “Macros” icon on the ribbon.
- Select "ProperNounAlyse" from the list.
- Click “Run”.

A fictive sample
Below is a simple word list of proper nouns with lots of inconsistencies – differences in accent use, apostrophe use and spelling.
Below is a simple word list of proper nouns with lots of inconsistencies – differences in accent use, apostrophe use and spelling.
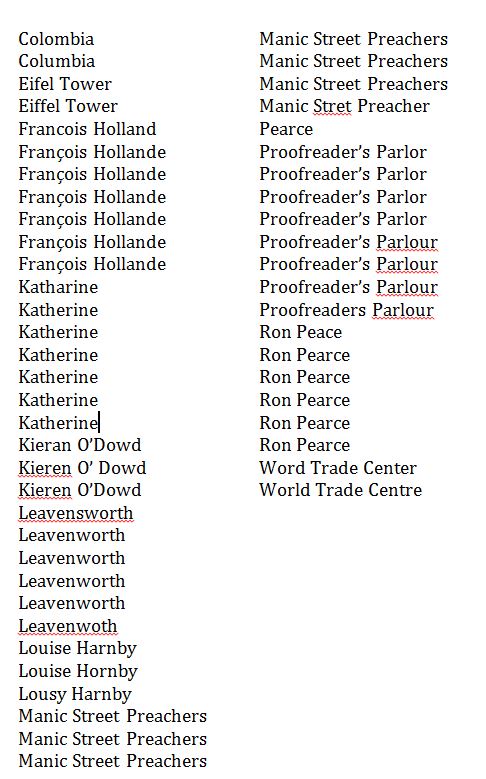
I run ProperNounAlyse on the document. It analyses the text and then creates a new Word file with the following results:
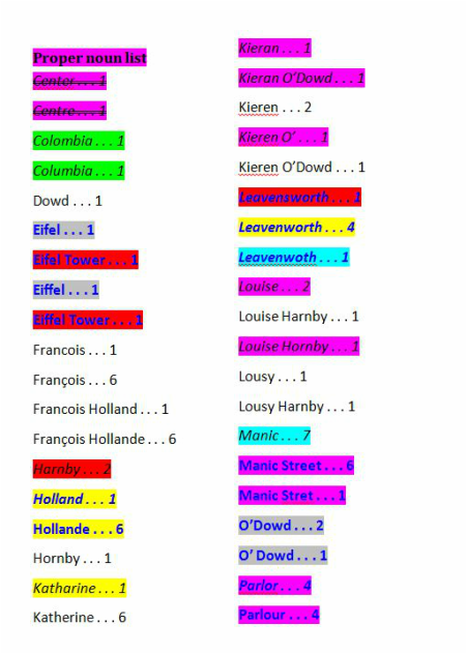
|
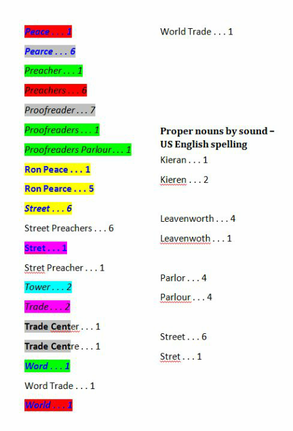
|
I’m provided with an at-a-glance summary of potential problems that I need to check. It may be that the differences identified are not mistakes, but I know what to look for.
“I don’t need to use techie tools … my eyes are good enough”
Macros don’t get tired. Macros don’t get distracted. I don’t believe any proofreader who claims they can do as good a job with their eyes alone as they can do with their eyes and some electronic assistance. It’s a case of using these kinds of tools as well as, not instead of, the eyes and brain.
I could have relied on my eyes to find all of the above problems, and in a small file I would hope to have hit the mark 100%. But if I’d been working on 100,000 words of text, and there were twenty key characters, a plethora of grammatical glitches, two major plot holes, numerous layout problems, and a mixture of hundreds of other inconsistencies regarding hyphenation, capitalization, punctuation and regional spelling variation, there would have been a lot of problems to solve; I want to utilize every tool available to help me do that.
Yes, my eyes and brain are two of those tools. But using macros like ProperNounAlyse and others (PerfectIt, for example, just because it’s another favourite!) speeds me up, pure and simple, and massively reduces the chance of a miss.
I ran ProperNounAlyse on a recent fiction proofread for an independent author who is a phenomenally good writer – great plot, excellent pacing, engaging characters. But he was so busy crafting the 95,000 words it took to build a fantastic story that he’d introduced a lot of proper-noun inconsistencies. That’s fine – it’s not his job to deal with these; it’s mine. It took me minutes, rather than hours, to locate them and deal with them. And I know I found them – every one of them.
What will the client remember?
If you’re still reluctant to try out ProperNounAlyse (or any other editorial tool for that matter), consider this: What will the client remember? The three hundred mistakes that you spotted or the three howlers you missed?
When it comes to proper nouns, especially in large volumes of character-based editorial work, it’s too easy to miss a discrepancy. And character names stand out to readers. Taking just a few minutes to run a simple-to-use macro might determine whether your client thinks your work was pretty good or outstanding.
Which of those is likely to gain you a repeat booking or a referral to another potential client?
Louise Harnby is a line editor, copyeditor and proofreader who specializes in working with crime, mystery, suspense and thriller writers.
She is an Advanced Professional Member of the Chartered Institute of Editing and Proofreading (CIEP), a member of ACES, a Partner Member of The Alliance of Independent Authors (ALLi), and co-hosts The Editing Podcast.
Visit her business website at Louise Harnby | Fiction Editor & Proofreader, say hello on Twitter at @LouiseHarnby, connect via Facebook and LinkedIn, and check out her books and courses.
She is an Advanced Professional Member of the Chartered Institute of Editing and Proofreading (CIEP), a member of ACES, a Partner Member of The Alliance of Independent Authors (ALLi), and co-hosts The Editing Podcast.
Visit her business website at Louise Harnby | Fiction Editor & Proofreader, say hello on Twitter at @LouiseHarnby, connect via Facebook and LinkedIn, and check out her books and courses.
Have you ever thought about adding a second screen to your computer setup at home? If you’re never able to cram in everything you’d like to see on a single screen, investing in a second one might be the way to go. My guest John Espirian discusses the value of increasing our screen real estate.
Switching between multiple files
As anyone who works in the editorial field knows, it can be difficult to work onscreen when one has to juggle lots of digital files. We often have to switch between Word documents, PDFs, web browser windows and lots more besides.
A single screen often isn’t enough to cope with all this at once, meaning we have to use the keyboard or mouse to jump between windows.
If this sounds familiar, you could make your working life easier by using a second screen, which is what I and many of my editorial colleagues have done.
A single screen often isn’t enough to cope with all this at once, meaning we have to use the keyboard or mouse to jump between windows.
If this sounds familiar, you could make your working life easier by using a second screen, which is what I and many of my editorial colleagues have done.
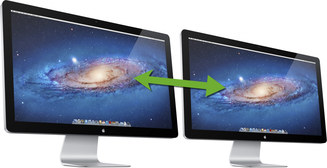
Working with two screens can be a great timesaver
Before we go any further, here are a few general tips that could help you work better with your current setup.
Tip 1: Use the keyboard to switch between programs
When switching between programs, you can save time by ignoring the mouse and keeping your hands on the keyboard. If you aren’t already using these keyboard shortcuts, start practising them now:
- Windows: press Alt-Tab
- Mac: press Cmd-Tab

Active Mac programs shown when pressing Cmd-Tab
Here’s how to use these key combinations:
- Keep your thumb down on either the Alt or Cmd key (whichever applies to your computer)
- Repeatedly press the Tab key to cycle through each open program
- Let go of both keys to switch to the selected program
Tip 2: Increase your screen resolution
Increasing your screen resolution really just means making everything appear a little smaller, which allows space for more items to fit into the viewable area.
Steps for Mac users
Steps for Mac users
- Go to the Apple menu and click System Preferences
- Click Displays
- Select a resolution from the available options

Mac screen resolution – options may look different on older machines
Steps for Windows users
* If your Control Panel layout isn’t similar to that shown in the image below, click Display and then Adjust resolution instead.
- Go to the Control Panel
- Click Adjust screen resolution*
- Select a resolution from the available options
* If your Control Panel layout isn’t similar to that shown in the image below, click Display and then Adjust resolution instead.
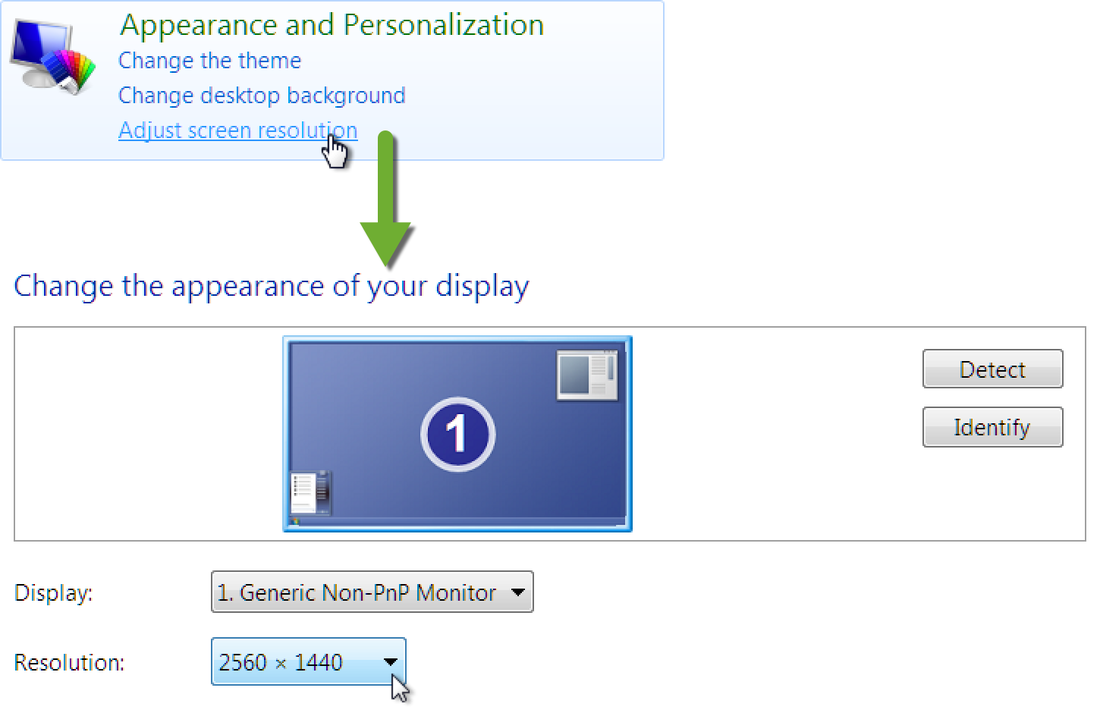
Windows screen resolution
Your screen will work best at its ‘native’ (default/recommended) resolution, but the performance may be perfectly adequate at different resolutions.
Tip 3: Be wary of straining your eyes

f.lux – manage screen colours
|
Your eyes may feel less strained if you use a program such as f.lux to change the colours on the screen throughout the day. The program gradually shifts blue tones to red tones and could be useful if you work late into the evening. Thanks to proofreader Chris Panas-Galloway for the tip.
It’s also very important to get your eyes checked regularly, especially if you spend a lot of time working onscreen. |
Visit your ophthalmologist or optometrist and make sure you’re using the right eyewear, if any.
The above tips should help us get the best from a single-screen setup. Let’s move on and see how we can boost productivity by adding a second screen.
The above tips should help us get the best from a single-screen setup. Let’s move on and see how we can boost productivity by adding a second screen.
Adding a second screen
The best advert I can give you for the benefits of having a second screen is summed up by the extended screenshot below, taken from my own desktop.
This image shows four quite wide pages side by side with space to spare. This makes for an excellent user experience and has been the perfect way for me to get things done more quickly than ever before.
This image shows four quite wide pages side by side with space to spare. This makes for an excellent user experience and has been the perfect way for me to get things done more quickly than ever before.
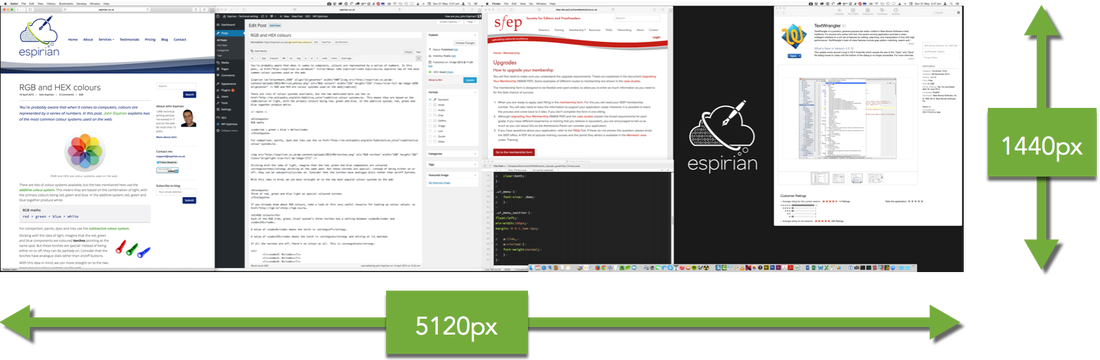
A view of my two screens – view full-resolution image (4.8MB)
Aligning and positioning screens
It’s important that your eyes are at the same level as the top of your screen(s). There’s a lot more information about how best to sit at your desk on Apple’s Eyes and Vision page.
When using two screens, try your best to keep both at very similar levels, so that your view adjusts easily between them. A pair of good quality stands with adjustable height settings will allow you to equalise the heights of the screens. This adds to the cost but is best for your long-term health – plus you should gain a little storage space underneath the stands.
Screen recommendations
Here are my general recommendations if you’re looking to buy a second screen:
Making the connection
Your screen will work best at its ‘native’ (default/recommended) resolution, but the performance may be perfectly adequate at different resolutions. Here are the commonest options:
It’s important that your eyes are at the same level as the top of your screen(s). There’s a lot more information about how best to sit at your desk on Apple’s Eyes and Vision page.
When using two screens, try your best to keep both at very similar levels, so that your view adjusts easily between them. A pair of good quality stands with adjustable height settings will allow you to equalise the heights of the screens. This adds to the cost but is best for your long-term health – plus you should gain a little storage space underneath the stands.
Screen recommendations
Here are my general recommendations if you’re looking to buy a second screen:
- Get the largest screen you can afford and that fits on your desk
- Choose the largest screen resolution available
- Make sure your computer can be connected to the screen
Making the connection
Your screen will work best at its ‘native’ (default/recommended) resolution, but the performance may be perfectly adequate at different resolutions. Here are the commonest options:
- VGA: the oldest system still in use. Opt for this only if you’re using old equipment. Expect the picture quality to be poor.
- DVI: still a common connection type on some PCs and on older Macs (pre-2008). Look carefully at the differences between this cable and the VGA one. DVI cables will always have more than VGA’s standard 15 pins.
- HDMI: the commonest connection type, popularised by High Definition (HD) televisions. Most modern PCs should have an HDMI port. Expect the picture quality to be good. The connectors are thin and wide, with two slanted sides.
- DisplayPort: perhaps the best option, found on modern Macs and high-specification PCs. Expect the picture quality to be very good. The cable looks similar to HDMI, but there is just one slanted side instead of two.
- Mini Displayport (Thunderbolt): apart from a narrower port and cable, this is a near-equivalent to DisplayPort and is now standard on almost all new Macs. Apple’s brand name for the port is Thunderbolt; for our purposes we can treat Mini DisplayPort and Thunderbolt as being the same.
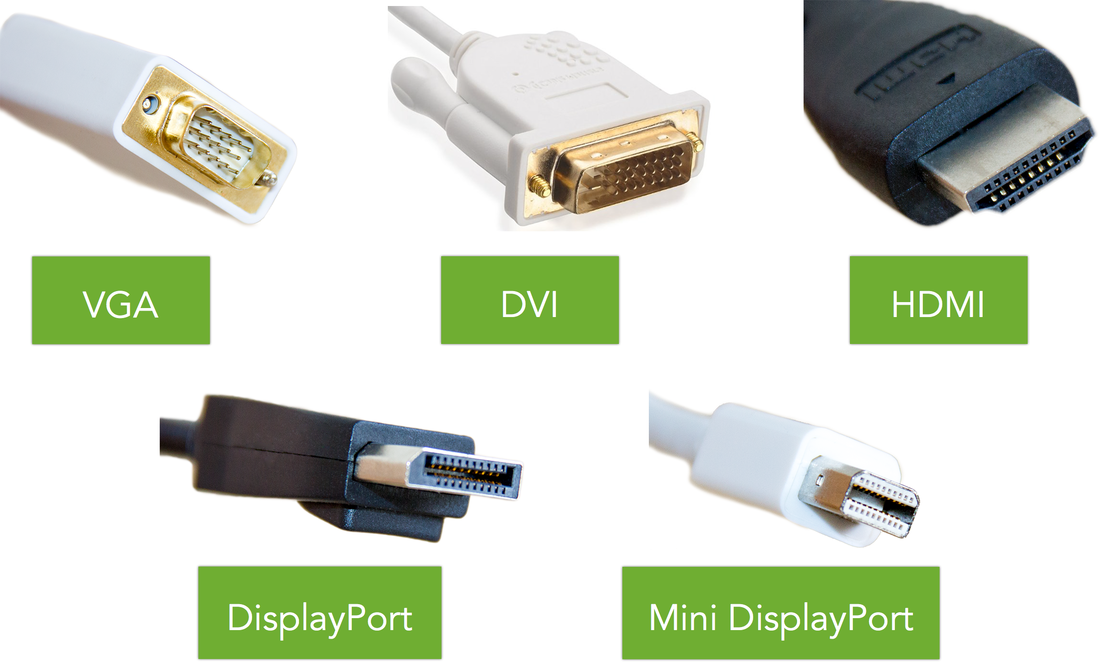
For completeness, I ought to mention that Apple’s new MacBook laptops now use a USB-C port. This means yet another type of adapter and cable is required to connect these new machines to a second screen (and at around £60, Apple’s official adapter isn’t cheap). The latest MacBook Pro and MacBook Air laptops still support Mini DisplayPort/Thunderbolt.
My own choice
My own choice
|
Having looked at several options, I decided to go for a DisplayPort-compatible screen with a 3840 × 2160 maximum resolution. In practice, running the screen at 2560 × 1440 has been more than adequate.
At a very reasonable £360, the Samsung LU28D590DS 28-inch Ultra HD LED screen suited my requirements and budget. |

Samsung LU28D590DS
|
Conclusion
Having looked at several options, I decided to go for a DisplayPort-compatible screen with a 3840 × 2160 maximum resolution. In practice, running the screen at 2560 × 1440 has been more than adequate.
What do you think? Have you added a second screen and wished you’d done it a long time ago? Post a comment below or catch up with me on Twitter.
What do you think? Have you added a second screen and wished you’d done it a long time ago? Post a comment below or catch up with me on Twitter.
John Espirian is the relentlessly helpful technical copywriter and author of Content DNA.
John writes B2B web content to help his clients explain how their products and services work. He also helps people to build a better presence on LinkedIn.
Find John at espirian.co.uk or on LinkedIn.
John writes B2B web content to help his clients explain how their products and services work. He also helps people to build a better presence on LinkedIn.
Find John at espirian.co.uk or on LinkedIn.
If you’re thinking about becoming a proofreader, it’s important to understand that this term can mean different things in different contexts and with different client groups. This article focuses on working with raw text.
What type of proofreading you want to do and which group of clients you want to be work-ready for will determine the choices you make with regard to training.
What type of proofreading you want to do and which group of clients you want to be work-ready for will determine the choices you make with regard to training.

Some proofreaders work directly with the creators of the written materials – independent authors, students and business professionals, for example.
These clients send Word files and the proofreader amends the files directly (often with Track Changes switched on so that the client can see what’s been changed).
Others work for intermediaries such as publishers and project-management agencies. Here the author supplies the text files; then the in-house project manager (PM) organizes the various elements of the production process – including copyediting, proofreading, typesetting and printing.
After copyediting and typesetting, the PM supplies page proofs to the proofreader, who makes annotations that identify where there are problems to be attended to. The proofreader does not amend the text directly.
In Part I, I gave the new entrant to the field an overview of what it’s like to be a proofreader working with page proofs. Here in Part II, I consider proofreading that involves working directly with the raw-text Word files.

Which types of client want to work in Word?
Most of the proofreading done in Word stems from having been commissioned directly by the content creator – a business executive, a self-publishing author or a student.
Academic writers, particularly those submitting articles to journals and for whom your first language is their second, are also likely to send Word files. Only one of my publisher clients asks me to proofread in Word.
What is the proofreader looking for?
It depends on the client's expectations (see below: Disadvantages) and your terms and conditions. Certainly, when it comes to proofreading for non-publisher clients, the definition of proofreading starts to look unclear and the boundaries between this and copyediting become blurred.
Unlike with page proofs, we can't check the final designed layout of the file but we still need to read every word.
Some of the issues dealt with in the list below would be acceptable to the proofreader working for an academic author but not when working with a Master's student. (Some clients might even want/expect a level of restructuring, rewriting and checking that a proofreader wouldn't consider to be within their remit.)
- Grammar, spelling and punctuation errors
- Some formatting issues (section breaks, paragraph indentation, heading styles)
- Consistency of hyphenation, spelling, punctuation style, and capitalization
- In-text citations are presented according to preferred style and can be located in the book’s references or bibliography
- Footnote/endnote markers are present and correct in the text and correspond to relevant footnotes/endnotes
What are the advantages?
What are the disadvantages?
There are still legal issues to consider …
Even if you are working directly with the primary authors of the content, you still need to get their permission to upload their text to third-party sites if you want to utilize software that's not on your computer.
The files you've been sent from Indie authors, students and businesses are their property and they send them to you in good faith, so you must get permission for their content to leave your computer.
- You're directly amending the text, so use of any software that complements your eye will be far more efficient than if you're working on page proofs (where the unformatted text has to be stripped from PDF to Word document).
- If the client is a proficient Word user and is familiar with how Track Changes works (particularly the Accept/Reject function), there is less danger that they will accidentally miss the error you've located because you're directly amending the text – you're not relying on them to actually implement the change themselves; the author would have to actively reject its inclusion. Compare this to working on page proofs: suggested amendments could be missed at the proof collation or final typesetting stage.
- One of the handiest things about working in Word is the comment-box function. Being able to record queries, leave comments about why you’ve done X or Y, and draw attention to a problem that needs the client’s consideration but that is beyond your remit are often much appreciated by clients.
What are the disadvantages?
- If the final product will be published in print, there's no post-typesetting check. Just like copyeditors and proofreaders, typesetters are human. Even the most experienced professionals may make a mistake and incorrectly format a paragraph or implement the wrong header style.
- The line between editing and proofreading becomes blurred. It's important to establish the level of intervention expected. If you're not a copyeditor you won't want to provide the deeper level of checking that one of your editing colleagues would. Not all clients understand the differences between proofreading and copyediting, so early communication and clarification about the client's requirements are essential.
- Not all clients are familiar with Word, and don't know how to 'read' the Track Changes version of a file. This can mean spending unbillable hours educating the client as to what you've done and how they can see it. Worse still, some clients may not understand how to properly accept or reject a tracked change, and accept or delete it in error. That's why it's important to establish the client's level of fluency with Word before you agree to take on the project, not after you've completed it.
- Some clients won't even consider Track Changes, and want additions to be marked in a separate colour and deletions marked as strike-throughs. When working like this, the efficiencies that you've gained by working directly within Word diminish. Others may ask you to send both a Track-Changed version and a 'clean' version because they're unsure of how to navigate the viewing panes that distinguish between 'Final: Show Markup', 'Final', 'Original: Show Markup' and 'Original'.
There are still legal issues to consider …
Even if you are working directly with the primary authors of the content, you still need to get their permission to upload their text to third-party sites if you want to utilize software that's not on your computer.
The files you've been sent from Indie authors, students and businesses are their property and they send them to you in good faith, so you must get permission for their content to leave your computer.

What does this mean for training?
Knowing the software ... If you want to proofread in Word, you'll need to be proficient in using it. Word is one of the most powerful pieces of word-processing software available, and there's a huge amount you can do with it if you want to proofread (or edit) efficiently.
You might therefore need to supplement your proofreading training with learning that focuses on using macros, making the best of Find/Replace and wildcards, using Track Changes, and Microsoft Word usage in general.
There's still the issue of how much to interfere ... If you do end up proofreading for a publisher client who wants you to work in Word, it will be necessary to consider the issue of when to leave well enough alone, as discussed in Part I.
However, independent authors looking for a proofreader may actually be expecting a deeper edit and will be disappointed if you're not prepared to rewrite sentences for them.
If you've not had experience of, or training in, editing, you may find that a 'proofreading' project ends up being a bigger bite than you can chew.
One of my colleagues feels that specific training in editing isn't always critical when working with business clients, whereas for self-publishing novelists it would be very important. I'm inclined to agree. One person might be relatively comfortable suggesting improved sentence construction to a business client but very wary of doing so with an author of fiction.
What this shows is how blurry the edges can become and how important it is to have a detailed conversation before you begin a project.
I often encourage independent fiction authors looking for a proofreader to consider commissioning editing first. Editors with both editing and proofreading skills are better placed to take on jobs for non-publisher clients that fall in the editing camp, or somewhere between editing and proofing (proofediting).
If you think you'll end up straying beyond the realm of proofreading, you might consider adding copyediting courses into your training mix. Think about what type of client you're going to be working for to help you decide what's appropriate.
Summing up …
Proofreading isn't some catch-all phrase that means the same thing to every client group. What you actually do, on which medium, how much you interfere, the extent to which you can use complementary tools, and the expectations of the client will differ greatly.
This means a range of competencies will need to be acquired depending on whom you’re working for. Your training will need to match the requirements of various client groups – a publisher’s expectations in terms of industry-recognized standards will be different from a business executive’s or student’s, so take care to research any proofreading training syllabus carefully to make sure it’s providing you with the skill set relevant to your target client group.
Your training should suit your needs, your business plan, your objectives – and what will be right for one person may not be right for another.
Read this article's sister post: Not all proofreading is the same: Part I – Working with page proofs.
Louise Harnby is a line editor, copyeditor and proofreader who specializes in working with crime, mystery, suspense and thriller writers.
She is an Advanced Professional Member of the Chartered Institute of Editing and Proofreading (CIEP), a member of ACES, a Partner Member of The Alliance of Independent Authors (ALLi), and co-hosts The Editing Podcast.
Visit her business website at Louise Harnby | Fiction Editor & Proofreader, say hello on Twitter at @LouiseHarnby, connect via Facebook and LinkedIn, and check out her books and courses.
She is an Advanced Professional Member of the Chartered Institute of Editing and Proofreading (CIEP), a member of ACES, a Partner Member of The Alliance of Independent Authors (ALLi), and co-hosts The Editing Podcast.
Visit her business website at Louise Harnby | Fiction Editor & Proofreader, say hello on Twitter at @LouiseHarnby, connect via Facebook and LinkedIn, and check out her books and courses.
If you’re thinking about becoming a professional proofreader, it’s important to understand that the term 'proofreading' can mean different things in different contexts and with different client groups. This article focuses on working with designed page proofs,
What type of proofreading you want to do and which groups of clients you want to be work-ready for will determine the choices you make with regard to training.
What type of proofreading you want to do and which groups of clients you want to be work-ready for will determine the choices you make with regard to training.
Some proofreaders work directly with the creators of the written materials being proofread – independent authors, students and business professionals, for example. These clients send Word files and the proofreader amends the files directly (often with Track Changes switched on so that the client can see what’s been changed).
Others work for intermediaries such as publishers and project management agencies. Here the author supplies the text files; then the in-house project manager (PM) organizes the various elements of the production process – including copy-editing, proofreading, typesetting and printing.
After copy-editing and typesetting, the PM supplies page proofs to the proofreader, who makes annotations that identify where there are problems to be attended to. The proofreader does not amend the text directly.
Here in Part I, I give the new entrant to the field an overview of what it’s like to be a proofreader working with page proofs. In Part II, I’ll consider proofreading work that involves working directly with the raw Word files.

What are page proofs?
Page proofs, traditionally defined, are so called because they are laid out exactly as they will appear in the final printed book. If all has gone well, what the proofreader is looking at will be almost what the reader sees if they were to walk into a bookshop, pull this title off the shelf and browse through the pages.
The layout process has been taken care of by a professional typesetter or interior formatter who designs the text in a way that is pleasing to the eye and in accordance with a publisher’s brief.
Page proofs from publishers and project management agencies are usually either in paper or PDF format. When working on paper, you'll likely still be supplied with a PDF (which comes in useful when using digital tools).
In addition to the bulk of the typeset text, page proofs include the following elements: page numbers; running heads; a contents list; copyright information; cataloguing data; figures, tables and any other finished artwork; bibliography; and perhaps an index.
The jacket may or may not be included, but there’ll usually be a title page and a half-title page.
To reiterate, the pages have been professionally designed, so your job is not only to check for any final grammar, spelling or punctuation errors that have slipped in during the production chain; you're also tasked with ensuring that the appearance of the book is consistent and correct according to the instructions given to the typesetter by the client.
Thus, you'll need to carry out a range of checks to ensure the following:
This isn't a comprehensive list but it gives you an idea of how this type of proofreading goes beyond just checking the text for typos.
Download this free proofreading checklist if your client doesn't supply you with one.
Page proofs, traditionally defined, are so called because they are laid out exactly as they will appear in the final printed book. If all has gone well, what the proofreader is looking at will be almost what the reader sees if they were to walk into a bookshop, pull this title off the shelf and browse through the pages.
The layout process has been taken care of by a professional typesetter or interior formatter who designs the text in a way that is pleasing to the eye and in accordance with a publisher’s brief.
Page proofs from publishers and project management agencies are usually either in paper or PDF format. When working on paper, you'll likely still be supplied with a PDF (which comes in useful when using digital tools).
In addition to the bulk of the typeset text, page proofs include the following elements: page numbers; running heads; a contents list; copyright information; cataloguing data; figures, tables and any other finished artwork; bibliography; and perhaps an index.
The jacket may or may not be included, but there’ll usually be a title page and a half-title page.
To reiterate, the pages have been professionally designed, so your job is not only to check for any final grammar, spelling or punctuation errors that have slipped in during the production chain; you're also tasked with ensuring that the appearance of the book is consistent and correct according to the instructions given to the typesetter by the client.
Thus, you'll need to carry out a range of checks to ensure the following:
- the running heads match the chapter title
- the chapter title matches the entry in the contents list
- the design of the various text elements is consistent (e.g. correct font, text size, use of bold/italic, consistent capitalization, correct paragraph indentation, line spacing, etc.)
- the chapter title drops are consistent throughout
- the text on facing rectos and versos (right-hand and left-hand pages) is balanced
- in-text citations are presented according to preferred style and can be located in the book's references or bibliography
- footnote/endnote markers are present and correct in text and correspond to relevant footnotes/endnotes
- odd page numbers always appear on recto pages
- bad word breaks are flagged
- part titles always appear on new recto pages
This isn't a comprehensive list but it gives you an idea of how this type of proofreading goes beyond just checking the text for typos.
Download this free proofreading checklist if your client doesn't supply you with one.

Where are you in the chain?
The proofreader is one person in a fairly lengthy chain. Different clients work in different ways but the following is not uncommon:
The process is often further complicated by the ebook creation process. Text might be digitized at different stages of the process.
The proofreader is one person in a fairly lengthy chain. Different clients work in different ways but the following is not uncommon:
- Author submits text to in-house PM.
- PM commissions a copy-editor to work (usually onscreen in Word) on the text, liaising with the author regarding queries. It’s at this point that most of the intervention occurs.
- Copy-editor returns the files to the PM.
- PM commissions a typesetter to lay out the text according to brief.
- Typesetter returns the first set of page proofs to the PM.
- PM commissions a proofreader to check the text for any final design problems and text-based errors.
- PM sends a copy of the page proofs to the author for final checking.
- Proofreader and author return their corrected page proofs to the PM.
- PM checks the corrections from both the author and the proofreader and collates them in one set of proofs. These are sent back to the typesetter.
- Typesetter implements all agreed amendments and returns the file to the PM.
- PM checks the final page proofs before sending the files to a professional printer.
The process is often further complicated by the ebook creation process. Text might be digitized at different stages of the process.

What does this mean for your working methods?
You're not actually changing anything … You can use digital tools to complement your eye – various scripted macros, consistency checkers like PerfectIt, and reference-checking software like ReferenceChecker.
To use these tools you need to strip text from a PDF of the page proofs, place it in a Word document, and then run your digital tools. Any mistakes flagged up, however, need to be marked up on the page proofs – that is, on paper or PDF (as agreed with the PM).
You don’t get to change the actual text – you only get to make marks on it (usually those little hieroglyphics that constitute, in the UK, the BS 5261C:2005 proof-correction symbols).
But you're checking everything … Recall, too, that you're paid to check every word and every page. Relevant software is a brilliant addition to any proofreader’s tool kit, but it will only go so far because the proofreader’s job goes beyond error-checking. We’re looking for layout problems, too, because we’re working on designed text – the first draft of the final page proofs.
There are legal issues … you can only use software tools that are already sitting on your PC. This is because of confidentiality issues. All of my PMs consider it unacceptable business practice for me to send the page proofs (or the text stripped from them) to a third party, as the following direct quotes demonstrate:
Confidentiality is absolutely core … We send PDFs to proofreaders in good faith. The files must not be uploaded to external websites or distributed to third parties.
We ask that anyone who receives a file from us in the course of their freelance work [...] does not share that file with anyone, does not post it to any remote server or LAN, makes no copies of it and deletes it after use.
We send files to you on the strict understanding that they are for you to use only in completing the assignment we've placed with you.

What does this mean for training?
If you want to proofread for publishers, it’s likely that you’ll be working on page proofs. This means you’ll need to learn to use the industry-recognized mark-up language effectively and efficiently, and you’ll need to be able to carry out the necessary design and layout checks.
If your training course doesn't teach you how to mark up using the relevant symbols or what to look out for in terms of layout problems, it’s probably not the right course to make you fit for publisher work.
Furthermore, you’ll have to learn not to interfere beyond your brief. Not all publishers want every single inconsistency attended to. Amendments made at page-proof stage are expensive to implement so many publishers ask for 'minimal' correction. How they define 'minimal' will vary so you’ll need to work according to a clear brief.
And if you’re not given a clear brief, you’ll need to ask for one. Assumptions about your remit are to be avoided – what one PM considers unworthy of change will be considered an essential error by another!
The business of knowing when to leave well enough alone and when to interfere is one of the trickiest issues to deal with, so doing a course that has an assessment element is a good idea if you are working with page proofs and publisher clients.
Summing up …
Proofreading isn't some catch-all phrase that means the same thing to every client group. What you actually do, on which medium, how much you interfere, the extent to which you can use complementary tools, and the expectations of the client will differ greatly.
This means a range of competencies will need to be acquired depending on whom you’re working for. Your training will need to match the requirements of various client groups – a publisher’s expectations in terms of industry-recognized standards will be different from a business executive’s or student’s, so take care to research any proofreading training syllabus carefully to make sure it’s providing you with the skill set relevant to your target client group.
Your training should suit your needs, your business plan, your objectives; and what will be right for one person may not be right for another.
In Part II, I look at proofreading for clients who want you to work directly on the text in Word; how the line between editing and proofreading can become blurred; and how this might influence the type of training you do or the work you choose to take on.
Louise Harnby is a line editor, copyeditor and proofreader who specializes in working with crime, mystery, suspense and thriller writers.
She is an Advanced Professional Member of the Chartered Institute of Editing and Proofreading (CIEP), a member of ACES, a Partner Member of The Alliance of Independent Authors (ALLi), and co-hosts The Editing Podcast.
Visit her business website at Louise Harnby | Fiction Editor & Proofreader, say hello on Twitter at @LouiseHarnby, connect via Facebook and LinkedIn, and check out her books and courses.
She is an Advanced Professional Member of the Chartered Institute of Editing and Proofreading (CIEP), a member of ACES, a Partner Member of The Alliance of Independent Authors (ALLi), and co-hosts The Editing Podcast.
Visit her business website at Louise Harnby | Fiction Editor & Proofreader, say hello on Twitter at @LouiseHarnby, connect via Facebook and LinkedIn, and check out her books and courses.
If you’re proofreading onscreen, either with my proofreading stamps or your software’s comment and mark-up tools, it’s worth spending a few minutes to set up the various onscreen elements in an ergonomic fashion as well as familiarizing yourself with basic keyboard shortcuts.
Some aspects of onscreen work are speedier – searching for and implementing global changes, for example – while moving between the various mark-up tools is not as quick as using a hand and pen. There are, however, things you can do to compensate and make your onscreen experience more effective.
1. Make the toolbar work for you
Shift the most-used elements on your toolbar so that they are near to each other and on the side of the screen with which you operate your mouse. These elements might include the typewriter, mark-up tools, text tools, and stamp and save buttons. Use your mouse to click, hold and drag the elements across the toolbar ribbon.
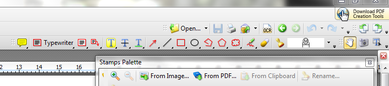
2. Use the stamps palette
Use stamps of proofreading symbols to complement the comment box and mark-up tools in your PDF editor. You can create your own or use the sets I’ve already developed. They’re available free of charge here. If you’re unfamiliar with these, see PDF Editing: Making the Most of the Stamps Tool.
Remember to keep your stamps palette open; it will save you time when selecting each stamp you want to use.
In XChange you can minimize the size of the symbols as they appear in the palette (see the highlight in the screenshot to the left). This enables you to see a greater number of stamps while you are working without having to scroll up and down the palette. In Acrobat, the palette is not as user-friendly, so use a second screen to get the best of the display.
In XChange, number similar stamps sequentially so that they appear in a logical order. This will make it easier to find the stamp you need, particularly if each palette contains a lot of symbols (If you’ve downloaded my XChange stamps simply change the number-name in order to re-sequence them).
It's useful to keep your palettes of different-coloured stamps separate so that the palettes don't become overly cluttered. Again, this will enable you to locate the stamp you need more efficiently.
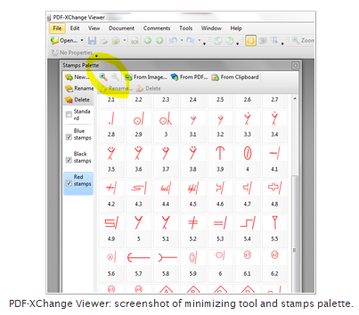
3. Hook up a second screen
I generally use a laptop, but I hook up my old desktop screen to enable me to use two screens at once when I’m doing onscreen work. This works well on three counts:
4. Utilize basic keyboard shortcuts
These are my preferred keyboard shortcuts when working with PDFs. There are many, many more but I like these because all but one can be managed easily with one hand.
Alt Tab: this is one of my most-used keyboard short cuts and is especially useful if you only have one screen to work on and need to flit between different programs or files.
Ctrl S: save
Ctrl C: copy
Ctrl X: cut
Ctrl V: paste
Ctrl Z: undo
Ctrl A: select all
Ctrl Shift F: opens search window
5. Bookmark key pages
If you refer back to the same key pages time and again and your client hasn’t already bookmarked these (contents, part titles, chapter first page, bibliography, index etc.), it’s easy to do it yourself and will save you time. Use Ctrl B to open the bookmark function in Acrobat, PDF-XChange or PDF-XChange Viewer and name your page.
6. Use a snipping tool to make your own quickie stamps
If you are constantly using a particular combination of mark-up symbols in a piece of work (e.g. you have to change A to Å many times), you can make your own quickie stamp using a snipping tool. Windows supplies this, but if your operating system doesn’t there are plenty of free alternatives online. Pin it to the task bar at the bottom of your screen to access it quickly.
In the case given above, you would use the typewriter to print Å on your PDF, followed by the replace-slash stamp. Use your snipping tool to draw round both marks and save. Then import your new stamp into your palette. Now you only have to make one click, not two, in order to make the margin mark.
I generally use a laptop, but I hook up my old desktop screen to enable me to use two screens at once when I’m doing onscreen work. This works well on three counts:
- The desktop screen is larger, so it’s much more comfortable to work on. I can enlarge the PDF view to 150%, which displays most of the page on the screen while presenting the text in a size that’s easy on the eye.
- A larger screen means you can expand your stamps palette in a way that will maximize the number of stamps on show without interfering with your PDF page.
- It’s inconvenient and time-consuming when you want to write a query to the client only to have the comment box open up under another element, which then has to be moved. To avoid this, you can slide elements such as the Search window and Comments List over to the smaller screen so that they are visible and usable at all times, but not taking up the grey space where the comment boxes appear.
4. Utilize basic keyboard shortcuts
These are my preferred keyboard shortcuts when working with PDFs. There are many, many more but I like these because all but one can be managed easily with one hand.
Alt Tab: this is one of my most-used keyboard short cuts and is especially useful if you only have one screen to work on and need to flit between different programs or files.
Ctrl S: save
Ctrl C: copy
Ctrl X: cut
Ctrl V: paste
Ctrl Z: undo
Ctrl A: select all
Ctrl Shift F: opens search window
5. Bookmark key pages
If you refer back to the same key pages time and again and your client hasn’t already bookmarked these (contents, part titles, chapter first page, bibliography, index etc.), it’s easy to do it yourself and will save you time. Use Ctrl B to open the bookmark function in Acrobat, PDF-XChange or PDF-XChange Viewer and name your page.
6. Use a snipping tool to make your own quickie stamps
If you are constantly using a particular combination of mark-up symbols in a piece of work (e.g. you have to change A to Å many times), you can make your own quickie stamp using a snipping tool. Windows supplies this, but if your operating system doesn’t there are plenty of free alternatives online. Pin it to the task bar at the bottom of your screen to access it quickly.
In the case given above, you would use the typewriter to print Å on your PDF, followed by the replace-slash stamp. Use your snipping tool to draw round both marks and save. Then import your new stamp into your palette. Now you only have to make one click, not two, in order to make the margin mark.

Related articles
To access the stamps files, see the article Free Downloadable Proofreading Stamps. For a more detailed look at using stamps for onscreen work, go to PDF Editing: Making the Most of the Stamps Tool. For installation instructions, click here.
Anything to share?
Do you have any tips to share for more efficient onscreen work, such as favourite keyboard shortcuts or using function keys? Please share them with us in the Comments section below so that we can all improve our onscreen working experience.
Louise Harnby is a line editor, copyeditor and proofreader who specializes in working with crime, mystery, suspense and thriller writers.
She is an Advanced Professional Member of the Chartered Institute of Editing and Proofreading (CIEP), a member of ACES, a Partner Member of The Alliance of Independent Authors (ALLi), and co-hosts The Editing Podcast.
FIND OUT MORE
> Get in touch: Louise Harnby | Fiction Editor & Proofreader
> Connect: Twitter at @LouiseHarnby, Facebook and LinkedIn
> Learn: Books and courses
> Discover: Resources for authors and editors

PDF MARKUP

AUTHOR RESOURCES

EDITOR RESOURCES


TESTIMONIALS
Dare Rogers
'Louise uses her expertise to hone a story until it's razor sharp, while still allowing the author’s voice to remain dominant.'
Jeff Carson
'I wholeheartedly recommend her services ... Just don’t hire her when I need her.'
J B Turner
'Sincere thanks for a beautiful and elegant piece of work. First class.'
Ayshe Gemedzhy
'What makes her stand out and shine is her ability to immerse herself in your story.'
Salt Publishing
'A million thanks – your mark-up is perfect, as always.'
CATEGORIES
All
Around The World
Audio Books
Author Chat
Author Interviews
Author Platform
Author Resources
Blogging
Book Marketing
Books
Branding
Business Tips
Choosing An Editor
Client Talk
Conscious Language
Core Editorial Skills
Crime Writing
Design And Layout
Dialogue
Editing
Editorial Tips
Editorial Tools
Editors On The Blog
Erotica
Fiction
Fiction Editing
Freelancing
Free Stuff
Getting Noticed
Getting Work
Grammar Links
Guest Writers
Indexing
Indie Authors
Lean Writing
Line Craft
Link Of The Week
Macro Chat
Marketing Tips
Money Talk
Mood And Rhythm
More Macros And Add Ins
Networking
Online Courses
PDF Markup
Podcasting
POV
Proofreading
Proofreading Marks
Publishing
Punctuation
Q&A With Louise
Resources
Roundups
Self Editing
Self Publishing Authors
Sentence Editing
Showing And Telling
Software
Stamps
Starting Out
Story Craft
The Editing Podcast
Training
Types Of Editing
Using Word
Website Tips
Work Choices
Working Onscreen
Working Smart
Writer Resources
Writing
Writing Tips
Writing Tools
ARCHIVES
July 2024
June 2024
May 2024
April 2024
March 2024
October 2023
August 2023
July 2023
June 2023
May 2023
April 2023
March 2023
January 2023
December 2022
November 2022
October 2022
September 2022
August 2022
July 2022
June 2022
May 2022
April 2022
March 2022
February 2022
January 2022
December 2021
November 2021
October 2021
September 2021
August 2021
July 2021
June 2021
May 2021
April 2021
March 2021
February 2021
January 2021
December 2020
November 2020
October 2020
September 2020
August 2020
July 2020
June 2020
May 2020
April 2020
March 2020
February 2020
January 2020
December 2019
November 2019
October 2019
September 2019
August 2019
July 2019
June 2019
May 2019
April 2019
March 2019
February 2019
January 2019
December 2018
November 2018
October 2018
September 2018
August 2018
July 2018
June 2018
May 2018
April 2018
March 2018
February 2018
January 2018
December 2017
November 2017
October 2017
September 2017
August 2017
July 2017
June 2017
May 2017
April 2017
March 2017
February 2017
January 2017
December 2016
November 2016
October 2016
September 2016
June 2016
May 2016
April 2016
March 2016
February 2016
January 2016
December 2015
November 2015
October 2015
September 2015
July 2015
June 2015
May 2015
March 2015
February 2015
January 2015
November 2014
October 2014
September 2014
August 2014
July 2014
June 2014
March 2014
January 2014
November 2013
October 2013
September 2013
August 2013
June 2013
February 2013
January 2013
November 2012
October 2012
September 2012
August 2012
July 2012
June 2012
May 2012
April 2012
March 2012
February 2012
January 2012
December 2011
 RSS Feed
|
|
|
|

|

|
|
|
|

© 2011–2024 Louise Harnby