

|
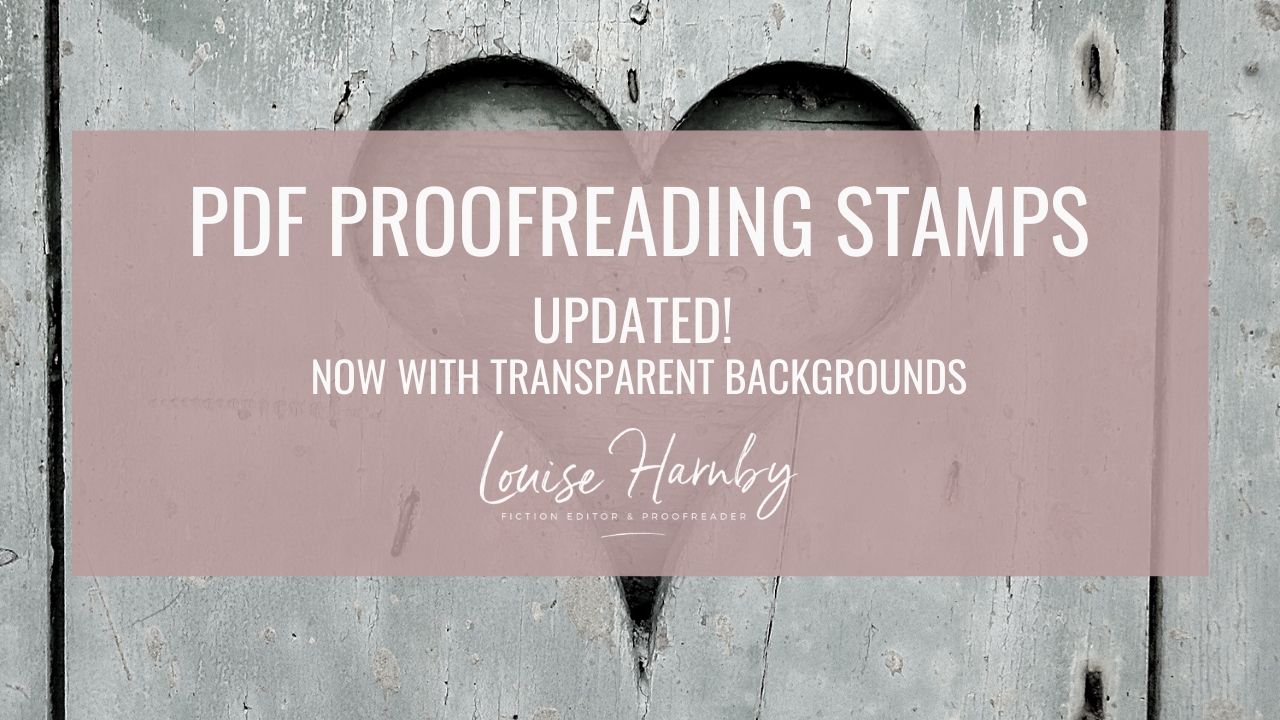
Want to mark up greyscale and colour PDFs digitally? My upgraded BSI-compliant stamps now have fully transparent backgrounds and are completely free to download.
Many of my colleagues have been using these PDF proofreading stamps for years. And they worked fine as long as the markup area was white.
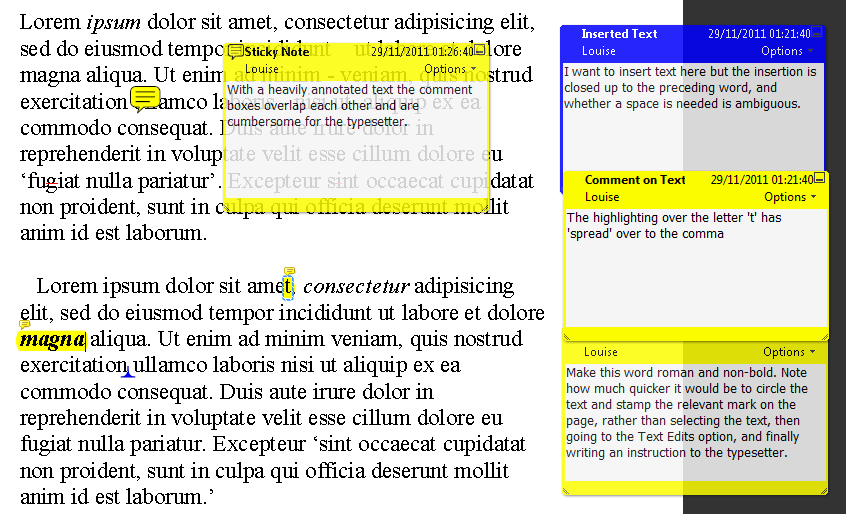
However, when it came to annotating tinted elements, the markup looked messy. That's because when I created the stamps back in 2012 – all 113 of them – I took design shortcuts that meant some stamps didn’t have transparent backgrounds. I knew some of the stamps weren’t perfect but creating three sets had been backbreaking work and, if I'm honest, I couldn’t face returning to the project and redrawing them. Eight years on, I decided to review the position. And, in fact, amending the problem stamps turned out to be not nearly as onerous a task as I’d expected. What the new stamps look like Below is a mock-up to show you the improvements. All the stamps now have transparent backgrounds, which means you can place them anywhere on the PDF page regardless of whether you’re marking up on white space, tinted boxes or photographs. 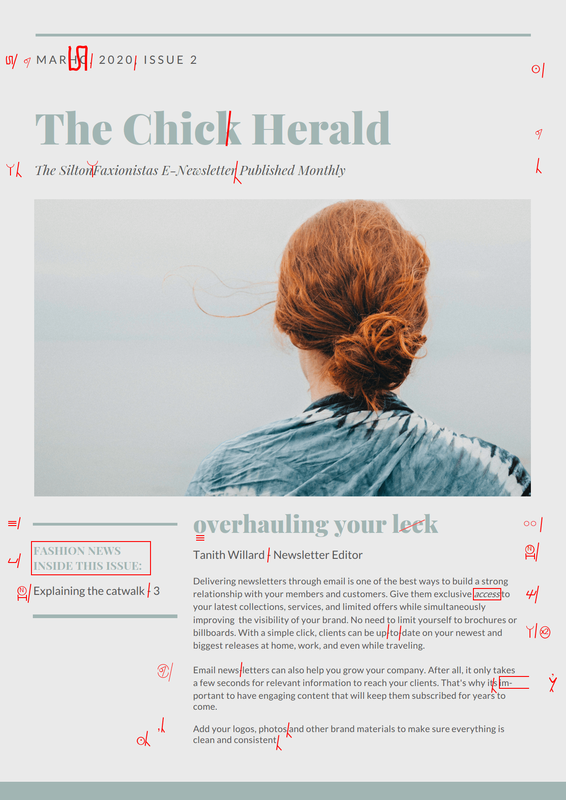
Advantages of using stamps
If you're happy with your PDF editor's onboard annotation tools, great; carry on using them. However, some proofreaders choose to add these stamps to their editing toolbox for the following reasons:
Click on the button below to access the updated stamps. They come in red, blue and black, and can be with with Windows and Mac OS.
Louise Harnby is a line editor, copyeditor and proofreader who specializes in working with crime, mystery, suspense and thriller writers.
She is an Advanced Professional Member of the Chartered Institute of Editing and Proofreading (CIEP), a member of ACES, a Partner Member of The Alliance of Independent Authors (ALLi), and co-hosts The Editing Podcast. Visit her business website at Louise Harnby | Fiction Editor & Proofreader, say hello on Twitter at @LouiseHarnby, connect via Facebook and LinkedIn, and check out her books and courses.
6 Comments
If you're starting out on your journey as a professional proofreader and you're marking up PDF proofs, this one's for you.
There was a time when if a publisher commissioned me for a proofreading project I could expect a large, heavy parcel of paper to turn up in the mailbox. The parcel would contain at least the final page proofs (see Not all proofreading is the same: Part I – Working with page proofs).
If I was required to proofread against copy, the parcel would also include the galley proofs (a printed copy of the pages of raw text supplied by the author on which the copy-editor had marked initial corrections). Paper proofreading is an expensive business before the publisher has even paid the editorial freelancer’s invoice. And it’s a double whammy – the client has to pay for the proofs (and possibly the galleys) to be delivered to the proofreader, and it has to bear the costs of the return postage. I’ve worked on large academic books in the past that incurred postage and packaging costs of over £70 per proofreading project. And let’s not talk about the cost of paper and ink. It’s not surprising, then, that some publishers and project-management agencies have embraced cost-effective solutions. PDF markup has proved to be an effective alternative. Digital delivery costs nothing as long as the client and proofreader already have internet access. It’s not just good news for the client – the proofreader benefits, too. I live in rural Norfolk and have to drive to my nearest post office. That’s time that I can’t bill for, not to mention the wear and tear on my car (though HM Revenue & Customs does have a mileage allowance). Even so, I have better things to do. Visits to the post office aside, many proofreaders have found PDF proofreading to be a more efficient task than paper-based work. For those of us working for publishers on a fixed-fee basis per project, this means a better hourly rate. Given that some publishers haven’t increased their freelance rates for many years (or have done so but only minimally), such efficiencies can mean the difference for the proofreader between continuing the working relationship and waving goodbye to the client. The proofreader’s options for PDF markup Most PDF editing software includes onboard commenting and markup tools for annotation purposes so that the proofreader can:
Stamps (digital proofreading marks) are another option. See 'The Proofreader’s Corner: Using the Stamping Tool for PDF Proofreading Mark-up', An American Editor, September 2015, for an overview of the subject. The Working Onscreen archive on The Editing Blog has other related content that may be of interest to new entrants to the field. Platforms include (but are not limited to): Futureproofs (client pays for use of platform), PDF-XChange (considerably cheaper and trusted alternative to Acrobat Pro with excellent functionality), Acrobat Professional (well-known and trusted but expensive) and Adobe Reader (free, and increasingly user-friendly. Latest version is DC). Potential pitfalls to avoid Onscreen proofreading can save the proofreader and the client time and money, but there are a number of pre-project steps that should be taken to ensure that the final outcome is a happy experience for all parties. Making assumptions based on your own preferences, or your colleagues’ experiences, could lead to readability and compatibility problems. Ask your client what they want Ask your client what their preferences are rather than making assumptions. Be prepared to be flexible. Some publishers have streamlined their production processes and have a strict set of guidelines concerning which annotation tools should be used for digital proofreading. Some clients will be happy for you to use digital stamps based on publishing-industry-recognized markup symbols. Others might insist on sticking to a particular PDF editor’s onboard comment-and-markup tools. Yet others may expect a mixture of both. Some may even want you to actually edit, rather than just annotate, the PDF (though this is very risky as it could interfere drastically with the layout of professionally typeset page proofs). Some publishers are experimenting with Futureproofs (which has its own onboard markup system – for a review, see my article Digital proofreading using Futureproofs, November 2015). I merrily used the onboard commenting tool for a Spanish business client for two years, assuming wrongly that she wouldn't have a clue what the British Standards Institution proof-correction symbols were. She then surprised me by asking whether I knew how to use the “more efficient standard proofreading markup language”. I was happy to oblige, using stamps, because it was quicker for me, but I’d wasted precious time for two years because I’d made a flawed assumption. Test the platform Once you've agreed with your client on how you will mark up the PDF, do a small test to check that both of you are seeing the same annotations and that the markup “sticks” during the delivery process. For example, I wanted to use the stamping tool in PDF-XChange on a recent project with a new client. We agreed in principle that this was acceptable.
File size Some marked-up PDFs can be huge. A client once sent me a PDF of 2,329 KB. By the time I'd stamped it, it was 25,395 KB (I zipped it down to 23,646 KB). If your email provider won’t handle large files, you will need to agree an alternative delivery system with your client. Examples could include setting up a shared file in Dropbox, uploading directly to the client’s ftp site or using the likes of FileZilla, or transferring via an internet-based service such as WeTransfer. Again, don’t assume that what suits you will suit your client. One of my project managers was happy in principle to use Dropbox (which I have) but then found out via her IT department that she wasn’t allowed to download the software to her PC. We had to work out an alternative. Up-to-date software Keep your software up to date. Perhaps Acrobat Standard (version 9) or PDF-XChange Viewer worked for you and your clients three years ago. However, the clients you’ve inherited recently are working with different software or more updated versions of existing tools. Installing regular updates and upgrading to the latest versions can help to reduce the risk of compatibility and readability issues at either your end or your client’s. Resource guide
Louise Harnby is a line editor, copyeditor and proofreader who specializes in working with crime, mystery, suspense and thriller writers.
She is an Advanced Professional Member of the Chartered Institute of Editing and Proofreading (CIEP), a member of ACES, a Partner Member of The Alliance of Independent Authors (ALLi), and co-hosts The Editing Podcast.
In this article, I show you how to create your own digital proofreading stamps for PDF proofreading and editing.  A caveat I’m based in the UK so I’ll be referring to the British Standards Institution’s (BSI) BS 5261C:2005 'Marks for Copy Preparation and Proof Correction' throughout this article (readers can buy a hard-copy list of these marks from the Society for Editors and Proofreaders). You might be used to seeing different symbols to indicate the same instructions. That’s because, depending on where you live, different standards may apply. Compare, e.g., the Canadian Translation Bureau and BSI marks for a selection of instructions: 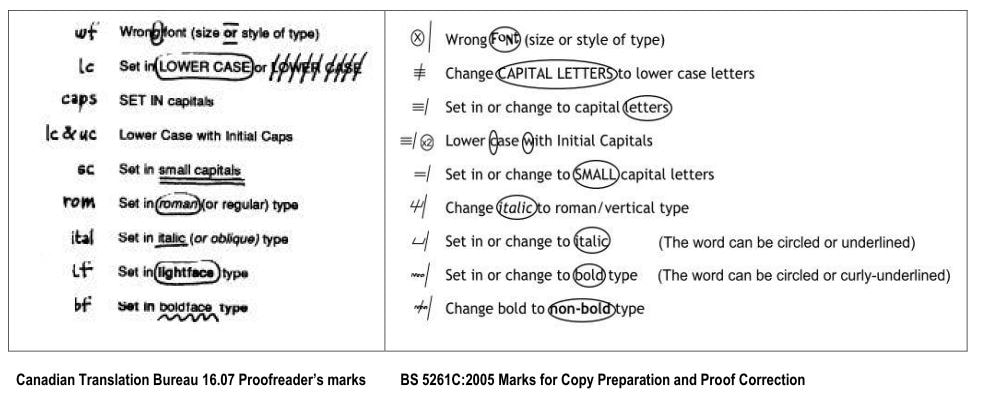 What matters is not which proof-correction language you use, but what your client requires. Recap of existing digital resources If you want to use the BS 5261C:2005 proof-correction marks to annotate a PDF, visit Roundup: PDF Proofreading Stamps (quick-access links). This provides the access links to a full set of downloadable PDF proofreading stamps in black, blue, and red, as well as the installation instructions. US stamps files are available via the Copyediting-L site, under the Resources tab. Scroll down to 'Diana Stirling’s (2008) editing marks for PDF documents (Zip documents)'. Finally, search the Editing Tools section of Katharine O’Moore-Klopf’s Copyeditors’ Knowledge Base using the key words 'PDF Editing Stamps'. This will bring up a number of other useful resources. Why might I need to make my own stamps? You might wish to create your own stamps for three reasons:
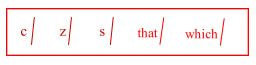
 When we modify standard stamps in this way, we save time – every second we save stamping only one symbol rather than two adds up to significant increases in productivity. Creating your own stamps There are two ways to go about creating your own customized stamps. First method You can using a free snipping tool to copy a mark that you’ve drawn, typed, or found online. If I want to create a new stamp – for example, the 'change is to are' instruction mentioned above – I can use my PDF editor’s comment-and-markup tools to type the word 'are' and stamp a Replace symbol after it. Then I simply click on my snipping tool, select 'New', and drag the cursor over the marks I’ve made. I then save this as a PNG, GIF, or JPEG. The image is now available for upload into my PDF Editor’s stamps palette. In Windows 10, the snipping tool looks like this: 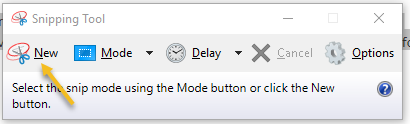 Where your snipping tool is located will depend on which version of Windows you’re using. The advantage of using a snipping tool is that it’s very efficient. I’ve pinned my onboard Windows snipping tool to the task bar at the bottom of my screen, so it’s always accessible. If you are using an operating system that doesn’t include a snipping tool, there are of alternatives available online. There are disadvantages to using this method:
Using the snipping tool to create stamps is recommended if you need a quick solution and you don’t think you’ll need to use the new symbol in future jobs. If you do think you’ll use your new symbol time and time again, it might be worth considering the second method. Second method You can use a DTP program such as Microsoft Publisher, Adobe InDesign, and QuarkXPress, or a graphics program like CorelDraw and Adobe Illustrator. I use MS Publisher because it’s included in my MS Office bundle. I’ve also found it quite easy to use – this is partly because it’s entry-level DTP software and partly because it’s an MS product so the functionality is quite similar to that of MS Word. Once you’ve drawn your new symbol in your DTP program, you need to save the document as a PDF. This can usually be done very simply, using the 'Save as' function. The image will then be ready for upload into your PDF editor’s stamps palette. The disadvantage of using this method is that it requires greater investment in time in the short run. I’d only recommend it if you are creating a stamp that you think will be useful for many jobs to come. The advantages of going down the DTP route are:
Using a DTP/graphics program is more time consuming but gives a more professional finish and is worth it if you think you’ll use the new symbol in multiple jobs. Saving and installing your new stamps If you have used the snipping tool to create a new GIF, JPEG, or PNG stamp, you can save it wherever you wish. I usually choose the Downloads folder. Then open your PDF editor and upload the stamp. Installing snipped images to PDF-XChange
Installing snipped images to Adobe Acrobat (v. 9)
Installing snipped images to Adobe Reader (v. XI) I haven’t found a way to import snipped stamps into Reader; the only option is to upload stamps that have been saved as a PDF, which isn’t possible with the Windows snipping tool at least. Given that PDF-XChange is still a very affordable editor, with outstanding functionality, I’d recommend trying it as an alternative to the free Adobe Reader and the rather more expensive Acrobat Professional. Saving and installing DTP-created images If you have used DTP software and saved your stamps in PDF format, you may need to save into a specific folder. The installation process is a little more complicated and will depend on the PDF editor you are using. If you are using PDF-XChange, Adobe Acrobat Professional, or Adobe Reader, carefully read the installation instructions I’ve provided on The Editing Blog. Related reading … If you are new to PDF proofreading, you might find the following links of interest:
Louise Harnby is a line editor, copyeditor and proofreader who specializes in working with crime, mystery, suspense and thriller writers. She is an Advanced Professional Member of the Chartered Institute of Editing and Proofreading (CIEP), a member of ACES, a Partner Member of The Alliance of Independent Authors (ALLi), and co-hosts The Editing Podcast. Visit her business website at Louise Harnby | Fiction Editor & Proofreader, say hello on Twitter at @LouiseHarnby, connect via Facebook and LinkedIn, and check out her books and courses.
In this article, I provide an overview of PDF proofreading mark-up using the stamping tool.
When I first started my business, I was strictly a proofreader and most of my work was on paper.
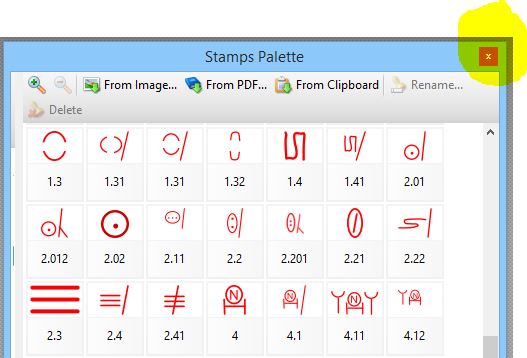
Back in 2006, I was working primarily for publishers. These clients often wanted me to proofread against copy rather than blind. That meant that I was receiving large packages through the mail containing not only the final page proofs but also the galley proofs. Postage costs were huge, though my clients bore the cost; but I still had to factor in the time I spent either waiting for couriers or hopping into my car and driving to the post office so that I could return the galleys and marked-up proofs. These days, things are different. Most publishers have embraced digital mark-up. I'm still required to work on final page proofs, and the clients still like me to annotate using UK-industry-standard mark-up language, but I can do it all onscreen – using my PDF editor’s commenting and mark-up tools – and the stamping tool. This saves the publisher money by eliminating postage costs and removing the need to print hundreds of pages of hard copy. It also saves me time, and, for those of us in the business of editorial freelancing, time is money. Most editorial professionals have already embraced digital mark-up (either on PDF or in Word). Little of what follows may be news to them. Even though this article is aimed at the novice who's in the process of investigating digital workflows and the tools available to assist them, experienced professionals, and professionals seeking to expand into proofreading, are likely to find the information valuable. Two caveats First, I’m based in the UK. If you’re from elsewhere, you might not recognize some of the symbols shown in this post. That’s not because the symbols are wrong, but because there are differences in mark-up language between countries. The British Standards Institution has issued the BS 5261C:2005 ‘Marks for Copy Preparation and Proof Correction’ (readers can buy a hard-copy list of these marks from the Chartered Institute of Editing and Proofreading (CIEP) and that’s what my publisher clients expect to see. Your clients might have different expectations. Second, stamping tools can be used in a number of different PDF editors. My own preference is PDF-XChange (from Tracker Software). Some of my colleagues prefer Tracker’s PDF Editor. Others, still, use Adobe Acrobat Professional or Adobe Reader. If you’re not sure what suits you best, take advantage of the various free trials on offer. For demonstration purposes, some of the screenshots in this essay are based on working in PDF-XChange. However, the underlying principles are the same. What are proofreading stamps? Proofreading stamps are simply digital versions of the symbols you would draw by hand on a paper proof. Below is a screenshot of some of the BS 5261C:2005 symbols that UK proofreaders use. 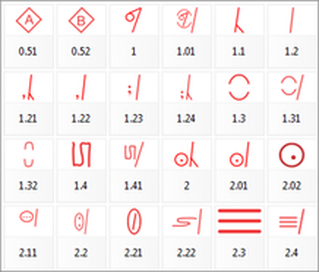
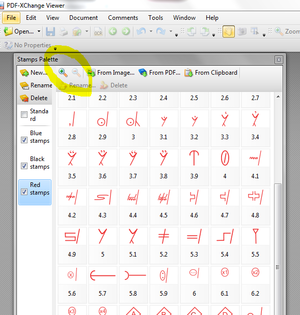
The screenshot above shows a partial view of the PDF-XChange stamps palette. I’ve chosen to number the symbols, rather than naming them, because this allows me to change the order easily (see Onscreen proofreading tips: Reorganizing your stamps palette in PDF-XChange).
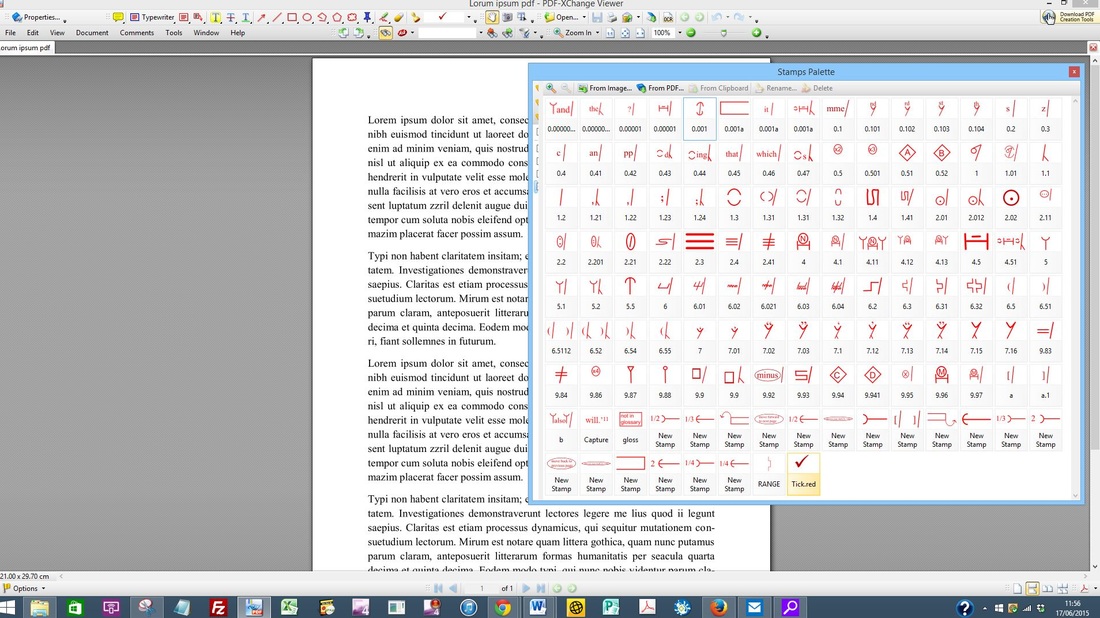
Each symbol in a palette can be selected and then stamped onto a PDF using the relevant tool, usually accessed through the PDF editor’s comment-and-mark-up toolbar. Below, the stamping tool in PDF-XChange is circled: 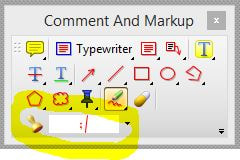
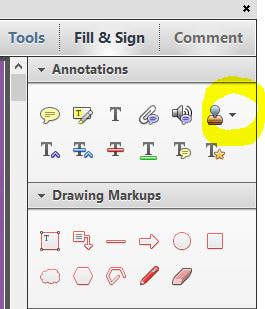
Here’s what it looks like in Adobe Reader:
And, finally, below is a screenshot from Adobe Acrobat 9:

The answer is not actually as straightforward as one might hope! As far as I’m aware, my Irish and Australian colleagues find the BS 5261C:2005 symbols acceptable (feel free to correct me if I’m mistaken); in the UK, these BSI marks are absolutely considered standard.
However, my Canadian colleague Adrienne Montgomerie, in her essay ‘The Secret Code of Proofreaders‘ (Copyediting, October 15, 2014), points out that for editorial professionals in parts of North America ‘[t]he challenge is always whether or not the designer will understand the marks. It’s hard to say that there are standard marks.’ She goes on to illustrate the differences between the Canadian Translation Bureau’s Canadian Style guide marks and the marks preferred by the Chicago Manual of Style. The best advice I can give to novices is that they check with their national editorial society and their clients before embarking on this type of work. Why use mark-up language on digital proofs? Using stamps isn’t the only way to mark up a PDF, of course. Some of my colleagues’ clients prefer sole use of the commenting and mark-up tools embedded in their PDF editors. When I use the stamping tool, it’s because my client wants to see all the suggested corrections in the page-proof margin (just like with a hard-copy proofread) rather than in pop-ups (see the example later in this article under ‘What does a stamped PDF proof look like?’). Ask your client what they prefer. In ‘Are proof-correction marks redundant? Not even close!' – an introductory guide to using proofreading mark-up symbols – I consider the issue of why these little hieroglyphics are useful. If you’re new to proofreading, you might like to read the article in full. For the purposes of this article, the key points can be summarized as follows:
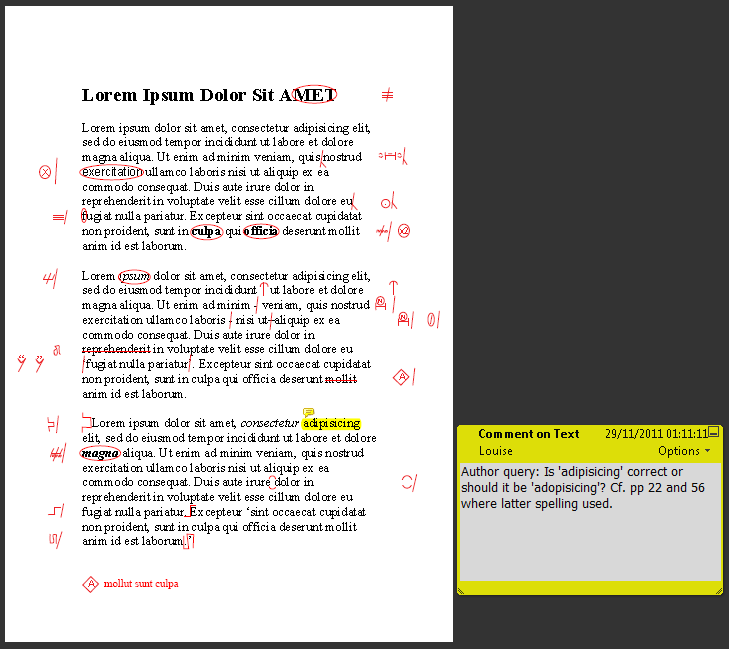
Where can I find digital stamps? If you want to use the BS 5261C:2005 proof-correction marks to annotate a PDF, you can find everything you need on this site in the Stamps archive. In particular, Roundup: PDF Proofreading Stamps (quick-access links) provides the access links to a full set of downloadable PDF proofreading stamps and the installation instructions. U.S. stamps files are available via the Copyediting-L site, under the Resources tab. Scroll down to ‘Diana Stirling’s (2008) editing marks for PDF documents (Zip documents)’. Finally, search the Editing Tools section of Katharine O’Moore-Klopf’s Copyeditors’ Knowledge Base using the key words ‘PDF Editing Stamps.’ This will bring up a number of useful resources that you might prefer to try. Where can I learn onscreen mark-up? If you’re already familiar with standard proof-correction marks, and have used them extensively on paper-based projects, you might well be able to teach yourself to mark up onscreen with stamps. That’s how I went about building my digital mark-up skillset. However, if you’re a novice or lack confidence, you might prefer more formal training that introduces you to using proof-correction language correctly and clearly (whether on paper or digitally). In the UK, the Chartered Institute of Editing and Proofreading (CIEP) and The Publishing Training Centre, to give just two examples, include onscreen mark-up as part of their distance-learning proofreading training. Denise Cowle has a self-paced course called How to Mark Up PDF Page Proofs: Best practice for editors and proofreader. There's also some good, and free, online guidance on the Right Angels and Polo Bears blog under the PDF Mark-up for Editors tab. See also the Stamps and Working Onscreen archives on this blog. What does a stamped PDF proof look like? A PDF that’s been marked up using proof-correction stamps looks just like its paper cousin – the only difference is that it’s in a file on your computer rather than in a pile on your desk. As you can see from the sample below, you can, of course, use the onboard tools. Here, I’ve added in a query for the author (using the Commenting function); if, however, my client had wanted all annotation to be viewable in the margins, I’d have created a separate query sheet to communicate my concern with the highlighted spelling issue. 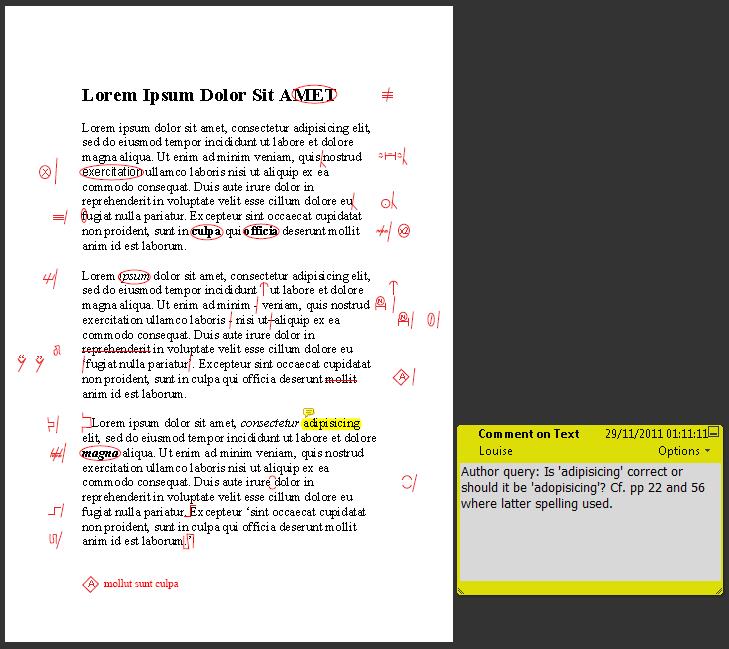
Summing up
Proof-correction marks are not a thing of the past — far from it. Whether you are working on paper or onscreen, being able to offer this method of annotating a proof is a valuable business asset. It gives both you and your clients choices. There will be times when a client will prefer you to work on paper, or directly in Word. And there will be times when you work with clients who don’t know the meaning of proof-correction symbols, and will ask you instead to use a PDF editor’s onboard commenting and markup tools. However, if you are going to be working with clients who want a traditional margin-based proofreading service (where all your annotations are made on the typeset page) but in a digital format, the ability to mark up using proofreading stamps will serve you well.
Louise Harnby is a line editor, copyeditor and proofreader who specializes in working with crime, mystery, suspense and thriller writers.
She is an Advanced Professional Member of the Chartered Institute of Editing and Proofreading (CIEP), a member of ACES, a Partner Member of The Alliance of Independent Authors (ALLi), and co-hosts The Editing Podcast. Visit her business website at Louise Harnby | Fiction Editor & Proofreader, say hello on Twitter at @LouiseHarnby, connect via Facebook and LinkedIn, and check out her books and courses.
In this post I show you how to reorganize the display of your digital proofreading stamps in PDF-XChange so you can improve the efficiency with which you work.

The free digital stamps files I’ve provided here on The Editing Blog contain over 70 individual images, all based on the British Standards Institution’s “Marks for copy preparation and proof correction” (BS 5261C:2005).
The issue for many newbies is that the palette can appear cumbersome – we all work in different ways, and the symbols that we most often use may not be positioned in the most convenient place for our particular needs. Having the full palette open on the screen takes up a lot of space, even if, like me, you use multiple screens. I prefer to have my palette near the text because it’s quicker to access, thus increasing my efficiency: 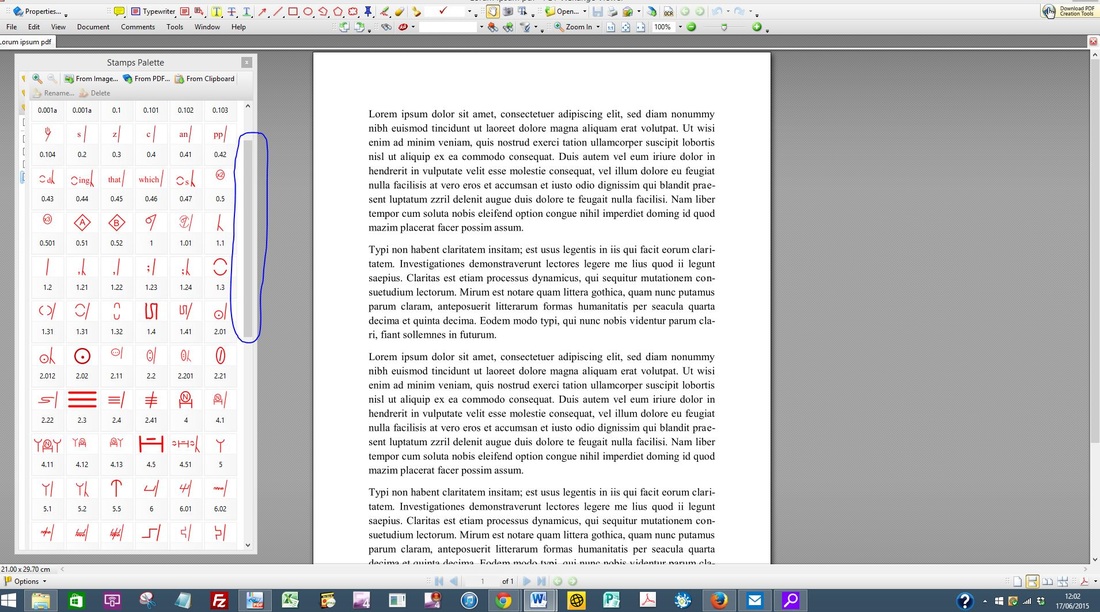
Decreasing the size of the palette is one option, and allows placement on the screen that won’t interfere with the text. However, this requires using the scroll bar on the palette in order to access the stamps located further down the palette, reducing efficiency further because not all the stamps are on display.
Reorganizing the stamps for your own needs
When I created the original stamps files, I ordered them according to what my specific needs were at that time. But my preferences have changed since 2012, and it’s not unusual for my current preferences to change on a job-by-job or client-by-client basis. For example, one particular client for whom I work provides me with PDFs that frequently require the use of the Turn over character(s)/word(s)/line(s) symbol. This symbol is located near the end of the downloadable stamps files. This meant that when I first opened up the palette in XChange it appeared as follows (see highlighted area at the bottom of the image below): 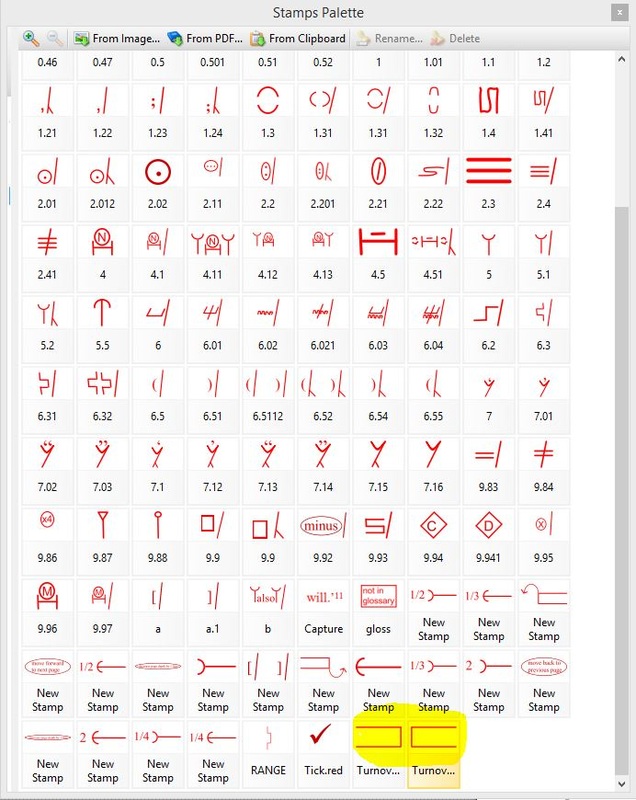
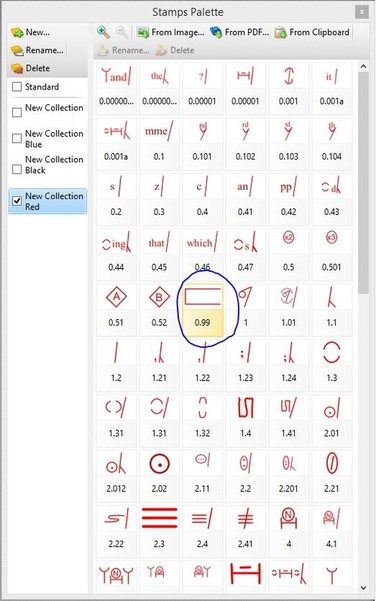
The solution is to move the frequently used symbol to the top of the palette for this particular client work. This is most simply done by renaming the stamp in a way that forces it into the required position. My preference is to name most of my stamps with numbers rather than descriptive names (see image above and compare the often-used Delete symbol (named 1) with the rarely used Change to small caps mark (named 9.83).
The beauty of renaming with numbers is that you have the freedom to move any stamp anywhere at any time. You can change the positions as and when you wish. For demonstration purposes, I’ve chosen to move the right-hand margin Turn over symbol to the top of the palette and place it next to the Delete symbol. The process is quick and simple: 1) Left-click on the symbol you want to move. The area below the mark, where the symbol's name is located, will appear with an orange tint. 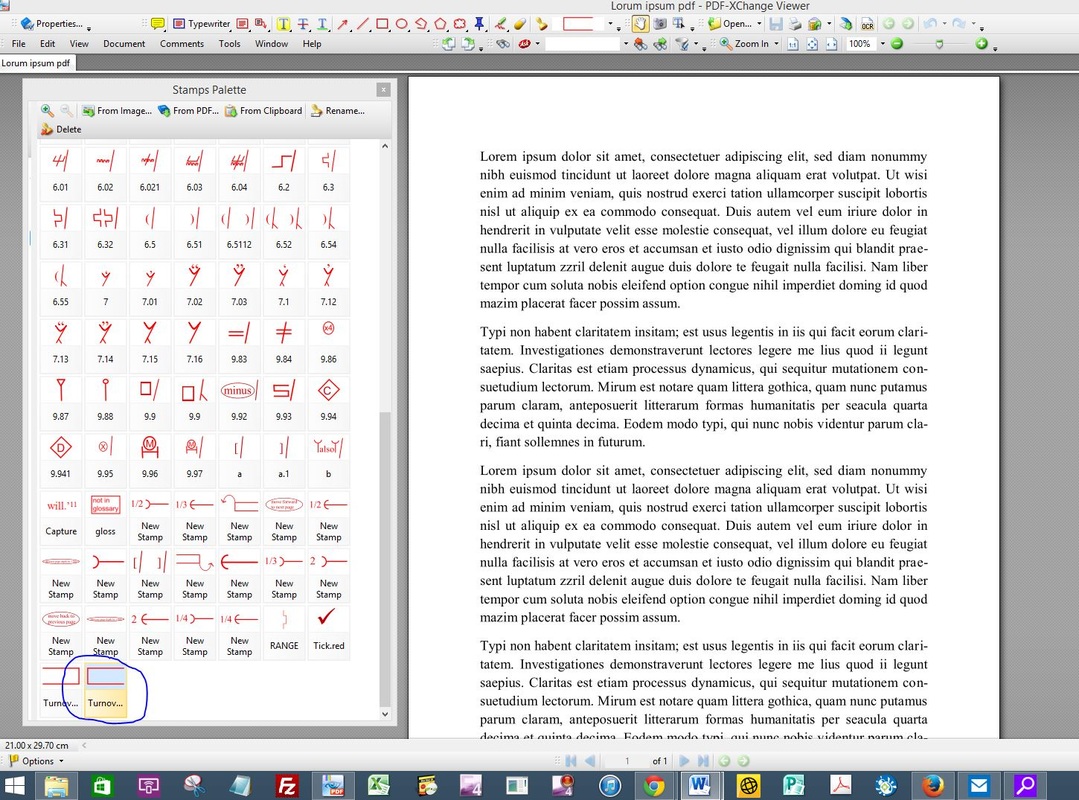
2) Move your mouse to the top of the palette and left-click on the “Rename” tab. A window will appear, housing the stamp’s current name.
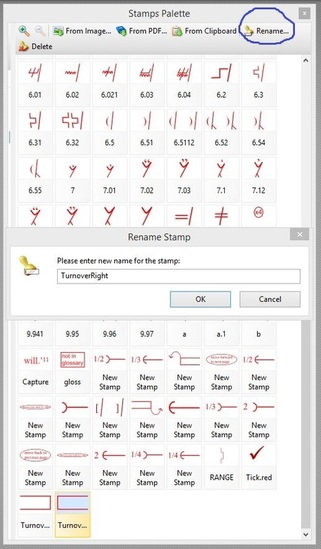
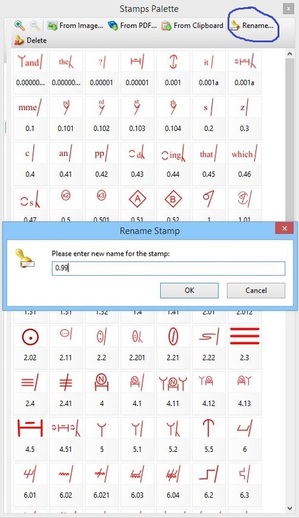
3) Type in a new numbered name that will force the stamp into the numerically ordered position you desire. In this case, I want the Turn over symbol to appear next to the Delete symbol. Delete is named “1”; the stamp to the left is named “0.52”. Choosing any number between 0.52 and 1 for Turn over will therefore ensure preferred placement. I decide to rename Turn over as “0.99”. I type in the number and select “OK”.
4) Note that the stamp has been renamed but it still hasn’t moved into its new position.
In order to force the repositioning, I need to move out of the currently displayed palette and then reopen it. This can be done in two ways. Either close the palette completely by clicking on the X in the top-right-hand corner of the window (then reopen via the menu: Tools>Comment And Markup Tools>Show Stamps Palette) …
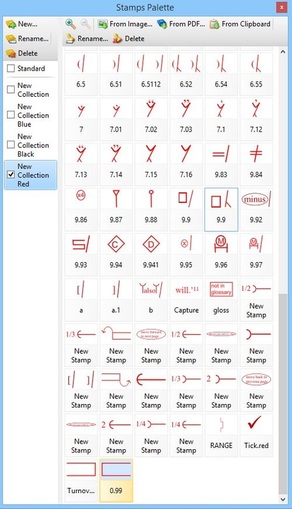
… or switch to a different Collection and then move back into the original Collection in which you renamed your stamp. The Collections can be found on the left-hand sidebar of the XChange palette, and you can move this sidebar in and out of view by clicking on and dragging the thick grey line, as highlighted below.
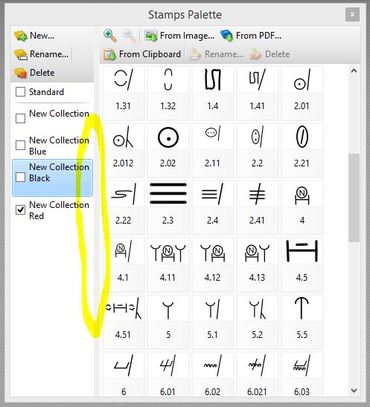
5) When you reopen the palette and click on the appropriate Collection, you’ll see your renamed stamp positioned exactly where you want it. To move the Collections sidebar out of view, simply click and drag on the grey line. This will provide more space in which to display all your proofreading symbols.
Marginal gains for increased efficiency
If renaming stamps seems like a lot of effort for little reward, remember that marginal gains count for a lot with editorial work. This is why tools such as macros, shortcuts and find/replace are useful. The same applies to creating an efficient stamps palette. Every second you spend scrolling to find the stamp you want adds up. Seconds become minutes, and minutes become hours. If you’re being paid per hour, and your client doesn’t have a top-line budget, it may not matter how long it takes you to do a job, nor that you’re working inefficiently. However, many clients do have a top line, and many editorial professionals are working for fixed fees. Efficiency matters. Furthermore, some of us need to attend to the way in which we use our hands, wrists and arms repetitively when working onscreen. Organizing a stamps palette in a way that is memorable to you, and enables the fastest possible access, speeds up the onscreen markup process and reduces physical strain. If you haven’t got round to renaming your stamps numerically, try it and see whether it makes a difference.
Louise Harnby is a line editor, copyeditor and proofreader who specializes in working with crime, mystery, suspense and thriller writers.
She is an Advanced Professional Member of the Chartered Institute of Editing and Proofreading (CIEP), a member of ACES, a Partner Member of The Alliance of Independent Authors (ALLi), and co-hosts The Editing Podcast. Visit her business website at Louise Harnby | Fiction Editor & Proofreader, say hello on Twitter at @LouiseHarnby, connect via Facebook and LinkedIn, and check out her books and courses.
If you’re proofreading onscreen, either with my proofreading stamps or your software’s comment and mark-up tools, it’s worth spending a few minutes to set up the various onscreen elements in an ergonomic fashion as well as familiarizing yourself with basic keyboard shortcuts.
Some aspects of onscreen work are speedier – searching for and implementing global changes, for example – while moving between the various mark-up tools is not as quick as using a hand and pen. There are, however, things you can do to compensate and make your onscreen experience more effective.
1. Make the toolbar work for you Shift the most-used elements on your toolbar so that they are near to each other and on the side of the screen with which you operate your mouse. These elements might include the typewriter, mark-up tools, text tools, and stamp and save buttons. Use your mouse to click, hold and drag the elements across the toolbar ribbon. 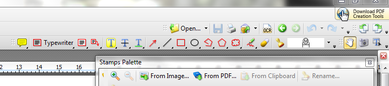
2. Use the stamps palette
Use stamps of proofreading symbols to complement the comment box and mark-up tools in your PDF editor. You can create your own or use the sets I’ve already developed. They’re available free of charge here. If you’re unfamiliar with these, see PDF Editing: Making the Most of the Stamps Tool. Remember to keep your stamps palette open; it will save you time when selecting each stamp you want to use. In XChange you can minimize the size of the symbols as they appear in the palette (see the highlight in the screenshot to the left). This enables you to see a greater number of stamps while you are working without having to scroll up and down the palette. In Acrobat, the palette is not as user-friendly, so use a second screen to get the best of the display. In XChange, number similar stamps sequentially so that they appear in a logical order. This will make it easier to find the stamp you need, particularly if each palette contains a lot of symbols (If you’ve downloaded my XChange stamps simply change the number-name in order to re-sequence them). It's useful to keep your palettes of different-coloured stamps separate so that the palettes don't become overly cluttered. Again, this will enable you to locate the stamp you need more efficiently. 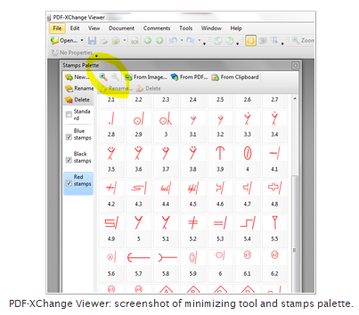
3. Hook up a second screen
I generally use a laptop, but I hook up my old desktop screen to enable me to use two screens at once when I’m doing onscreen work. This works well on three counts:
4. Utilize basic keyboard shortcuts These are my preferred keyboard shortcuts when working with PDFs. There are many, many more but I like these because all but one can be managed easily with one hand. Alt Tab: this is one of my most-used keyboard short cuts and is especially useful if you only have one screen to work on and need to flit between different programs or files. Ctrl S: save Ctrl C: copy Ctrl X: cut Ctrl V: paste Ctrl Z: undo Ctrl A: select all Ctrl Shift F: opens search window 5. Bookmark key pages If you refer back to the same key pages time and again and your client hasn’t already bookmarked these (contents, part titles, chapter first page, bibliography, index etc.), it’s easy to do it yourself and will save you time. Use Ctrl B to open the bookmark function in Acrobat, PDF-XChange or PDF-XChange Viewer and name your page. 6. Use a snipping tool to make your own quickie stamps If you are constantly using a particular combination of mark-up symbols in a piece of work (e.g. you have to change A to Å many times), you can make your own quickie stamp using a snipping tool. Windows supplies this, but if your operating system doesn’t there are plenty of free alternatives online. Pin it to the task bar at the bottom of your screen to access it quickly. In the case given above, you would use the typewriter to print Å on your PDF, followed by the replace-slash stamp. Use your snipping tool to draw round both marks and save. Then import your new stamp into your palette. Now you only have to make one click, not two, in order to make the margin mark. 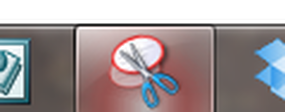
Related articles
To access the stamps files, see the article Free Downloadable Proofreading Stamps. For a more detailed look at using stamps for onscreen work, go to PDF Editing: Making the Most of the Stamps Tool. For installation instructions, click here. Anything to share? Do you have any tips to share for more efficient onscreen work, such as favourite keyboard shortcuts or using function keys? Please share them with us in the Comments section below so that we can all improve our onscreen working experience.
Louise Harnby is a line editor, copyeditor and proofreader who specializes in working with crime, mystery, suspense and thriller writers.
She is an Advanced Professional Member of the Chartered Institute of Editing and Proofreading (CIEP), a member of ACES, a Partner Member of The Alliance of Independent Authors (ALLi), and co-hosts The Editing Podcast. FIND OUT MORE > Get in touch: Louise Harnby | Fiction Editor & Proofreader > Connect: Twitter at @LouiseHarnby, Facebook and LinkedIn > Learn: Books and courses > Discover: Resources for authors and editors If you don't have the full paid-for versions of, say, Adobe Acrobat or PDF-XChange, you can still use my proofreading stamps. At a recent local SfEP chapter workshop, my colleague Sara Peacock demonstrated the stamps. She says: "The stamps work with [the free] Adobe Reader, but the proofreader will need to ensure that whoever creates the PDF 'enables comments' before sending it, otherwise the comment tools that are needed (as well as the stamps, the pencil tool, the strikeout tool, and so on) won't be accessible. "However, all of these tools (or their equivalents) are available in the free PDF-XChange viewer, in which the stamps can also be used. (Personally, I find it a more stable piece of software than the Adobe version so I use it all the time anyway. It's a bonus that I don't need to insist on enabled PDFs.)" I normally work in the full version of Acrobat Standard, but following Sara's comments I decided to give XChange Viewer a try. I must say, it was a doddle and the functionality is exceptional given that this won't cost you anything. The stamps palette is much clearer, for one thing, and uploading the stamps is quicker, too. I'd recommend giving Viewer a try, even if you're a die-hard Acrobat user! Even better, XChange Viewer allows you to upload them all in one go! To access the stamps files, see the article Free Downloadable Proofreading Stamps. For a more detailed look at using stamps for onscreen work, go to PDF Editing: Making the Most of the Stamps Tool. For installation instructions, click here.  A sample of just a few of my proofreading stamps. Tips
 PDF-XChange Viewer: screenshot of stamps palette and minimizing tool. Louise Harnby is a line editor, copyeditor and proofreader who specializes in working with crime, mystery, suspense and thriller writers. She is an Advanced Professional Member of the Chartered Institute of Editing and Proofreading (CIEP), a member of ACES, a Partner Member of The Alliance of Independent Authors (ALLi), and co-hosts The Editing Podcast. Visit her business website at Louise Harnby | Fiction Editor & Proofreader, say hello on Twitter at @LouiseHarnby, connect via Facebook and LinkedIn, and check out her books and courses.
Want to annotate a PDF with digital proofreading marks? Below are my free proofreading stamps files in red, blue and black. They conform to British Standard BS 5261-2 (2005).
You will not have to resize these stamps – I've designed them to work with the font size that most book files use. Simply upload them into your PDF editor and you’re ready to go!
|
PDF MARKUP
AUTHOR RESOURCES
EDITOR RESOURCES
TESTIMONIALSDare Rogers'Louise uses her expertise to hone a story until it's razor sharp, while still allowing the author’s voice to remain dominant.'Jeff Carson'I wholeheartedly recommend her services ... Just don’t hire her when I need her.'J B Turner'Sincere thanks for a beautiful and elegant piece of work. First class.'Ayshe Gemedzhy'What makes her stand out and shine is her ability to immerse herself in your story.'Salt Publishing'A million thanks – your mark-up is perfect, as always.'CATEGORIES
All
ARCHIVES
July 2024
|


 RSS Feed
|
|
|
|

|

|
|
|
|

© 2011–2024 Louise Harnby