

|
Discover how editors and proofreaders can use text generative AI as a business tool that enhances marketing, increases productivity and reduces stress.

|


|
On The Editing Podcast: How to edit for consistency and style |
> Author resources library (includes links to free webinars and writing tools)
> Editor resources library (see in particular the Editing Tools section)
> Editor resources library (see in particular the Editing Tools section)
Louise Harnby is a line editor, copyeditor and proofreader who specializes in working with crime, mystery, suspense and thriller writers.
She is an Advanced Professional Member of the Chartered Institute of Editing and Proofreading (CIEP), a member of ACES, a Partner Member of The Alliance of Independent Authors (ALLi), and co-hosts The Editing Podcast.
FIND OUT MORE
> Get in touch: Louise Harnby | Fiction Editor & Proofreader
> Connect: Twitter at @LouiseHarnby, Facebook and LinkedIn
> Learn: Books and courses
> Discover: Resources for authors and editors
Fresh eyes on a piece of writing is ideal. Sometimes, however, the turnaround time for publication precludes it. Other times, the return on investment just won’t justify the cost of hiring a professional proofreader, especially when shorter-form content’s in play. Good enough has to be enough.
Here are 10 ideas to help you minimize errors and inconsistencies.
Here are 10 ideas to help you minimize errors and inconsistencies.
Checking our own writing rarely produces the same level of quality as a fresh pair of eyes. We see what we think is on the page, not what is on the page. That's because we're so close to the content.
I'm a professional editor and I know that when I don't pass on my blog posts to one of my colleagues there are more likely to be mistakes. It's not that I don't know my craft but that I'm wearing a writer's hat.
Sometimes, getting pro help isn't an option. So what can you do to minimize errors and inconsistencies? Here are 10 tips.
Style guides help you keep track of your preferences, including hyphenation, capitalization, proper-noun spelling, figures and measurements, time and date format.
- If you’re a novelist, use my Style Sheet Template
- If you’re a business writer, check out the Chartered Institute of Editing and Proofreading (CIEP) guide Your House Style

|
|
2. Use a page-proofs checklist
This pro-proofreading checklist (free when you sign up to The Editorial Letter) helps you spot and identify layout problems in designed page proofs (hard copy or PDF). It’s based on the house guidelines provided by the many mainstream publishers I've worked for.
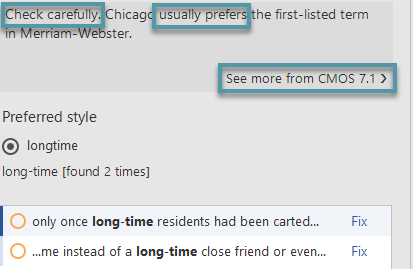
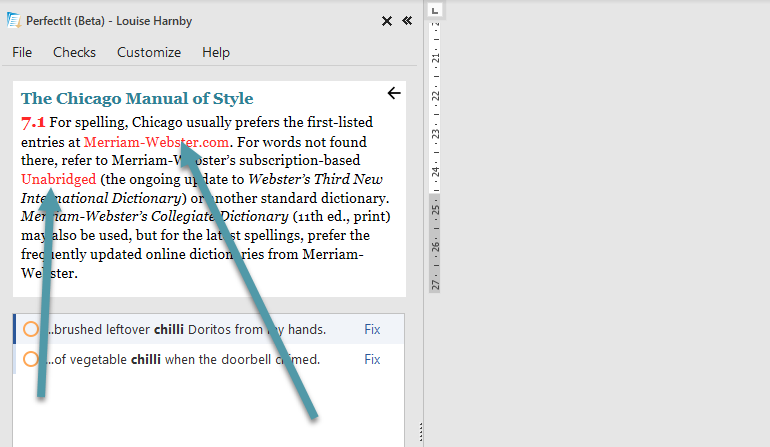
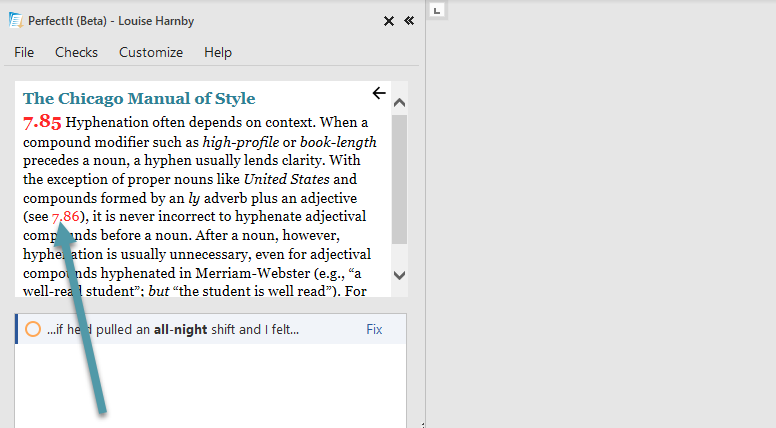
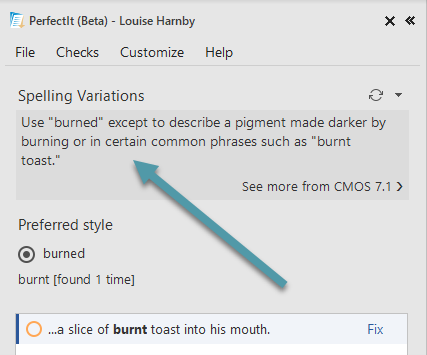
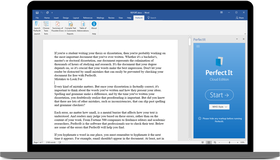
3. Run PerfectIt
PerfectIt is affordable software that takes the headache out of consistency checking. And because it’s customizable, it will help you enforce your style preferences and save you time. It’s a must-have tool for writers and pro editors.
4. Use find-and-replace in Word
Microsoft Word’s onboard find-and-replace tool enables you to locate and fix problems in your document quickly. This free ebooklet, The Author’s Proofreading Companion, includes a range of handy strings and wildcard searches.

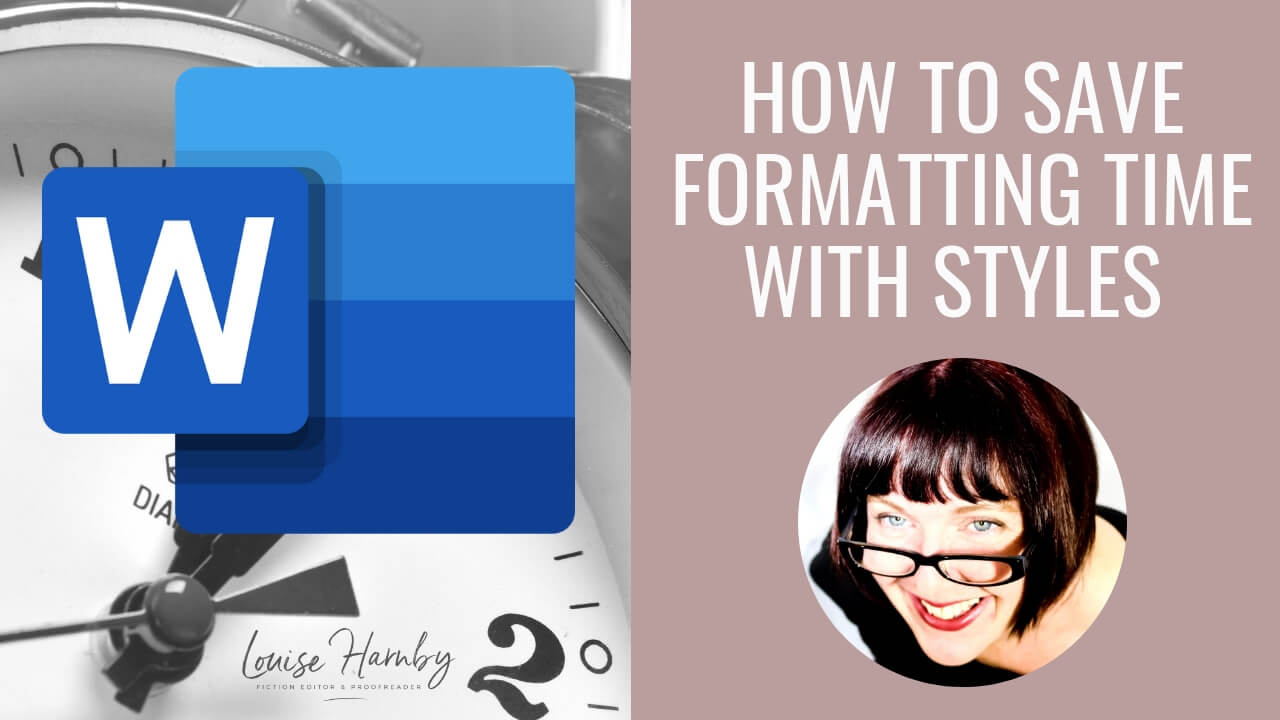
5. Set up styles in Word
Word's styles palette ensures the different elements of your text are formatted consistently. This tutorial shows you how to set up, assign and amend styles. It'll save you heaps of time whether you're working on business documents, web copy, short stories or novels.
|
|
6. Trade with a colleague
If you want fresh eyes but budget's an issue, swap quality-control checking with a colleague or friend in the same position. Pick someone who has a strong command of language, spelling and grammar.
Even if they're not a professional editor, they're wearing the hat of the reader, not the originator, and that means they'll spot things you missed.
Even if they're not a professional editor, they're wearing the hat of the reader, not the originator, and that means they'll spot things you missed.
7. Tools that locate inconsistent spelling
Here are 2 tools to help you locate inconsistent spelling:
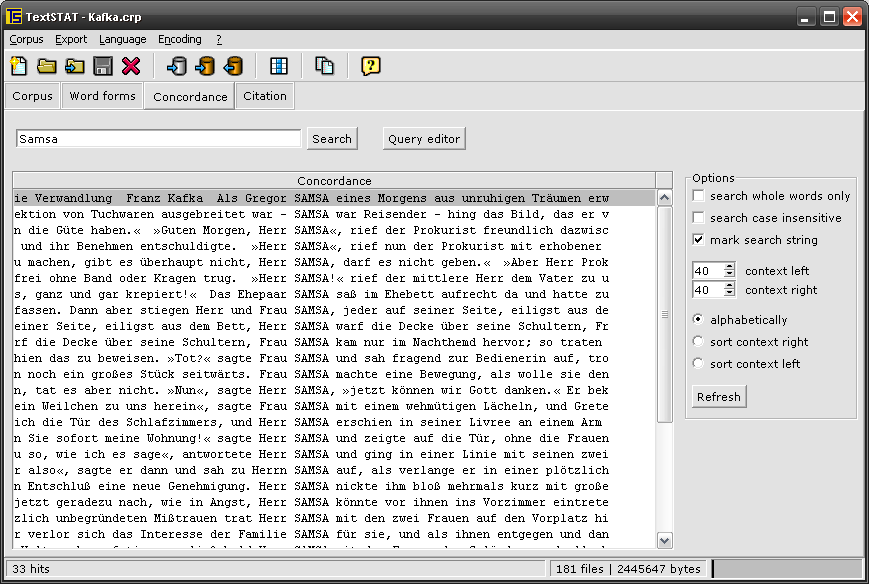
- TextSTAT: This concordance software generates simple alphabetized word lists that flag up potential problems
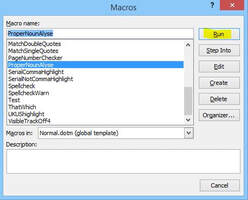
- ProperNounAlyse: An excellent macro from editor Paul Beverley that highlights potential inconsistencies in proper-noun usage
|
|
8. Run The Bookalyser
The Bookalyser analyses a text for inconsistencies, errors and poor style: 70 different tests across 17 report areas in about 20 seconds, for up to 200,000 words at once. It works on fiction and non-fiction, and for British and American English.

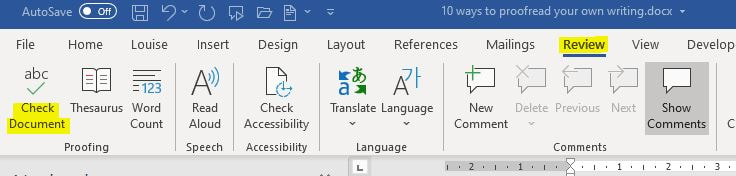
9. Run Word’s onboard Check Document tool
Microsoft Word has an onboard document-checking tool that flags up potential spelling and grammar problems. It's not foolproof (no software is) but it's a second pair of digital eyes that's available at a click.
Go to the ribbon, click on the Review tab, and select the Check Document button.
Go to the ribbon, click on the Review tab, and select the Check Document button.
10. Read it out loud
Read the text out loud. Your brain works faster than your mouth and you might well spot missing words, grammar flops and problems with sentence flow when you turn the written word into the spoken word!
Word also has an onboard narration tool that can do the speaking for you. There’s a tutorial here: ‘Hear text read aloud with Narrator’.
Word also has an onboard narration tool that can do the speaking for you. There’s a tutorial here: ‘Hear text read aloud with Narrator’.
Louise Harnby is a line editor, copyeditor and proofreader who specializes in working with crime, mystery, suspense and thriller writers.
She is an Advanced Professional Member of the Chartered Institute of Editing and Proofreading (CIEP), a member of ACES, a Partner Member of The Alliance of Independent Authors (ALLi), and co-hosts The Editing Podcast.
She is an Advanced Professional Member of the Chartered Institute of Editing and Proofreading (CIEP), a member of ACES, a Partner Member of The Alliance of Independent Authors (ALLi), and co-hosts The Editing Podcast.
- Get in touch: Louise Harnby | Fiction Editor & Proofreader
- Connect: Twitter at @LouiseHarnby, Facebook and LinkedIn
- Learn: Books and courses
- Discover: Resources for authors and editors
Writing or editing in Microsoft Word on a PC? Save yourself time by learning these 27 keyboard shortcuts.

If you don’t want to learn 27, learn just the first one: Save!
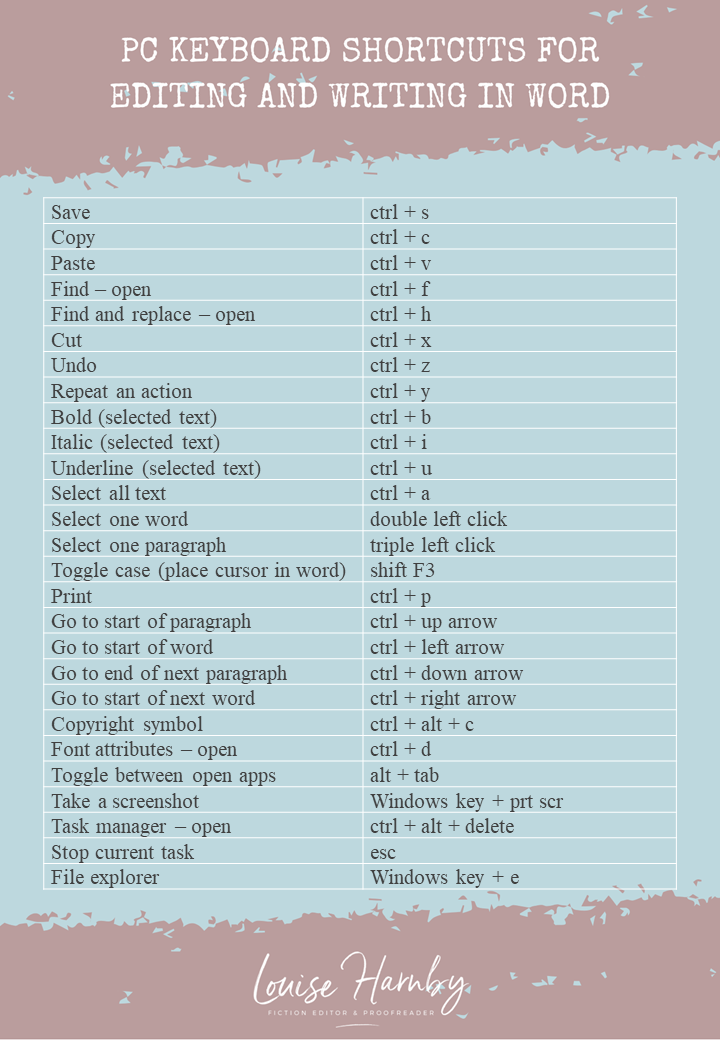
CLICK ON IMAGE TO DOWNLOAD A PDF
Louise Harnby is a line editor, copyeditor and proofreader who specializes in working with crime, mystery, suspense and thriller writers.
She is an Advanced Professional Member of the Chartered Institute of Editing and Proofreading (CIEP), a member of ACES, a Partner Member of The Alliance of Independent Authors (ALLi), and co-hosts The Editing Podcast.
Visit her business website at Louise Harnby | Fiction Editor & Proofreader, say hello on Twitter at @LouiseHarnby, connect via Facebook and LinkedIn, and check out her books and courses.
In this episode of The Editing Podcast, Denise and Louise talk about 10 editing macros that will save you time and improve the quality of your writing.

Click to listen to Season 2, Episode 5
Summary
Listen to find out more about:
Editing bites
Music credit
‘Vivacity’ Kevin MacLeod (incompetech.com). Licensed under Creative Commons: By Attribution 3.0 License.
Listen to find out more about:
- Macros how they work in Word
- CatchPhrase
- CitationLister and CitationListChecker
- CompareWordList
- File Cleaner
- FullPointInDialogue and CommaInDialogue
- MultiSwitch
- PerfectIt
- ProperNounAlyse
- SpellingErrorLister
- VisibleTrack
Editing bites
- ‘Advanced Find and Replace for Microsoft Word’: Available from Jack Lyon
- ‘20-Minute Macro Course’: Available from Tech Tools for Writers
Music credit
‘Vivacity’ Kevin MacLeod (incompetech.com). Licensed under Creative Commons: By Attribution 3.0 License.
Louise Harnby is a line editor, copyeditor and proofreader who specializes in working with crime, mystery, suspense and thriller writers.
She is an Advanced Professional Member of the Chartered Institute of Editing and Proofreading (CIEP), a member of ACES, a Partner Member of The Alliance of Independent Authors (ALLi), and co-hosts The Editing Podcast.
Visit her business website at Louise Harnby | Fiction Editor & Proofreader, say hello on Twitter at @LouiseHarnby, connect via Facebook and LinkedIn, and check out her books and courses.
She is an Advanced Professional Member of the Chartered Institute of Editing and Proofreading (CIEP), a member of ACES, a Partner Member of The Alliance of Independent Authors (ALLi), and co-hosts The Editing Podcast.
Visit her business website at Louise Harnby | Fiction Editor & Proofreader, say hello on Twitter at @LouiseHarnby, connect via Facebook and LinkedIn, and check out her books and courses.
In this episode of The Editing Podcast, Denise and Louise talk with Daniel Heuman, founder of Intelligent Editing and developer of PerfectIt – consistency-checking and style-enforcing software for editors and writers.
Click to listen to Season 2, Episode 3
Summary
Listen to find out more about:
Music credit
‘Vivacity’ Kevin MacLeod (incompetech.com). Licensed under Creative Commons: By Attribution 3.0 License http://creativecommons.org/licenses/by/3.0/
Listen to find out more about:
- What PerfectIt does
- Who uses PerfectIt
- What’s new with PerfectIt 4
- Using the onboard styles
- The PerfectIt 4 interface
- How to access PerfectIt on PC and Mac
- How much a subscription costs and what’s included
- Where to download PerfectIt
Music credit
‘Vivacity’ Kevin MacLeod (incompetech.com). Licensed under Creative Commons: By Attribution 3.0 License http://creativecommons.org/licenses/by/3.0/
Louise Harnby is a line editor, copyeditor and proofreader who specializes in working with crime, mystery, suspense and thriller writers.
She is an Advanced Professional Member of the Chartered Institute of Editing and Proofreading (CIEP), a member of ACES, a Partner Member of The Alliance of Independent Authors (ALLi), and co-hosts The Editing Podcast.
Visit her business website at Louise Harnby | Fiction Editor & Proofreader, say hello on Twitter at @LouiseHarnby, connect via Facebook and LinkedIn, and check out her books and courses.
She is an Advanced Professional Member of the Chartered Institute of Editing and Proofreading (CIEP), a member of ACES, a Partner Member of The Alliance of Independent Authors (ALLi), and co-hosts The Editing Podcast.
Visit her business website at Louise Harnby | Fiction Editor & Proofreader, say hello on Twitter at @LouiseHarnby, connect via Facebook and LinkedIn, and check out her books and courses.
Are you spending too much time on your novel’s text design? Here’s how to use the Styles function in Microsoft Word to ensure the various elements are formatted consistently.
In this article, I’ll walk you through the following:
What is the Styles tool?
The Styles tool allows you to apply design consistency to the various text elements in your book. In a novel, you might want to create different styles for the following:
Microsoft Word has a handy suite of on-board styles, though it’s unlikely they’ll match your specific requirements. Modifying these is still a little quicker than creating fresh styles so take a look at the properties and work out what you’ll retain and what you’ll change.
What properties can you influence?
You can influence every property of your text when you assign a style to it. However, in a novel, you’ll most likely focus on the following:
How to access the Styles tool
There are two ways to access the Styles function onscreen:
- What the Styles tool is
- The properties you can influence
- How to access the Styles tool
- Why it’ll save you time to use styles
- 3 ways to create a style
- 2 ways to modify a style
- How to assign a style to an element of text
- Troubleshooting
- How heading styles help you navigate
What is the Styles tool?
The Styles tool allows you to apply design consistency to the various text elements in your book. In a novel, you might want to create different styles for the following:
- book title
- author
- chapter titles
- subheadings
- indented body text
- full-out paragraphs in new chapters or sections
- displayed matter such as letters, texts, emails, reports
Microsoft Word has a handy suite of on-board styles, though it’s unlikely they’ll match your specific requirements. Modifying these is still a little quicker than creating fresh styles so take a look at the properties and work out what you’ll retain and what you’ll change.
What properties can you influence?
You can influence every property of your text when you assign a style to it. However, in a novel, you’ll most likely focus on the following:
- paragraph indentation
- spacing above and below the text
- font
- size
- colour
- italicization and bolding
- alignment (left, right, centred and justified)
- page flow (widow/orphan control; ensuring headings and corresponding text don’t fall on separate pages; page breaks)
How to access the Styles tool
There are two ways to access the Styles function onscreen:
- the Styles gallery in the ribbon
- the Styles pane
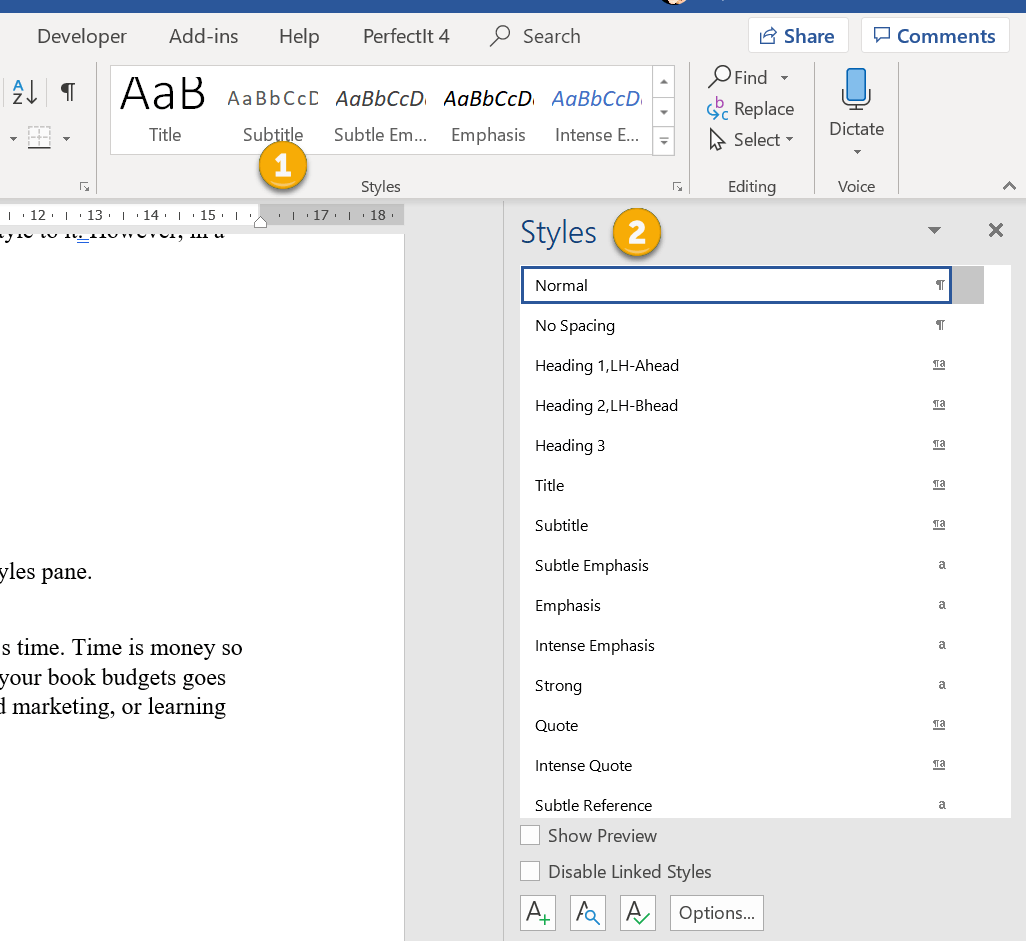
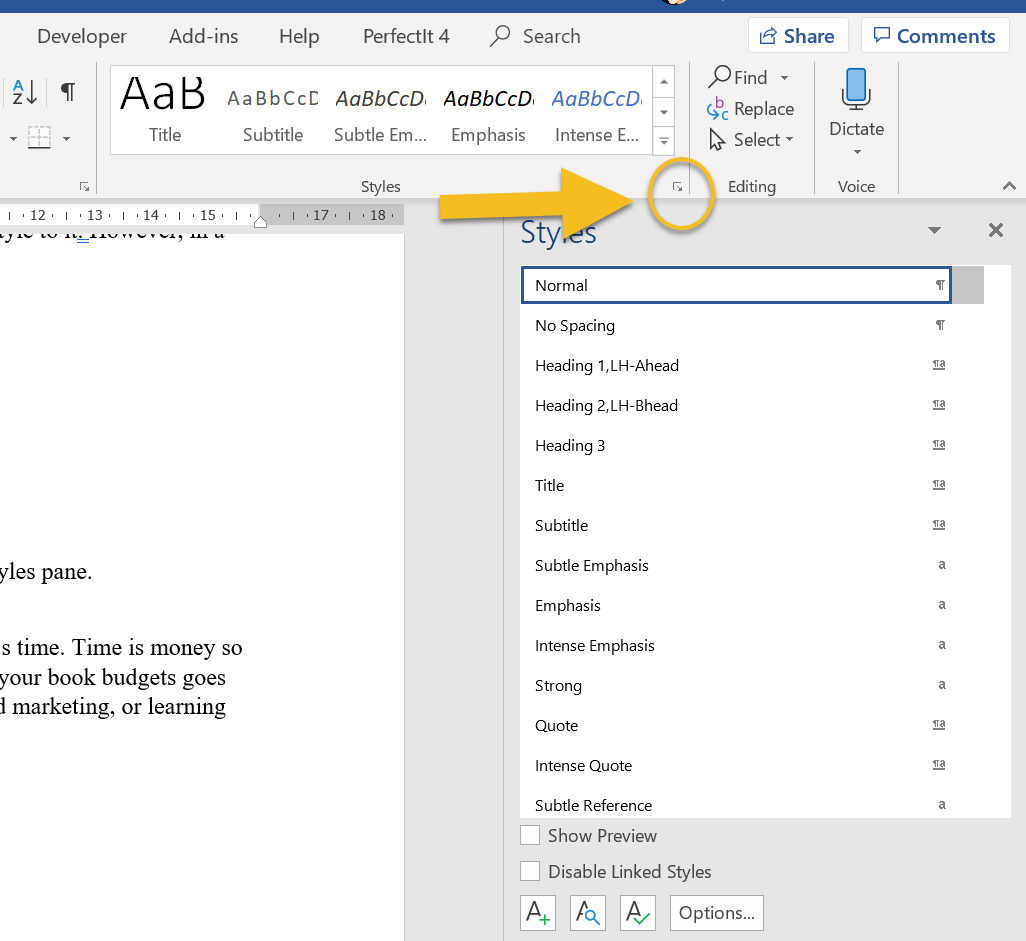
The gallery in the ribbon offers a preview of how the style appears. If I’m working with a lot of different text elements in a document, I find these visual clues useful when I want to locate a style quickly.
On smaller screens, less of the Styles gallery will be visible. To access the previews of all the styles in your gallery, click on the MORE arrow (circled).
On smaller screens, less of the Styles gallery will be visible. To access the previews of all the styles in your gallery, click on the MORE arrow (circled).
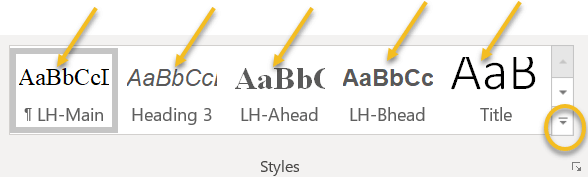
A new window will appear containing the full gallery.

Why you should format with styles
Using styles gives you control over design, consistency and formatting time.
Time is money, so when you do the job instead of asking other professionals to do it, your book budgets goes further. Perhaps you can invest a little more time or money on cover design, sales and marketing, or learning how to improve writing craft.
Can you format manually? Of course, but you could be making a lot of unnecessary work for yourself.
Scenario 1
You complete the writing, drafting, and editing, and get cracking on designing the layout. Now that there are 85,000 words in place, your thriller’s looking more like a textbook thanks to the font you’ve chosen for your main text: Arial 14. A serif font like Times New Roman would be easier on your reader’s eye.
The problem is, you can’t select all the text in the file with CTRL A and change it in one fell swoop because that would affect the chapter headings and the emails your transgressor is sending to the police, all of which are formatted differently. Instead, you have to work through the file, locate the main text elements manually, and change the font.
If, however, you’ve assigned a style to your main text, you can modify that font property in just a few clicks. The change will automatically change all the main text, and only that element, to your new font. Further down, I’ll show you how.
Scenario 2
You’ve written 12 additional paragraphs for your book but they’re in another document. You copy and paste the writing into your book file. Now you have to manually format the new sections so that they match the existing work.
If you’ve assigned styles, however, it’s as simple as cut, paste and left-click. Job done.
How to create a style
There are several ways to create a style in Word:
1A. Manual method
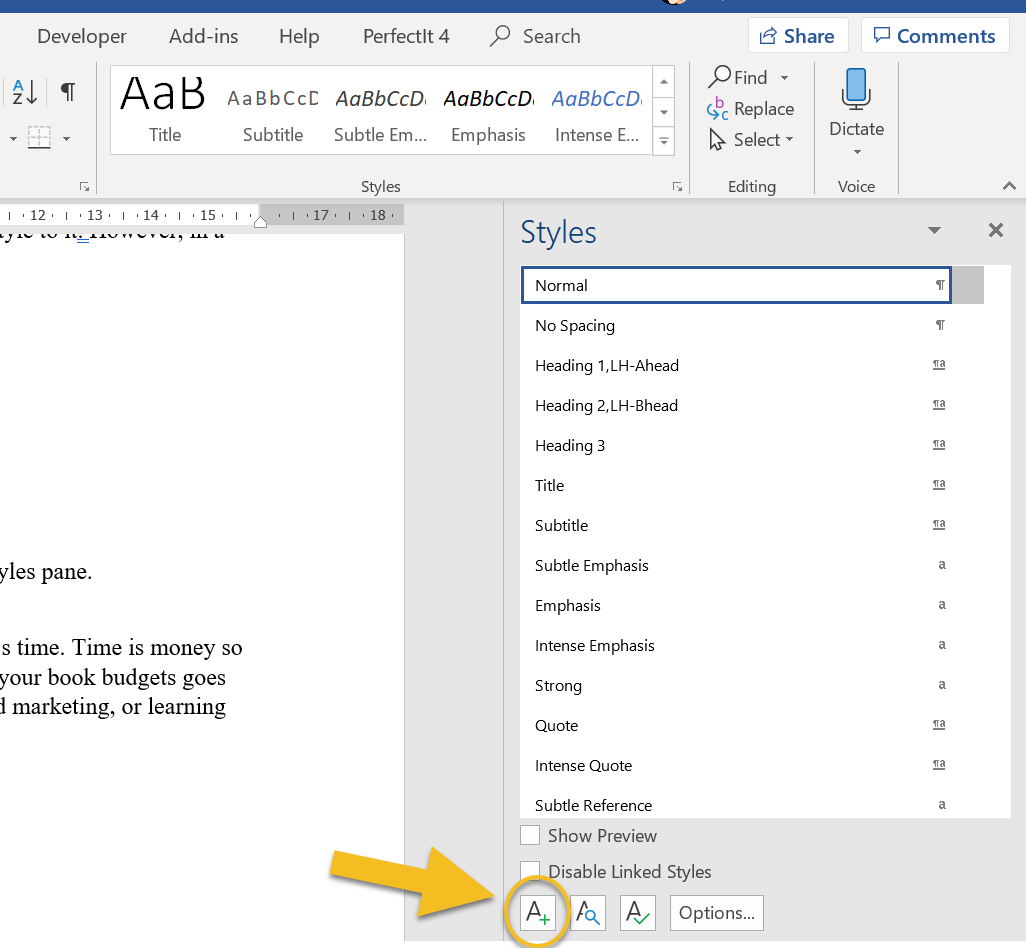
Open the styles pane and left-click on the A+ button in the bottom-left-hand corner.
Using styles gives you control over design, consistency and formatting time.
Time is money, so when you do the job instead of asking other professionals to do it, your book budgets goes further. Perhaps you can invest a little more time or money on cover design, sales and marketing, or learning how to improve writing craft.
Can you format manually? Of course, but you could be making a lot of unnecessary work for yourself.
Scenario 1
You complete the writing, drafting, and editing, and get cracking on designing the layout. Now that there are 85,000 words in place, your thriller’s looking more like a textbook thanks to the font you’ve chosen for your main text: Arial 14. A serif font like Times New Roman would be easier on your reader’s eye.
The problem is, you can’t select all the text in the file with CTRL A and change it in one fell swoop because that would affect the chapter headings and the emails your transgressor is sending to the police, all of which are formatted differently. Instead, you have to work through the file, locate the main text elements manually, and change the font.
If, however, you’ve assigned a style to your main text, you can modify that font property in just a few clicks. The change will automatically change all the main text, and only that element, to your new font. Further down, I’ll show you how.
Scenario 2
You’ve written 12 additional paragraphs for your book but they’re in another document. You copy and paste the writing into your book file. Now you have to manually format the new sections so that they match the existing work.
If you’ve assigned styles, however, it’s as simple as cut, paste and left-click. Job done.
How to create a style
There are several ways to create a style in Word:
- manually – 2 options
- by updating an existing unused style to match a piece of text you’ve selected or clicked within
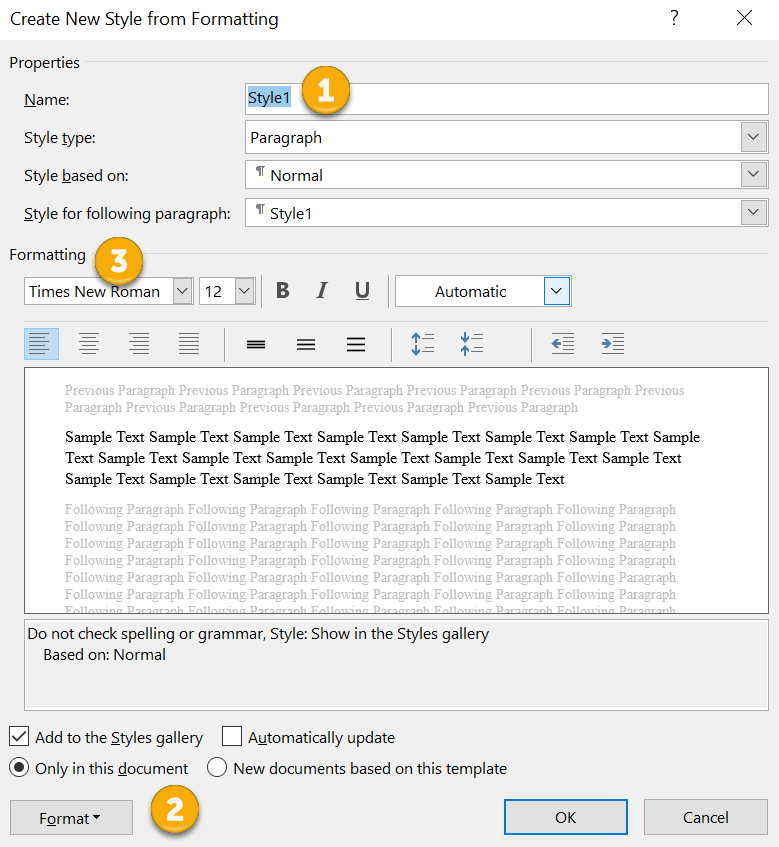
1A. Manual method
Open the styles pane and left-click on the A+ button in the bottom-left-hand corner.
A new window will open (CREATE NEW STYLE FROM FORMATTING). Now you can give your style a name (1) and assign properties to the font, paragraph spacing and page flow (2 and 3).

1B. Manual method B
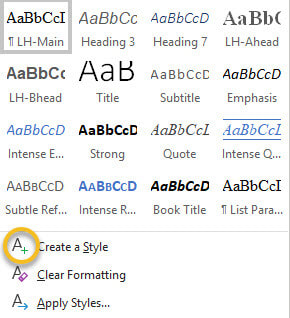
Alternatively, right-click on a piece of text that’s already formatted according to your preferences. A mini toolbar will appear. Click on the Styles button.
Alternatively, right-click on a piece of text that’s already formatted according to your preferences. A mini toolbar will appear. Click on the Styles button.

A new window will appear. Left-click on CREATE A STYLE.
Name your style, modify if you wish, and left-click OK.

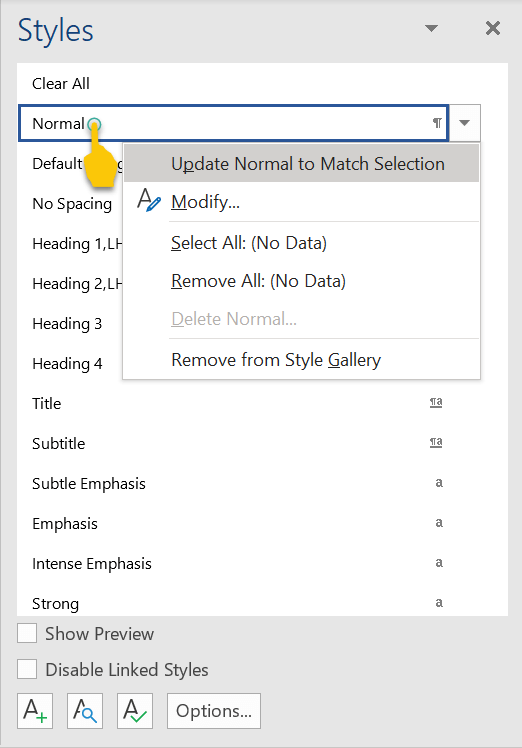
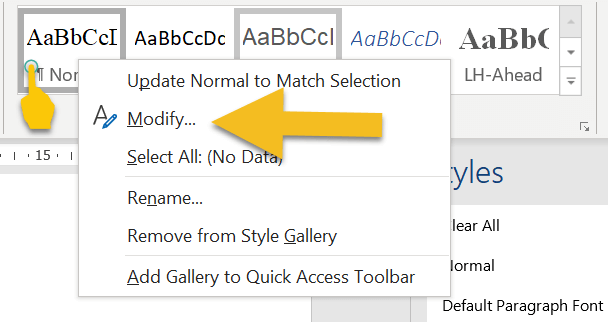
2. Updating method
Select a piece of text that’s already formatted according to your preferences. Now head up to the Styles gallery in the ribbon, or the Styles pane, and right-click on an unused style that you’re happy to update. Hover over UPDATE [STYLE] TO MATCH SELECTION, then left-click.
Select a piece of text that’s already formatted according to your preferences. Now head up to the Styles gallery in the ribbon, or the Styles pane, and right-click on an unused style that you’re happy to update. Hover over UPDATE [STYLE] TO MATCH SELECTION, then left-click.
How to modify a style
There are two ways to modify a style in Word:
1. Styles gallery
Go to the Styles gallery in the ribbon and right-click on the style you want to modify.
There are two ways to modify a style in Word:
- via the Styles gallery in the ribbon
- via the Styles pane
1. Styles gallery
Go to the Styles gallery in the ribbon and right-click on the style you want to modify.
Left-click on MODIFY and amend the properties of your style. Note that this will change every piece of text assigned with that style.
2. Styles pane
Go to the Styles pane on the right-hand side of your screen and right-click on the style you want to modify.
Go to the Styles pane on the right-hand side of your screen and right-click on the style you want to modify.
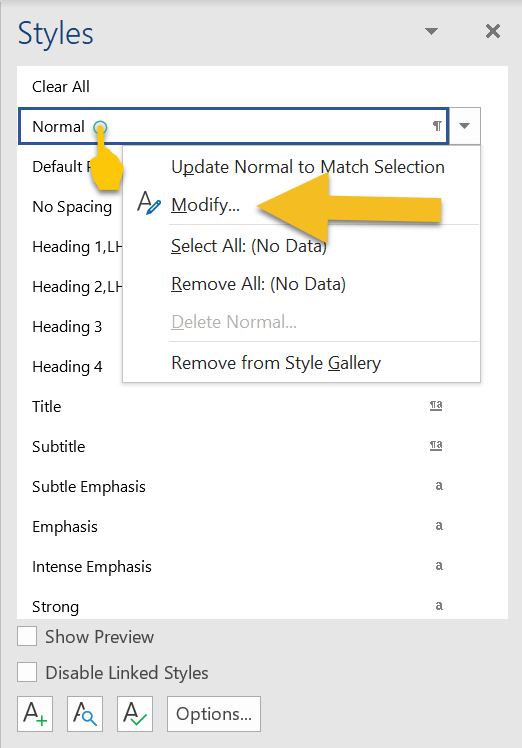
Left-click on MODIFY and amend the properties of your style. Again, bear in mind that this will change every piece of text with that style assigned.
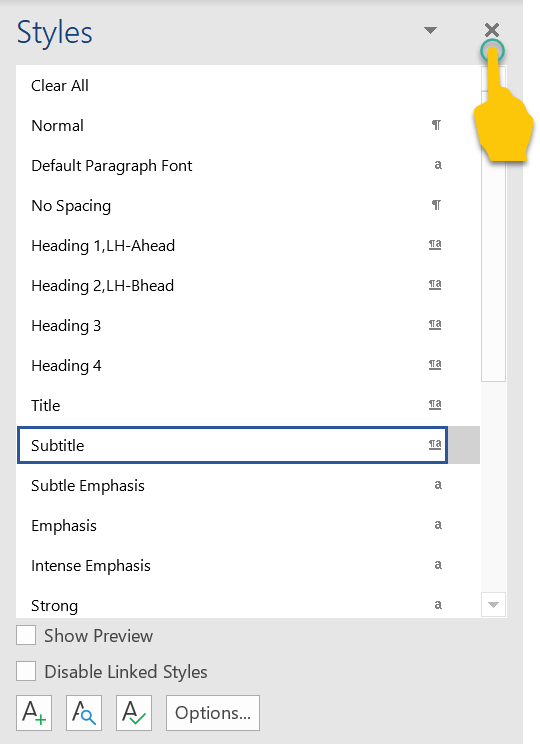
How to assign a style to an element of text
If a piece of text isn’t formatted correctly, left-click the cursor on a word or in a paragraph, or select it by double-clicking.
Now head up to the Styles gallery in the ribbon, or the Styles pane, and left-click on the preferred style. Your style will be assigned.
If you’re working on a smaller screen, you’ll probably find it easier to use the Styles gallery in the ribbon because it takes up less space than the Styles pane.
To close the Styles pane and free up some screen real-estate, left-click on the X in the top-right-hand corner.
Troubleshooting
Here’s how to fix some of the more common problems that arise when working with styles.
1. Styles gallery or pane isn’t visible
If the Styles gallery isn’t visible, make sure you’re in the HOME tab in the ribbon.
Here’s how to fix some of the more common problems that arise when working with styles.
1. Styles gallery or pane isn’t visible
If the Styles gallery isn’t visible, make sure you’re in the HOME tab in the ribbon.

If the Styles pane isn’t visible, left-click on the small arrow in the Styles gallery.
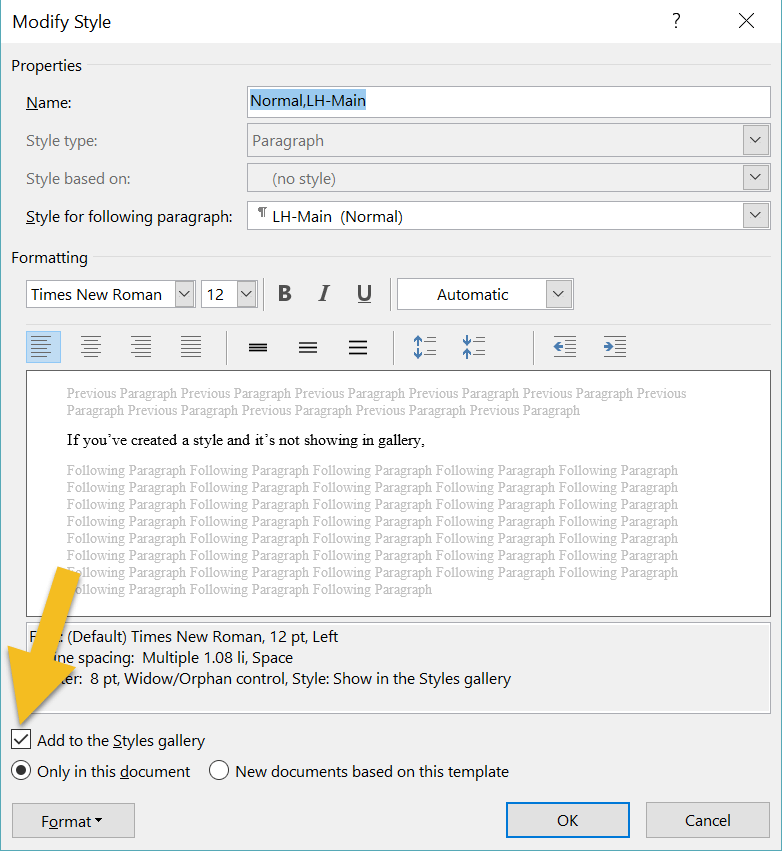
2. Style not showing in gallery
If you’ve created a style and it’s not showing in gallery, head to the Styles pane and right-click on the missing style. This opens the MODIFY pane. Make sure that the ADD TO THE STYLES GALLERY box is checked.
If you’ve created a style and it’s not showing in gallery, head to the Styles pane and right-click on the missing style. This opens the MODIFY pane. Make sure that the ADD TO THE STYLES GALLERY box is checked.
3. The gallery is cluttered with unused styles
If your gallery is busy with styles you don’t need to access, there are two ways to remove them. The quickest method is to right-click on an unwanted style, then left-click on REMOVE FROM STYLE GALLERY.
If your gallery is busy with styles you don’t need to access, there are two ways to remove them. The quickest method is to right-click on an unwanted style, then left-click on REMOVE FROM STYLE GALLERY.
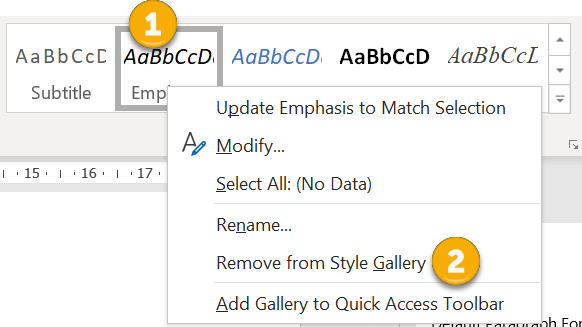
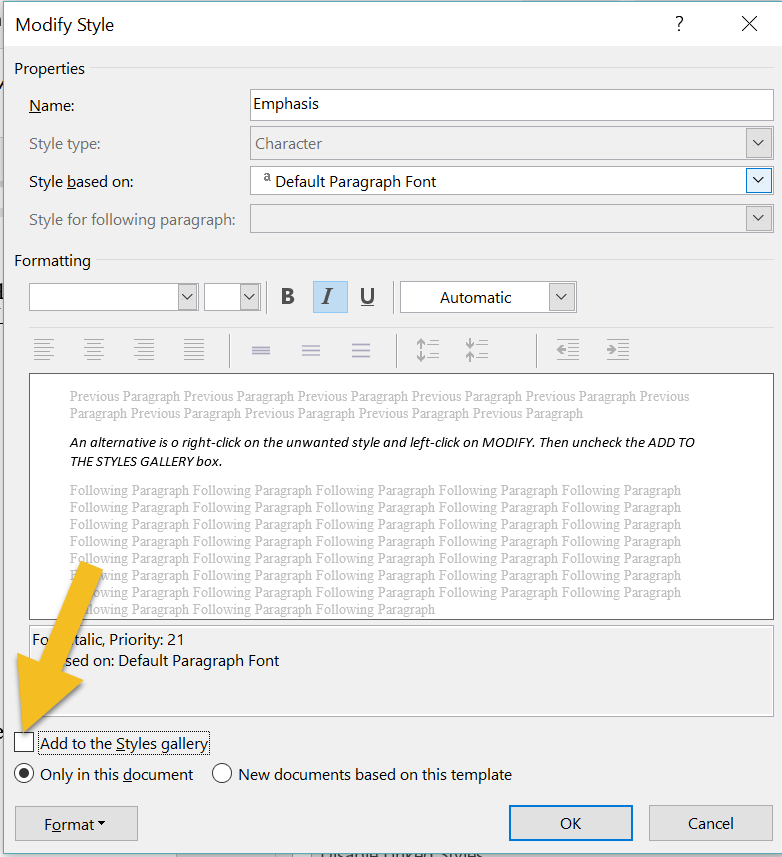
An alternative is to right-click on the unwanted style and left-click on MODIFY. Then uncheck the ADD TO THE STYLES GALLERY box.
4. You’ve renamed a style but Word’s default name is still displayed in the pane
If you’re using the Styles pane to apply styles, the list might appear cluttered if Word’s default names are displaying, even though you've modified them. To fix, left-click on the OPTIONS button.
If you’re using the Styles pane to apply styles, the list might appear cluttered if Word’s default names are displaying, even though you've modified them. To fix, left-click on the OPTIONS button.
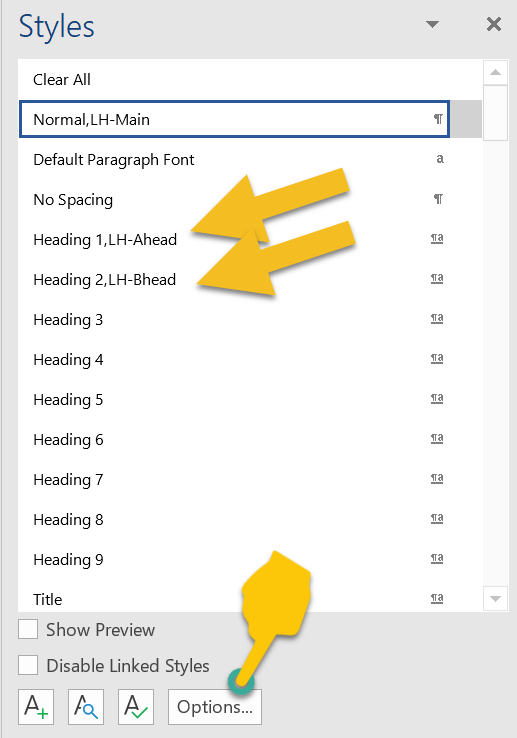
Check the HIDE BUILT-IN NAME WHEN ALTERNATE EXISTS box, then left-click on OK.
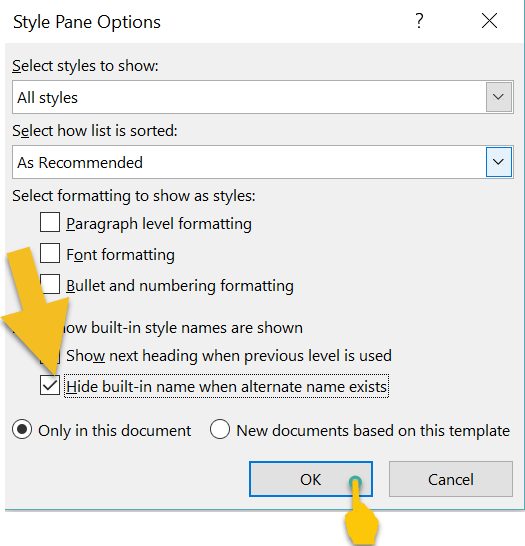
Your list will now display with your modified names.

Heading styles and navigating your Word file
One of the advantages of using the Styles tool for a novel is navigation.
To access the Navigation pane, press CTRL F on a PC. Now, left-click on the HEADINGS tab. Any style based on one of the in-built heading styles will show up in the menu.
One of the advantages of using the Styles tool for a novel is navigation.
To access the Navigation pane, press CTRL F on a PC. Now, left-click on the HEADINGS tab. Any style based on one of the in-built heading styles will show up in the menu.
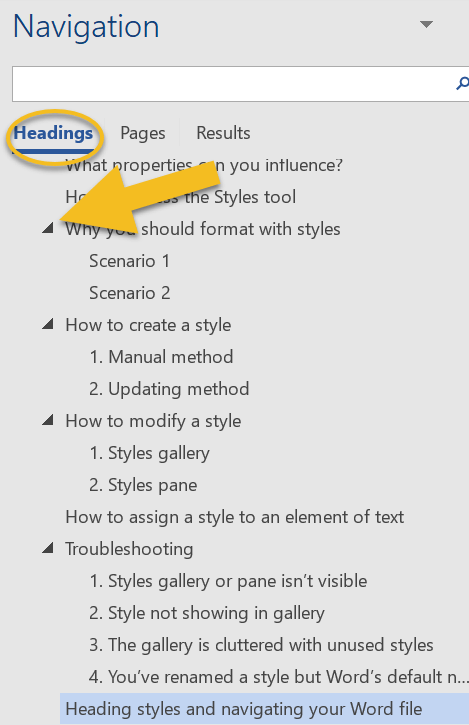
I use this function when I’m editing and want to check that chapter headings (and subheadings) are formatted consistently, assigned the correct level of priority, and numbered chronologically.
Headings with arrows next to them indicate lower-level subheadings. You can expand or collapse subheadings by left-clicking on the arrows.
Furthermore, if you want to shift a headed or subheaded section to another position in your document, left-click on the relevant heading and drag up or down the menu.
Summing up
Styles let you focus on your writing rather than fretting about internal text design.
Applying a style to an element of your book file takes a fraction of the time required for manual formatting. And because any style can be tweaked, you get to change your mind as often as you like.
If you have any problems with using Word’s Styles gallery and pane, drop me a note in the comments and I’ll do my best to fix the issue.
Fancy watching a video tutorial? Visit my YouTube channel and watch: Self-editing Your fiction in Word: How to Use Styles.
Louise Harnby is a line editor, copyeditor and proofreader who specializes in working with crime, mystery, suspense and thriller writers.
She is an Advanced Professional Member of the Chartered Institute of Editing and Proofreading (CIEP), a member of ACES, a Partner Member of The Alliance of Independent Authors (ALLi), and co-hosts The Editing Podcast.
Visit her business website at Louise Harnby | Fiction Editor & Proofreader, say hello on Twitter at @LouiseHarnby, connect via Facebook and LinkedIn, and check out her books and courses.
She is an Advanced Professional Member of the Chartered Institute of Editing and Proofreading (CIEP), a member of ACES, a Partner Member of The Alliance of Independent Authors (ALLi), and co-hosts The Editing Podcast.
Visit her business website at Louise Harnby | Fiction Editor & Proofreader, say hello on Twitter at @LouiseHarnby, connect via Facebook and LinkedIn, and check out her books and courses.
In this episode of The Editing Podcast, Denise and Louise discuss the order of play for the different levels of editing, and some ideas about how you can keep costs down.
Click to listen to Episode 9
Summary of Episode 9
Listen to find out more about:
Editing bites
Other resources
Music credit
‘Vivacity’ Kevin MacLeod (incompetech.com). Licensed under Creative Commons: By Attribution 3.0 License: http://creativecommons.org/licenses/by/3.0/
Listen to find out more about:
- The different levels of editing
- The order of play – when to do what
- Who else can help – beyond the pro editor
- Planning ahead
- Getting comparative quotations for the job
- Honing story craft
- Manuscript critiques or evaluations
- Learning through example – commissioning mini edits
- Word’s onboard tools, macros and add-ins
- Style sheets
Editing bites
- PerfectIt (consistency-checking software)
- Proofreading checklist (free PDF booklet, available when you sign up to The Editorial Letter)
- Ask A Book Editor (Facebook group)
Other resources
-
Author resources library
- A nifty little proofreading and editing macro: ProperNounAlyse (blog post)
- Creating your own style sheet (scroll to bottom of blog post)
- Free downloadable style-sheet template (scroll to bottom of blog post)
- How do I find spelling inconsistencies when proofreading and editing? TextSTAT (blog post)
- How Not to Write a Novel (Howard Mittelmark and Sandra Newman)
- Self-editing your fiction in Word: How to use styles (video tutorial)
- Should a writer hire a freelance editor before submitting to an agent? And should editors accept the work? (blog post)
- The different levels of editing: Proofreading and beyond (blog post)
- The Magic of Fiction (Beth Hill)
- Using proofreading macros: Highlighting confusables with CompareWordList (blog post)
- Write to be Published (Nicola Morgan)
Music credit
‘Vivacity’ Kevin MacLeod (incompetech.com). Licensed under Creative Commons: By Attribution 3.0 License: http://creativecommons.org/licenses/by/3.0/
Louise Harnby is a line editor, copyeditor and proofreader who specializes in working with crime, mystery, suspense and thriller writers.
She is an Advanced Professional Member of the Chartered Institute of Editing and Proofreading (CIEP), a member of ACES, a Partner Member of The Alliance of Independent Authors (ALLi), and co-hosts The Editing Podcast.
She is an Advanced Professional Member of the Chartered Institute of Editing and Proofreading (CIEP), a member of ACES, a Partner Member of The Alliance of Independent Authors (ALLi), and co-hosts The Editing Podcast.
- Get in touch: Louise Harnby | Fiction Editor & Proofreader
- Connect: Twitter at @LouiseHarnby, Facebook and LinkedIn
- Learn: Books and courses
- Discover: Resources for authors and editors
In this episode of The Editing Podcast, Denise and Louise demystify publishing language – the terms professionals use to describe the parts of a book – so that you can talk with confidence about your text.
Click to listen to Episode 2
Summary of Episode 2 ...
Editing bites
Indexing societies
Music credit
'Vivacity' Kevin MacLeod (incompetech.com). Licensed under Creative Commons: By Attribution 3.0 License.
- Publishing lingo
- The beginning (or front matter; prelims), the main or body text and the end matter (or back matter)
- Part titles, half titles, and title pages
- Forewords and prefaces
- Acknowledgements
- Pages, page numbers, and folios
- Double page spreads (DPSs)
- Rectos and versos
- Running heads and running feet
- Drop caps or dropped capitals
- Chapter drops
- Appendices and glossaries
- Footnotes and endnotes
- Bibliographies, references, and indexes
Editing bites
Indexing societies
- American Society for Indexing
- Association of Southern African Indexers and Bibliographers
- Australia and New Zealand Society of Indexers
- China Society of Indexers (site in Chinese)
- Deutsches Netzwerk der Indexer/German Network of Indexers
- Indexing Society of Canada/Société canadienne d’indexation
- Nederlands Indexers Netwerk/Netherlands Indexing Network
- Society of Indexers (UK)
Music credit
'Vivacity' Kevin MacLeod (incompetech.com). Licensed under Creative Commons: By Attribution 3.0 License.
Louise Harnby is a line editor, copyeditor and proofreader who specializes in working with crime, mystery, suspense and thriller writers.
She is an Advanced Professional Member of the Chartered Institute of Editing and Proofreading (CIEP), a member of ACES, a Partner Member of The Alliance of Independent Authors (ALLi), and co-hosts The Editing Podcast.
Visit her business website at Louise Harnby | Fiction Editor & Proofreader, say hello on Twitter at @LouiseHarnby, connect via Facebook and LinkedIn, and check out her books and courses.
Will your reader immerse themselves in your crime novel’s setting? Will the world you’ve built make sense, even if it’s a work of fantasy? And is it coherent? If you’re not sure, create a wiki.

A world-building wiki will help you keep track of your novel’s environment and the rules that govern it. And that will go some way to protecting your plot and maintaining a logical narrative.
‘But I write crime, not fantasy ...’
Even if your novel’s setting is the world as we know it right now, a world-building wiki is still useful.
I live in a hamlet in Norfolk (the UK one). Some of the things I have to deal with in my day-to-day life are different to those of friends who live only ten miles away in the city of Norwich.
|
For example, they’re connected to mains drainage. I, however, have to book the honey pot man to come and empty the septic tank once a year! Normal for me; weird for others.
And then there’s my local pal. He has the same drainage issues, but his working day is very different to mine. He’s a police officer. His work takes him directly into situations that I’m familiar with only at a distance, through the crime fiction I edit and the shows I watch on TV. |
Want to know what a honey pot man is? Read this! |
How does all of this relate to fiction writing?
One of my author clients bases his books in the Colorado Rockies. I know the lie of the land – how the weather affects the local population on a seasonal basis, how the pine smells in the spring, how the mountain passes are treacherous in the winter.
Then there’s the town where the sheriff’s office is located. And it is a sheriff rather than a chief constable who’s in charge of this fictional county’s law enforcement. I know about the guns people carry, the idiomatic turns of phrase they use, and where they tuck their chewing tobacco when they speak.
I live five thousand miles away and have never visited this region of the US, and yet I swear if I drove into that town with a flat tyre, I could locate the garage and a find place to grab a latte while the mechanic was fixing my car – without having to ask a soul.
And that’s because my author is a great world-builder.
He writes crime thrillers, but he never forgets that most of his readers aren’t cops; that many don’t even live in the US, never mind near the Colorado Rockies; and that no one lives in Rocky Points … because he made it up.
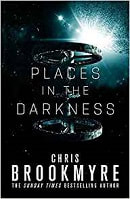
Chris Brookmyre, Orbit, 2018 |
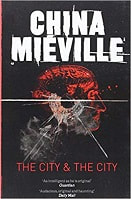
China Miéville, Pan, 2011 |
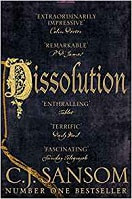
C.J. Sansom, Pan, 2015 |
Environments of the not-now and the not-here
Crime fiction is as versatile a genre as any other. For not-here, think about Chris Brookmyre’s Places in the Darkness. The Ciudad de Cielo space station makes the Colorado Rockies seem like a mere hop. It’s crime fiction, but spacey!
For not-now, how about C. J. Sansom’s Shardlake series. It’s crime fiction but the Tudor world in which our lawyer-detective operates bears little resemblance to that of a modern detective.
And then there’s China Miéville’s not-here and not-now The City & The City. It’s a richly gritty world of hardboiled crime fiction where things don’t work in quite the same way. However, the narrative feels utterly reliable.
All three authors are fine crime-writing world-builders, and their plots never unravel because the worlds they’ve shown us work.
Your wiki and your plot
Not everything in your wiki has to end up in your book, but all of the information will help you keep track of who’s who, what’s where, and how. That means you can keep the environment(s) in which your story is set coherent.
Furthermore, if you decide to write a series, your wiki will help you maintain consistency across books. Even if you switch to a new location, even a new planet, and different rules come into play, it’s a space in which you can record the additional information and keep yourself on track.
Let’s look at some of the elements you might include in your crime wiki.
Physical environment
Where does your story take place and how will the geography, geology and climate play with your plot? Does the landscape or the weather restrict or empower your characters, and if so, how?
Real or fantastical, every world must obey its own scientific laws. Continuity is key, and your wiki will help you stay on track.
Imagine your protagonist’s partner dies because the paramedic’s oxygen tank is empty, but they live on a world where the population breathes mainly nitrogen. Even your characters’ inhalations can blow a hole in your plot if you don’t keep track of the rules of your physical environment.
If you’re setting a story in a real place that you’ve not visited, the wiki is where you record the details you’ll need to stop pedantic locals getting the hump when your hero sprints from the Tube station at Amersham to the next stop on the line. Chalfont & Latimer looks close by on the London Underground map, but trust me, it’s not for sprinting. Embankment to Charing Cross, yes!
Culture, language and faith
Use your wiki to record the ideas, customs, belief systems and social behaviours that distinguish your world, and how those will impact on your characters. Record also how your characters speak, and whether they are out of place in the setting, or fully integrated.
|
Consider how historical cosy crime narratives find clever ways to enable characters who are restricted by socio-economic or gender disparities typical of the eras they’re set in.
A good example is Emily Brightwell’s Mrs Jeffries. She’s a Victorian housekeeper who nimbly engineers a higher quality of detection than her boss, the hapless Inspector Witherspoon, would be capable of without the help of his domestic staff. |
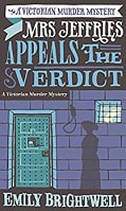
Emily Brightwell, Constable, 2018 |
How will you reflect the way people speak in your world? Do people from the region in which the novel’s set have a particular idiom or dialect, and will you express this just through dialogue or in the narrative too?
Will you offer nudges here and there or include it consistently and heavily throughout the book?
It goes without saying that if you include phrasing in a language you’re not fluent in, get it checked by someone who is. Google Translate is not the tool of choice here.
Rules of governance
Record who’s in control and how the rule of law works in your novel’s setting. If you’re mimicking reality, there might be variations not just between countries but also between states, counties, provinces or municipalities.
Who makes the law? Who upholds it? What powers do they have? What are their titles? Who are they accountable to? What are the checks and balances that restrict them? And what does sentencing and punishment look like in the world you’ve created?
How about the rules of engagement and the customary notifications given to characters apprehended by law enforcement? If a right-to-silence warning is given to a suspect arrested in the UK, and it’s referred to as a Miranda warning, your narrator’s reliability will be compromised. The term ‘caution’ is used in this neck of the woods.
Make notes about the way the jurisprudence system works, and the rights of your world’s citizens in the locations you situate them. For example, time and place will determine how long a person can be held without access to legal representation, and how they might be punished if they’re found guilty of a crime.
If your story is taking place in a fantastical setting, you can decide how all of this works. Still, your wiki will ensure there’s continuity in the way you apply your fictional rule of law to your characters.
Science, technology, engineering and medicine ... and guns
Your wiki is the perfect place to record essential information about science, tech and weaponry – what it is, how it works, who has access to it and what it’s used for.
If you’re going for authenticity, make notes about how it works in the real world. How heavy is a Glock 19, and can a suppressor be attached to the barrel? What noise does a suppressed gun really make – is it just a pop or something louder?
Years ago, I read a novel by a very well-known fantasy and horror writer. One of the subplots hinged on the DNA of a set of identical twins – one egg, one sperm, one zygote, which had split into two embryos. They had almost identical DNA. Only they didn’t because our twins were different sexes. That meant they were fraternal, not identical. The only thing they’d shared was a womb. A technical error pulled the plot to pieces.
Food, drink and dress
What do people eat and drink in this world, and how do they dress?
Are there foodstuffs or materials that are restricted, impractical, unaffordable or impossible to access for some or all of the characters in your world?
Does what people eat and how they dress indicate something about their status, their identity, their belief system, and what are the norms and rules surrounding their choices?
Even if this information isn’t integral to the plot, it can still help your reader immerse themselves in your narrative as they experience the colours, textures, tastes and smells of the world in which your characters are moving.
Heterogeneity in homogeneity
As with real life, just because a group of people share a location, a job, a faith, doesn’t mean they’re all the same.
Unless homogeneity is central to the plot, it can suck the soul from a novel because it’s unusual.
|
Michael J. Sullivan’s Hollow World is a mystery thriller set in the future where a person’s physical appearance is determined by their job. That doesn’t stop him looking for ways to distinguish the members of his worker groups – through belief systems, styles of dress, hobbies and passions, even the way they move and smile.
Use your wiki to record which differences and similarities make sense in your world, and how you will reflect them. |
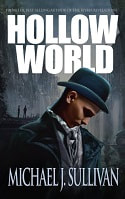
Michael J. Sullivan, Tachyon, 2014 |
Any other quirks
Record information about any other quirks that are story-specific in a miscellaneous section.
I nearly came undone with my own writing when embarking on a piece of flash fiction centred around where I live in Norfolk. During my research into pheasant shooting, I found out that my wee tale had come undone before I’d put a word on the page.
Initially, I’d centred my plot around a crime being ignored during the summer because of the gunshots from legal pheasant-shooting parties.
Louise Harnby, 2018. Click on the image to read |
Turned out this would have been impossible because the law in England prohibits shoots of that specific bird during the summertime.
Still, better that I made my discovery early on. Fixing it later would have required rewriting. The information I gleaned from my research would have gone straight into a wiki if I’d been writing an 80K-word novel rather than 800 words of flash. |
Summing up
You can include whatever you need to in your wiki. Fundamentally, it’s about consistency and continuity, such that your plot isn’t plundered because you forgot something crucial about your world and how it works.
More than that though, a reliable world is a believable world, even if it’s completely fabricated. When your readers feel like they can visit without having to ask where to grab a cuppa, you know you’ve built something beautiful.
Louise Harnby is a line editor, copyeditor and proofreader who specializes in working with crime, mystery, suspense and thriller writers.
She is an Advanced Professional Member of the Chartered Institute of Editing and Proofreading (CIEP), a member of ACES, a Partner Member of The Alliance of Independent Authors (ALLi), and co-hosts The Editing Podcast.
Visit her business website at Louise Harnby | Fiction Editor & Proofreader, say hello on Twitter at @LouiseHarnby, connect via Facebook and LinkedIn, and check out her books and courses.
She is an Advanced Professional Member of the Chartered Institute of Editing and Proofreading (CIEP), a member of ACES, a Partner Member of The Alliance of Independent Authors (ALLi), and co-hosts The Editing Podcast.
Visit her business website at Louise Harnby | Fiction Editor & Proofreader, say hello on Twitter at @LouiseHarnby, connect via Facebook and LinkedIn, and check out her books and courses.
If you’re including authentic technical or procedural information in your crime writing, you’ll be wearing your research hat. Your story should come first, of course. However, be sure to get your facts straight before you decide if and how far you’re going to bend reality.

Procedure varies between region and country, and when your novel is set will also determine the relevance of the resources I’ve included. Still, even those outside your jurisdiction might spark an insight that drives your storyline further or deepens your characterization
Conversations, consultations and ride-alongs
My brushes with the law have been limited to bad parking. Still, I know a few coppers socially, and it’s to them I’d head for procedural guidance in the first instance.
If you know a police officer, a forensic anthropologist, a crime-scene investigator, a barrister, or whatever, ask them if you can pick their brains. They’ll have expert subject knowledge and insights, and your talking with them face to face could be the most powerful tool of all.
If you don’t have existing contacts, ask your friends for theirs or put a call out on social media. A writer recently requested help from munitions experts via the Alliance of Independent Authors (ALLi) Facebook group. Several commenters provided advice and one offered to put her in touch with an expert.
If your book's set in the UK, try Consulting Cops or Graham Bartlett, author and crime fiction advisor. Both have teams of law-enforcement experts who'll help you keep your facts straight.
Here’s crime writer Julie Heaberlin discussing the importance of researching and feeling comfortable approaching experts, especially to bring deeper layering to her novels:
‘I’m very worried about not being accurate […] because there are a lot of writers who don’t research and that’s just more misinformation out there. And I learn things myself. Standing outside the Texas Death House during an execution … it wasn’t anything like I thought it would be.’
How to Write Crime – Harry Brett in conversation with Sophie Hannah and Julia Heaberlin. Waterstones, Norwich, 2018
How to Write Crime – Harry Brett in conversation with Sophie Hannah and Julia Heaberlin. Waterstones, Norwich, 2018

In a bid to improve relations between the police service and the public, some larger forces now operate ride-along schemes that allow members of the public to patrol with an officer. In the UK, these include Avon & Somerset, Nottinghamshire, Essex, Lincolnshire, Lancashire, Humberside and Warwickshire Police.
Search online using the keywords ‘ride-along police [your country/state/city]’ and see what comes up.
Search online using the keywords ‘ride-along police [your country/state/city]’ and see what comes up.
Watch and read
How about TV and movies? Your favourite crime dramas and fiction might have been meticulously researched. Then again, they might not. In ‘Five Rules for Writing Thrillers’ David Morrell urges writers to do the research but to use caution:
How about TV and movies? Your favourite crime dramas and fiction might have been meticulously researched. Then again, they might not. In ‘Five Rules for Writing Thrillers’ David Morrell urges writers to do the research but to use caution:
‘You don’t need to be a physician or an attorney to write a medical thriller or a legal thriller, but it sure helps if you’ve been inside an emergency ward or a courtroom. Read non-fiction books about your topic. Interview experts. If characters shoot guns in your novel, it’s essential to fire one and realize how loud a shot can be. Plus, the smell of burned gunpowder lingers on your hands. Don’t rely on movies and television dramas for your research. Details in them are notoriously unreliable. For example, the fuel tanks of vehicles do not explode if they are shot. Nor do tires blow apart if shot with a pistol. But you frequently see this happen in films.'
Morrell talks more about how research makes him ‘a fuller person’ and how he learned to fly in order to create an authentic pilot for his book The Shimmer. The expense of a pilot’s licence will probably be out of reach for the average self-publisher. YouTube could be the solution.

There are thousands of hours’ worth of real-life video footage on YouTube. You can learn from experts about how a body decomposes, how an autopsy is carried out, how a forensic sketch artist works, and how to clean up a crime scene.
And there are lectures on the science of blood spatter, computer forensics, investigation techniques, and forensic imaging. You name it, it’s probably there.
And there are lectures on the science of blood spatter, computer forensics, investigation techniques, and forensic imaging. You name it, it’s probably there.
Use Wikipedia
Wikipedia is great for any sleuthing writer wanting to track down information about criminal procedure. Do, however, use the primary sources cited in the references to verify the information. In the online masterclass ‘How to Write a Crime Novel’ Dr Barbara Henderson recommends using at least two sources for internet-verification purposes.
Here are some searches to get you started:
Security agencies

MI5 – the UK’s homeland security service
Visit the official site of MI5. There’s information on how it handles covert surveillance, communications interception, and intelligence gathering, plus a brief overview of its history since its creation in 1909.
Christopher Andrew’s The Defence of the Realm is the first authorized history of the service. Published by Penguin in 2010, it’s available on Amazon and in major bookstores.
Visit The National Archives and type MI5 into the search box. That will give you access to all the files that have been released into the public domain to date.
National Crime Agency (UK)
The NCA is tasked with protecting UK citizens from organized crime. Its website has articles and reports about cybercrime, money laundering, drugs and firearms seizure, bribery and corruption, and trafficking.
I recommend looking at the NCA’s free in-depth but readable reports such as the National Strategic Assessment of Serious and Organised Crime 2018, which outlines threats, vulnerabilities, the impact of technology, and response strategies.
MI6 (SIS) – the UK’s secret intelligence service
Visit the official website of the SIS to find out how it handles overseas intelligence gathering and covert operations. There’s a brief overview of the service’s history and some vignettes that illustrate how intelligence officers operate.
Keith Jeffery’s MI6: The History of the Secret Intelligence Service 1909–1949 is ‘the first – and only – history of the Secret Intelligence Service, written with full and unrestricted access to the closed archives of the Service for the period 1909–1949’. If you want historical information, this is a good place to start.
GCHQ – Government Communications Headquarters (UK)
The GCHQ website is worth visiting just to see the building from which it operates in Cheltenham! There’s an overview of GCHQ history, operations, its various operational bases, and how it works with Britain’s other security services to manage global threats.
For a more in-depth study of the service, start with Richard Aldrich’s GCHQ: The Uncensored Story of Britain's Most Secret Intelligence Agency.
FBI – Federal Bureau of Investigation (USA)
The FBI’s website is packed with the usual overview material of how and why, but I think the go-to resources are the likes of the free Handbook of Forensic Services, the Terrorist Explosive Device Analytical Center (TEDAC) page, and the training guidance.
The easiest way to navigate around the site is to head to the FBI home page and scroll down to the links in the footer.
NSA – National Security Agency
The NSA website is the place to go for twenty-first-century code-breaking information, and there’s a ton of information about cybersecurity and intelligence. Head for the Publications section to get free access to The Next Wave and various research papers. The material is dense but could be just the ticket for building backstories for cybergeek characters.
Police forces
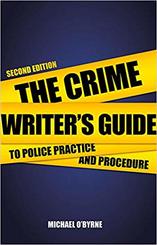
Michael O'Byrne is a former police officer who worked in Hong Kong, and later with the Metropolitan Police (sometimes referred to as New Scotland Yard). Try the second edition of his Crime Writer's Guide to Police Practice and Procedure.
INTERPOL
This is the world’s largest police force with nearly 200 member countries. The Expertise section of its website is rammed with useful and readable information on procedure, technical tools, investigative skills, officer training, fugitive investigations, border management and more.
UK police forces
Police procedure will vary depending on where you live. You can access a list of all UK police force websites here: Police forces, including the British Transport Police, the Central Motorway Policing Group, the Civil Nuclear Constabulary, the Ministry of Defence Police and the Port of Dover Police
An Garda Síochána – Ireland’s national police and security service
The easiest way to navigate the Garda’s website is to head for the home page and scroll down to the sitemap at the bottom. There you’ll find links to information on policing principles, organizational structure, and the history of the service. The Crime section is particularly strong on terminology and procedure.
Legal resources
Lawtons Solicitors’ website has an excellent Knowledge Centre filled with articles on parliamentary acts, offences, criminal charges and police procedure. What are the drug classifications in the UK? and Police Station interviews are just two examples.
Ann Rule’s advice on attending trials is aimed at true-crime writers, but you could use the guidance for fictional inspiration: Breaking Into True Crime: Ann Rule’s 9 Tips for Studying Courtroom Trials.
Crown Prosecution Service (UK): The Crown Prosecution Service (CPS) website provides detailed prosecution guidance for criminal justice professionals. It is extremely dense, and so it should be; it wasn’t designed for novelists! See, for example, the section on Core Foundation Principles for Forensic Science Providers: DNA-17 Profiling. Still, there’s a wealth of information there for those prepared to wade through it.
Department of Justice (USA): The DOJ site offers guidance on the role of the Attorney General, the organizational structure of the department, lots of statistical information, and maps of federal facilities.
Forensics resources

- Forensic Science and Beyond: Authenticity, Provenance and Assurance is a free, huge and fascinating study that includes evidence and case studies of forensic science in relation to cybercrime, chemical weapons, victim identification, pharmaceuticals, nuclear forensics, and more. It’s worth a read for plot ideas as much as procedure.
- The Crime Scene Investigator Network claims to be ‘the world’s most popular crime scene investigation and forensic science website’. It’s US-centric, so whether the procedures outlined there will be relevant to your jurisdiction will be worth checking.
Still, the site is easy to navigate and avoids academic jargon. There’s information on evidence collection (blood, semen, firearms residue, drugs, fingerprints, fibres, and so on), photography and procedure, and a collection of articles written by crime scene investigators. Well worth visiting, wherever you’re based. - If you want to know what the UK’s Forensic Science Regulator considers best practice, delve into its current Codes of Practice And Conduct, 2017 and The Control and Avoidance of Contamination in Crime Scene Examination involving DNA Evidence Recovery.
- For additional technical guidance, and to search for more forensics resources, visit the UK government’s Publications and search by keyword. What’s especially useful about these collections is that archived reports are held on file. And that means you can access guidance not only as it stands now, but in the past too.
- The Royal Anthropological Institute has a Code of Practice for Forensic Anthropology that ‘defines the purpose of the forensic anthropology process and the series of steps that must be followed from the time a forensic anthropologist (FA) is notified of involvement in a case until the presentation of findings, whether by report alone or through the provision of evidence in the court room’.
- There are some interesting insights into human taphonomic research (that's body farms to you and me) in this report: The Operation of Body Farms – Learning Points for Setting up a Human Taphonomy Facility in the UK.
- Val McDermid's Forensics: The Anatomy of Crime, published by the Wellcome Collection in 2015, 'traces the history of forensics from its earliest beginnings to the cutting-edge science of the modern day'.
- Introduction to Forensic Science: This is a free online course from the University of Strathclyde via FutureLearn. 'Explore the methods underpinning forensic science, from crime scene investigation to reporting evidential value within a case.'
Historical crime writing resources
- Victorian Crime & Punishment includes a prisoner database and case studies of real crimes and trials.
- The National Archives holds historical records of serving officers in the Metropolitan Police and the Royal Irish Constabulary.
- The Police History Society documents police museums, collections, historical societies and related resources.
- US crime writer Jason Lucky Morrow hosts a true-crime blog called Historical Crime Detective. The subtitle is ‘Where Old Crime Does New Time’. That in itself was enough to pull me in! He promises we ‘will discover forgotten crimes and forgotten criminals lost to history. You will not find high profile cases that have been rehashed and retold ad infinitum to ad nauseam.’
Weapons research

- Harvard Injury Control Research Center's web pages related to firearms research offers a wealth of information on gun-related, accidents, ownership, carrying, and bad science.
- Guns Guns Guns is an ‘online directory and forum for those who prize their right to keep and bear arms’. If you want to know something about firearms, the answer’s probably there.
- The Firearms section of the UK government’s website includes statistics on firearms certification and guidance on legal use.
- The ATF: Bureau of Alcohol, Tobacco, Firearms and Explosives (USA) includes a photo gallery of different categories of guns, a code of federal regulations, licensing information in regard to firearms and explosives, and articles about tools and services for law enforcement.
I hope you find these resources useful. I’ve barely been able to scratch the surface, not least because I’m busy trying to book a ride-along with my local bobby! While I sort that out, here’s some wise advice from David Morrell:
‘The point isn’t to overload your book with tedious facts. Rather, your objective is to avoid mistakes that distract readers from your story. If you’ve done your research, readers will sense the truth of your story’s background. In addition, the topic should interest you so much that the research is a joy, not a burden.'
Louise Harnby is a line editor, copyeditor and proofreader who specializes in working with crime, mystery, suspense and thriller writers.
She is an Advanced Professional Member of the Chartered Institute of Editing and Proofreading (CIEP), a member of ACES, a Partner Member of The Alliance of Independent Authors (ALLi), and co-hosts The Editing Podcast.
Visit her business website at Louise Harnby | Fiction Editor & Proofreader, say hello on Twitter at @LouiseHarnby, connect via Facebook and LinkedIn, and check out her books and courses.
She is an Advanced Professional Member of the Chartered Institute of Editing and Proofreading (CIEP), a member of ACES, a Partner Member of The Alliance of Independent Authors (ALLi), and co-hosts The Editing Podcast.
Visit her business website at Louise Harnby | Fiction Editor & Proofreader, say hello on Twitter at @LouiseHarnby, connect via Facebook and LinkedIn, and check out her books and courses.
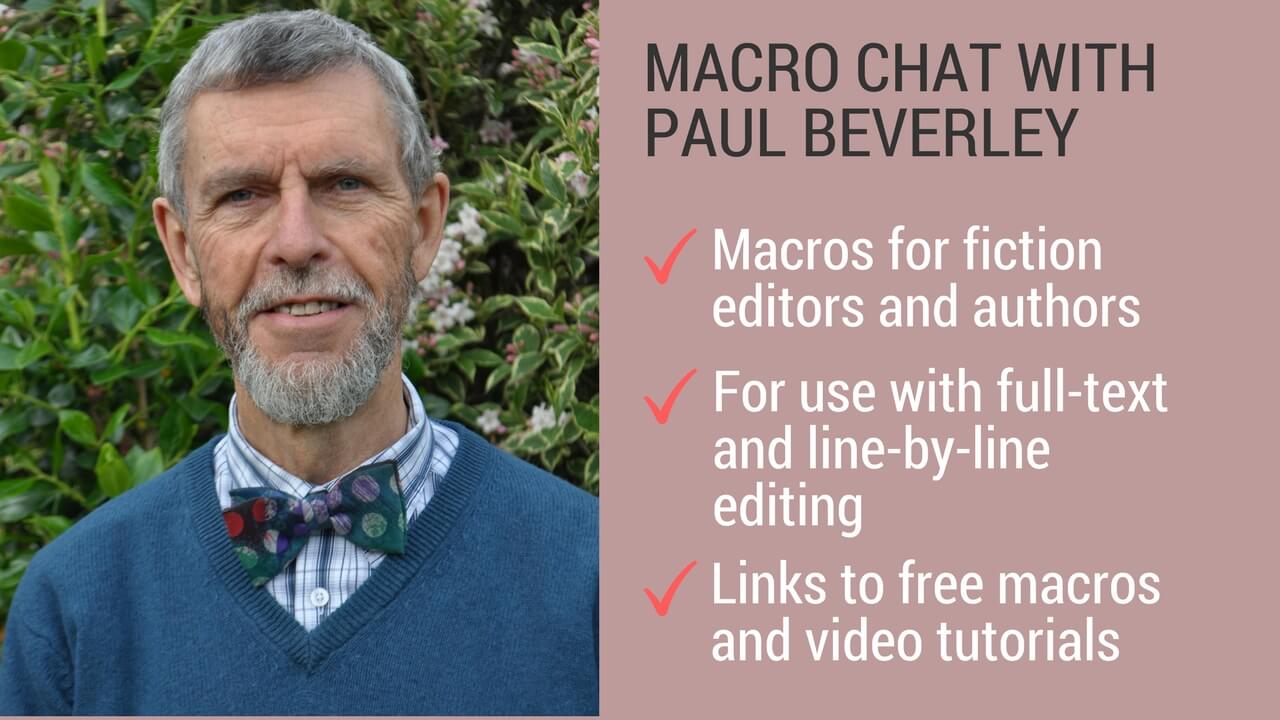
If you think there's no place for macros in fiction editing, think again. My friend Paul Beverley has collated a core group of macros that will have any fiction line editor, copyeditor or proofreader drooling! Self-publishing authors will love them too!
I don't use all of these (every editor has their preferences) but some of them are staples and save me oodles of time!
I don't use all of these (every editor has their preferences) but some of them are staples and save me oodles of time!
Some of the macros apply when you’re looking at the whole text of a novel, while others are selective ... for use while you’re editing line by line. Bear in mind that they're designed to be used with MS Word files.
Macros that work with the whole text
These macros are ideal near the beginning of the edit, when you’ve put together the whole book in one single file, and you want to look for inconsistencies.
ProperNounAlyse searches the novel for any words that look like proper nouns; it counts their frequency, and then tries to locate, by using a variety of tests, and pairs of names that might possibly be alternative spellings or misspellings, e.g. Jayne/Jane, Beverley/Beverly, Neiman/Nieman, Grosman/Grosmann etc.

FullNameAlyse is similar to ProperNounAlyse, but it searches for multi-part names, Fred Smith, Burt Fry, etc.
ChronologyChecker is aimed at tracing the chronology of a novel. It extracts, into a separate file, all the paragraphs containing appropriate chronology-type words: Monday, Wednesday, Fri, Sat, April, June, 1958, 2017, etc. This file is then more easily searchable to look at the significance of the text for the chronology.
WordsPhrasesInContext tracks the occurrence of specific names through a novel. You give it a list of names/words/phrases, and it searches for any paragraphs in the novel that contain them. It creates a separate file of those paragraphs, with the searched element highlighted in your choice of colour.
CatchPhrase searches your novel for over-used phrases and counts how many times each phrase occurs.
Macros for when editing line by line
FullPoint/Comma/Semicolon/Colon/Dash/QuestionMark/ExclamationMark
These macros change
he said, you know ...
into he said. You know ...
or he said: you know ...
or he said – you know ...
and so on.
FullPointInDialogue and CommaInDialogue
These two macros change
“Blah, blah.” He said.
into “Blah, blah,” he said.
and vice versa.

ProperToPronoun
This macro looks along the line to find the next proper noun, deletes it and types ‘she’. But if you then type Ctrl-Z, it changes it back to ‘he’.
MultiSwitch
You give this macro a list of changes that you might want to implement:
Jane
Jayne
Beverley
Beverly
that
which
which
that
When you click in a word, and run the macro, it finds your alternate and replaces it. It also works with phrases and can also provide a menu of alternates:
he said
he opined
he shouted
he voiced
she said
she opined
she shouted
she voiced

Louise Harnby is a line editor, copyeditor and proofreader who specializes in working with crime, mystery, suspense and thriller writers.
She is an Advanced Professional Member of the Chartered Institute of Editing and Proofreading (CIEP), a member of ACES, a Partner Member of The Alliance of Independent Authors (ALLi), and co-hosts The Editing Podcast.
Visit her business website at Louise Harnby | Fiction Editor & Proofreader, say hello on Twitter at @LouiseHarnby, connect via Facebook and LinkedIn, and check out her books and courses.
She is an Advanced Professional Member of the Chartered Institute of Editing and Proofreading (CIEP), a member of ACES, a Partner Member of The Alliance of Independent Authors (ALLi), and co-hosts The Editing Podcast.
Visit her business website at Louise Harnby | Fiction Editor & Proofreader, say hello on Twitter at @LouiseHarnby, connect via Facebook and LinkedIn, and check out her books and courses.
Here's how to convert a Word document into EPUB or MOBI file format. This option certainly won't be for everyone, but if it suits you, you can master it in seconds ... and for free.
Many authors create their books directly in Microsoft Word because of its excellent suite of onboard styling tools and its compatibility with a range of plug-ins and add-ins (including macros). Pro editors love it for the same reasons.
Once the writing, drafting, editing, and final revisions are complete, it’s time to publish. Is a Word file good enough for epublication? How about a DIY conversion to EPUB or MOBI? It depends on several factors:
Editorial assessment and freebies
Perhaps you want to send a review copy to a reader who has a Kindle. Or maybe you want to offer free ebooks for family members and friends. The devices your readers own will determine the required file format. Having your own EPUBs and MOBIs will give you flexibility beyond Word and PDF.
And if you're sending your book file for editorial assessment, your developmental editor might prefer to upload your book to their e-reader. They'll makes notes in the file in preparation for their final report or critique.
Doing the conversion yourself gives you the freedom to distribute your book without having to jump through the distributors’ hoops.
Your budget
How about if you’re making your book available for sale? Should you hire a pro formatter for your ebook interior? Yes, definitely, if you have the budget for it, because a pro formatter will do a pro job. The same applies to commissioning various rounds of professional editing.
But let’s be honest – not every indie author has deep pockets, and some of you will have to make choices about where to invest your budget. It might be that a DIY conversion will suffice, and in that case Calibre could be your friend.
What is Calibre?
Calibre is free open-source ebook-management software. With it you can convert a Word file to an EPUB or a MOBI.
Go to https://calibre-ebook.com to download and install the software. There are versions for Windows and Mac.
Your sales and distribution platform
Smashwords
If you want to publish via Smashwords, Word is the preferred format. Here's founder Mark Coker:
Once the writing, drafting, editing, and final revisions are complete, it’s time to publish. Is a Word file good enough for epublication? How about a DIY conversion to EPUB or MOBI? It depends on several factors:
- Your freebie plans
- Your budget
- Your sales and distribution platform
- The complexity of your interior design
Editorial assessment and freebies
Perhaps you want to send a review copy to a reader who has a Kindle. Or maybe you want to offer free ebooks for family members and friends. The devices your readers own will determine the required file format. Having your own EPUBs and MOBIs will give you flexibility beyond Word and PDF.
And if you're sending your book file for editorial assessment, your developmental editor might prefer to upload your book to their e-reader. They'll makes notes in the file in preparation for their final report or critique.
Doing the conversion yourself gives you the freedom to distribute your book without having to jump through the distributors’ hoops.
Your budget
How about if you’re making your book available for sale? Should you hire a pro formatter for your ebook interior? Yes, definitely, if you have the budget for it, because a pro formatter will do a pro job. The same applies to commissioning various rounds of professional editing.
But let’s be honest – not every indie author has deep pockets, and some of you will have to make choices about where to invest your budget. It might be that a DIY conversion will suffice, and in that case Calibre could be your friend.
What is Calibre?
Calibre is free open-source ebook-management software. With it you can convert a Word file to an EPUB or a MOBI.
Go to https://calibre-ebook.com to download and install the software. There are versions for Windows and Mac.
Your sales and distribution platform
Smashwords
If you want to publish via Smashwords, Word is the preferred format. Here's founder Mark Coker:
"We recommend the Microsoft Word path as the best option for most fiction and narrative non-fiction authors because it’s the easiest method to produce high-quality ebooks that are readable on any e-reading device. It will also generate your ebook in multiple ebook formats at the Smashwords store, making your book readable on any e-reading device. By using Microsoft Word, it’s also easy to modify your book at any time."
Make sure you follow the Smashwords guidelines on preparing your Word file, otherwise your published book will be a mess! Furthermore, you’ll risk not qualifying for inclusion in Smashwords’ premium catalogue, which gets your book in front of some big online retailers including:
- Apple iBooks store
- Baker & Taylor
- Barnes & Noble
- Flipkart
- Kobo
- OverDrive
- Oyster
- Scribd
If your interior is complex, Smashwords will accept EPUB files but they should be professionally designed. There’s further guidance in the Smashwords Style Guide.
Kindle Direct Publishing/Amazon
If you’re self-publishing via KDP, Amazon will create a MOBI for you from your word file. The same principles apply: as long as you follow the formatting instructions to the tee, and your book interior is straightforward, Word will suffice. Here’s where to access KDP’s Simplified eBook Formatting Guide.
If your interior is more sophisticated, I’d advise you to hire a pro. Neither a Word file nor the DIY Calibre conversion offered in this article will do the job to a high enough standard.
Direct sales
If you’re selling direct from your own author platform, you can offer a PDF. But that’s not what every customer wants. PDFs look fabulous on tablets but awful on e-readers. If your customer wants something different, and you want to maximize sales opportunities, you’ll need another option. Calibre could be the solution.
The complexity of your interior design
If you have a primarily text-based Word file that will tolerate a simple heading structure for titles, part titles and chapters – as is often the case for fiction and narrative non-fiction – this quick-conversion method could work well for you.
If your interior design is more complex, I strongly recommend you commission a professional formatter (some editors also have formatting skills) to do the job on your behalf.
In my test, which involved a non-fiction Word file with multiple heading levels, a contents list, boxes, images and other design features, the conversion results for EPUB and MOBI were far from perfect, though I did find solutions when I was prepared to compromise.
Here’s how I messed up ... so you don’t have to.
- Poor cover design: The image appeared squashed because I’d just grabbed what was to hand instead of checking the recommended size guidelines.
- Solution: Ensure your cover image is 600 x 800 px.
- Contents list: I left in the contents list created using Word's Table of Contents tool. It was disjointed and interrupted with coding tags.
- Solution: Remove it if you want to use the quick-conversion process outlined below. If you want to retain a contents list, you’ll need to bring in a pro formatter.
- Designed elements: My boxed text and other designed features looked horrible. All the formatting disappeared and the elements were poorly aligned.
- Solution: Turn these features into plain text, and style them using bold, italic and the indentation tool on the Word ribbon.
- Heading levels: My file had multiple heading styles, all of which looked beautiful in Word and on PDF. By the time I’d finished my speedy Calibre conversion, only one heading level remained. The rest appeared as plain text.
- Solution: Change all the headings to a single style and differentiate the levels using all-caps and centring.
- The main text, level-one headings and images: These converted beautifully.
- Solution: None needed!
If you still think your Word document fits the bill, here's how to create your EPUB or MOBI file.
How to do the quick conversion
Open your Word document and save it as an rtf (Rich Text Format) using the Save As function (select Rich Text Format from the drop-down menu). Close the file and head over to Calibre.
Click on the Add books icon and select your rtf.
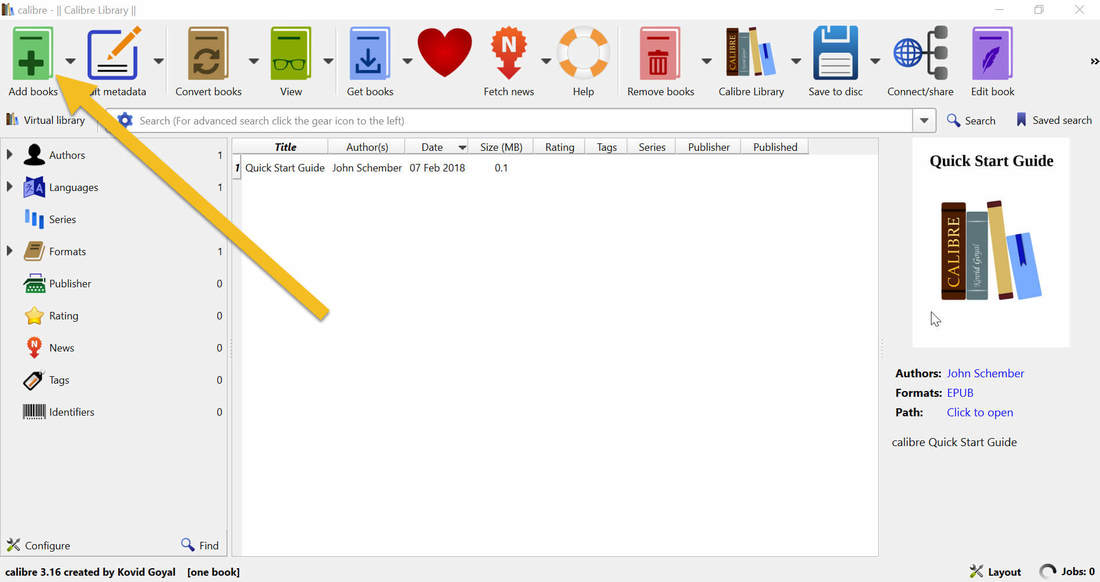
The file will upload to Calibre. Make sure your book file is highlighted, then click on the Convert books icon.
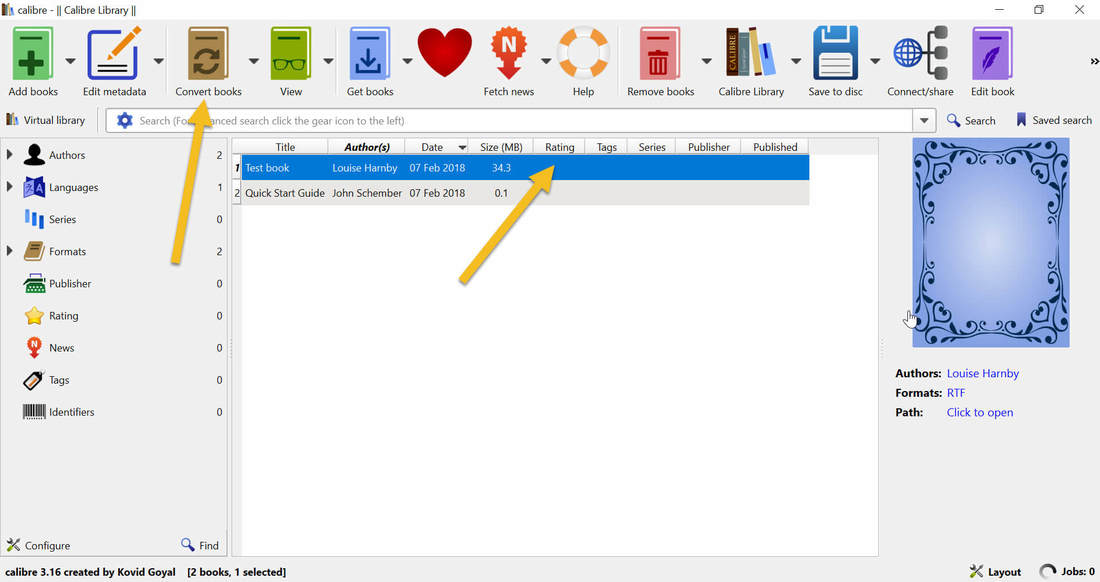
Now you can select and edit the metadata:
- The type of file you wish to create – I’ve chosen EPUB in this example (yellow box)
- The bibliographic details (green box)
- And your cover image (red box). Use the scroll bar (blue arrow) to scroll down and change the image file
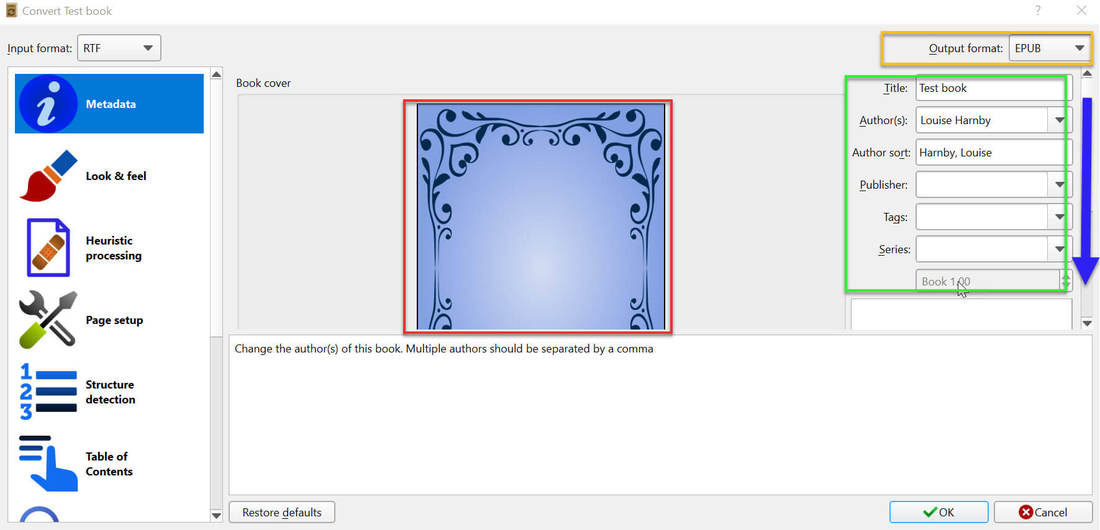
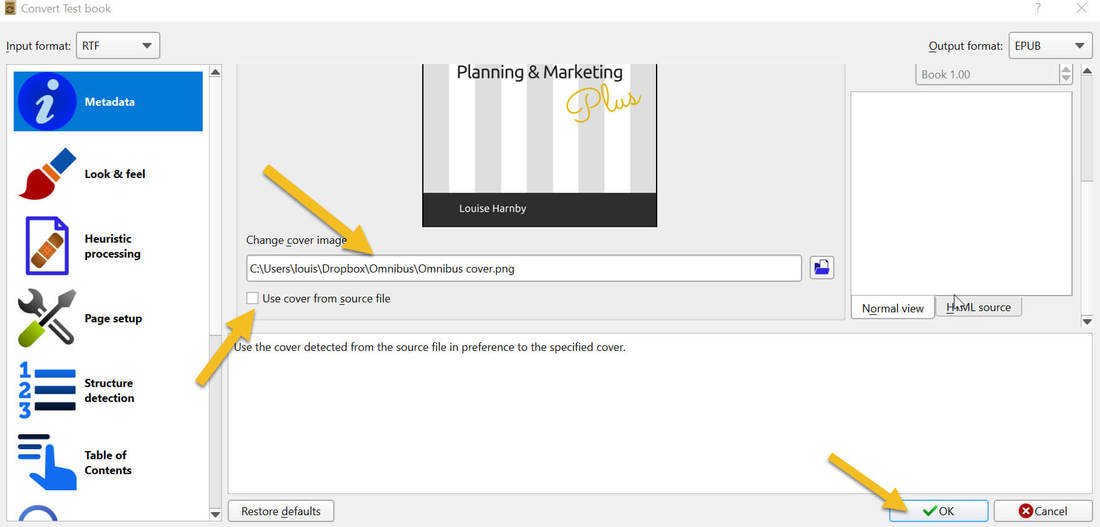
Click OK. In the bottom-right-hand corner you’ll see the Jobs icon whirring.
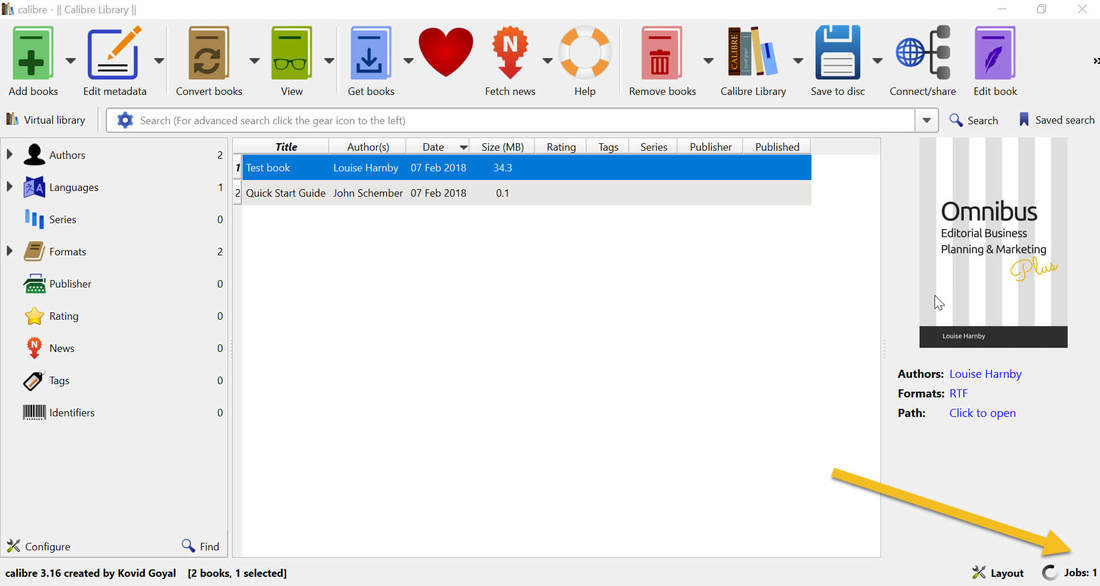
When the conversion is complete, click on the new file format to check that all is well.
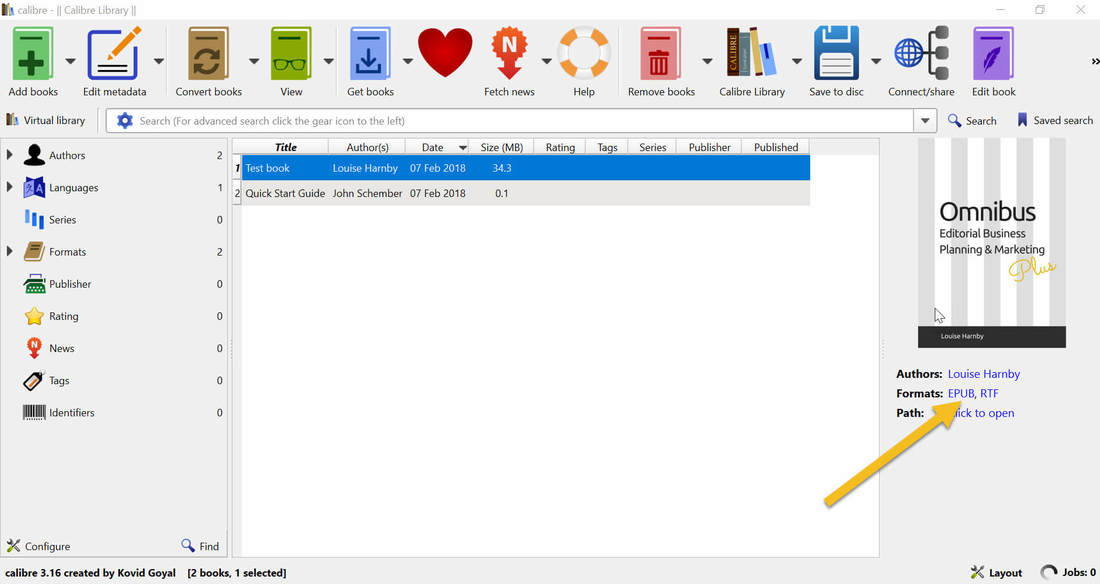
This will open the E-book viewer, and it’s one of Calibre’s top features because you can see at a glance what your reader will be looking at.
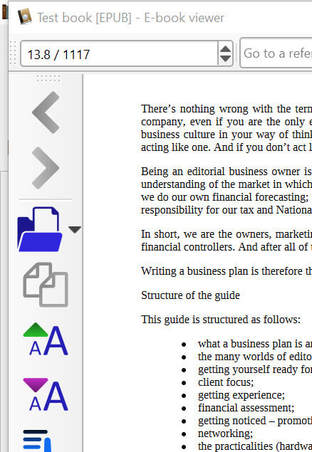
If you’re happy with your interior, save your converted file to your computer. It’s ready for upload and distribution.
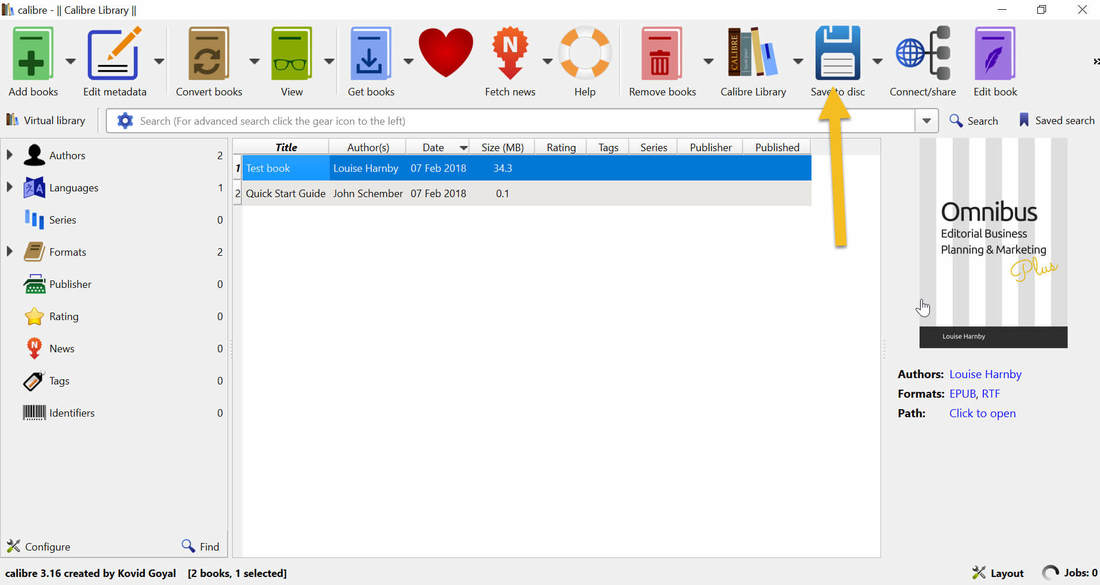
Summing up
If you have a straightforward interior that’s text-based, this quickie Calibre conversion is absolutely worth experimenting with. And it’s free, so even if things don’t go to plan you won’t have lost any money – you’ll just have learned the basics of a new tool that you might be able to take advantage of another time.
Poor formatting will earn you nothing but frustrated customers and bad reviews, so:
If your interior is complex, don't even think about using the method outlined here. Work with a pro. Professional eformatting isn’t a service I offer but I’m more than happy to put you in touch with colleagues who can help.
Drop me a line via my contact page or comment here on the blog.
If you have a straightforward interior that’s text-based, this quickie Calibre conversion is absolutely worth experimenting with. And it’s free, so even if things don’t go to plan you won’t have lost any money – you’ll just have learned the basics of a new tool that you might be able to take advantage of another time.
Poor formatting will earn you nothing but frustrated customers and bad reviews, so:
- Check the output on your own device before you offer it to the world!
- After you've uploaded your ebook to a third-party platform, check it again!
If your interior is complex, don't even think about using the method outlined here. Work with a pro. Professional eformatting isn’t a service I offer but I’m more than happy to put you in touch with colleagues who can help.
Drop me a line via my contact page or comment here on the blog.
Louise Harnby is a line editor, copyeditor and proofreader who specializes in working with crime, mystery, suspense and thriller writers.
She is an Advanced Professional Member of the Chartered Institute of Editing and Proofreading (CIEP), a member of ACES, a Partner Member of The Alliance of Independent Authors (ALLi), and co-hosts The Editing Podcast.
Visit her business website at Louise Harnby | Fiction Editor & Proofreader, say hello on Twitter at @LouiseHarnby, connect via Facebook and LinkedIn, and check out her books and courses.
She is an Advanced Professional Member of the Chartered Institute of Editing and Proofreading (CIEP), a member of ACES, a Partner Member of The Alliance of Independent Authors (ALLi), and co-hosts The Editing Podcast.
Visit her business website at Louise Harnby | Fiction Editor & Proofreader, say hello on Twitter at @LouiseHarnby, connect via Facebook and LinkedIn, and check out her books and courses.
If you're proofreading final designed page proofs, there's more to look out for than the odd typo or double space. Professional proofreaders identify and find solutions to a range of layout problems too.
This post featured in Joel Friedlander's Carnival of the Indies #84
.
Who's this checklist for?
This is for anyone checking final designed page proofs. For example:
I've proofread over 500 books for the mainstream publishing industry. The checklist below is based on the house guidelines provided by the publishers I've worked for.
The titles I've proofread include social science textbooks, handbooks and monographs, and works of fiction and narrative non-fiction. And while the subject matter has varied, the requirements for checking final page proofs hasn't.
Note my use of the term 'final designed page proofs'. This checklist is not for those doing a final quality-control check in a Word document. Rather, we're dealing with a typeset PDF or hardcopy of the book as it will appear when printed or published online.
For that reason, the proofreader is tasked with ensuring that the appearance of the book is consistent and correct according to client preference. This PDF provides a summary of the required checks.
To get a free copy, sign up to The Editorial Letter, monthly news about fiction editing and editorial business growth.
Who's this checklist for?
This is for anyone checking final designed page proofs. For example:
- self-publishing authors preparing for print-on-demand. Use this when working through the PDF generated by the likes of CreateSpace or Bookbaby.
- business owners producing PDF or printed reports, booklets, manuals or ebooks. Use this to check your file before it's distributed to your clients or uploaded to your website.
- professional proofreaders. Use this to check page proofs for your publisher clients and independent authors.
I've proofread over 500 books for the mainstream publishing industry. The checklist below is based on the house guidelines provided by the publishers I've worked for.
The titles I've proofread include social science textbooks, handbooks and monographs, and works of fiction and narrative non-fiction. And while the subject matter has varied, the requirements for checking final page proofs hasn't.
Note my use of the term 'final designed page proofs'. This checklist is not for those doing a final quality-control check in a Word document. Rather, we're dealing with a typeset PDF or hardcopy of the book as it will appear when printed or published online.
For that reason, the proofreader is tasked with ensuring that the appearance of the book is consistent and correct according to client preference. This PDF provides a summary of the required checks.
To get a free copy, sign up to The Editorial Letter, monthly news about fiction editing and editorial business growth.
Louise Harnby is a line editor, copyeditor and proofreader who specializes in working with crime, mystery, suspense and thriller writers.
She is an Advanced Professional Member of the Chartered Institute of Editing and Proofreading (CIEP), a member of ACES, a Partner Member of The Alliance of Independent Authors (ALLi), and co-hosts The Editing Podcast.
She is an Advanced Professional Member of the Chartered Institute of Editing and Proofreading (CIEP), a member of ACES, a Partner Member of The Alliance of Independent Authors (ALLi), and co-hosts The Editing Podcast.
- Get in touch: Louise Harnby | Fiction Editor & Proofreader
- Connect: Twitter at @LouiseHarnby, Facebook and LinkedIn
- Learn: Books and courses
- Discover: Resources for authors and editors
If you’re new to writing and self-publishing, I have a tip for you – one that will save you a major headache as you work through the initial writing and later redrafting stages of your novel ... Create your own style sheet!

Why a style sheet helps authors
Building a style sheet is like holding hands ... but with yourself.
It'll help you keep track of what’s going on in your novel – who’s who, what’s where, and when X, Y and Z happens.
At the same time, you'll be able to record your preferences for the micro elements of your book ... things like spelling, punctuation, the rules about the way your fictional world works, and how you treat the various elements of the text (from paragraphs and headings to narrative, speech and thoughts).
What’s included in a style sheet?
You can include anything you want but a solid, usable style sheet that'll really help you keep an eye on what's going on will include at least the following:
Some writers like to have everything in one place; others prefer to have several documents, each of which records different types of decisions, and toggle from one to another. It’s your choice – whatever helps you work most productively. So, for example, you might create different sheets for the following:
- character names, histories and traits
- how you’re going to handle point of view
- hyphenation and capitalization
- key geographical locations
- building names and layouts
- language choice
- punctuation style
- spelling preference
- tense choice
- timeline information
- treatment of dialogue and thoughts
- world-building rules
Some writers like to have everything in one place; others prefer to have several documents, each of which records different types of decisions, and toggle from one to another. It’s your choice – whatever helps you work most productively. So, for example, you might create different sheets for the following:
- the main character names and features, and the organizational, family or time-frame groupings they belong to
- a record of key events in the timeline (particularly useful if your novel covers multiple discrete time frames)
- geography: environments and buildings (especially important measurements, such as distances, heights, number of storeys, that if nonsensical could impair clarity)
- spelling and formatting preferences
Additional uses
A style sheet really comes into its own if you're writing a series. Not only will you have a reminder of the places, people and events in the previous book(s), you'll also be able to prevent accidental inconsistency or repetition.
I've proofread series for both indie writers and mainstream publishers. The authors hadn't kept a written record of what had gone before, and different copyeditors had been used for each book.
Copyeditors and proofreaders can spot these problems when they occur within a single book, but if they weren't hired for the previous novel(s), they'll be ignorant of inconsistency or repetition across the series. Your style sheet will enable them to flag up potential errors.
In other words, a style sheet won’t just help you. It’ll help those who assist you, too. And the more we know about what you want, the better the service we can provide for you.
I've proofread series for both indie writers and mainstream publishers. The authors hadn't kept a written record of what had gone before, and different copyeditors had been used for each book.
- In one case, this led to a character's surname changing slightly (but noticeably) in Book 2
- In another , the author had used the same surname for two separate key characters in different books in the series
Copyeditors and proofreaders can spot these problems when they occur within a single book, but if they weren't hired for the previous novel(s), they'll be ignorant of inconsistency or repetition across the series. Your style sheet will enable them to flag up potential errors.
In other words, a style sheet won’t just help you. It’ll help those who assist you, too. And the more we know about what you want, the better the service we can provide for you.
Rules versus preferences
Your decision is final at the end of the day. And while I and my colleagues can give you advice based on industry-recognized style manuals such as The Chicago Manual of Style or Oxford’s New Hart’s Rules, those resources are not the law (though they are excellent!).
Rather, they’re reference points that help writers and editors bring clarity, consistency and readability to text; they’re usually based on preference and convention, not rules (despite the title of the Oxford guide mentioned above!).
If you're not sure which particular element of style will suit your book best, talk to an editor.
- Developmental editors will be able to advise you on what works well in terms of big-picture decisions.
- Line editors, copyeditors and proofreaders will be able to guide you on the micro elements of style.
Summing up
Inconsistent styling could distract the reader. By creating a style sheet you'll help you and your support team make decisions and stick to them. And that will keep your reader engaged with the right thing – your story.
Related resource
If you're an editor or proofreader who wants to learn how to create and use branded style sheets that improve efficiency and consistency, and demonstrate professionalism, check out Editing with Style Sheets. The course includes a customizable template.
Louise Harnby is a line editor, copyeditor and proofreader who specializes in working with crime, mystery, suspense and thriller writers.
She is an Advanced Professional Member of the Chartered Institute of Editing and Proofreading (CIEP), a member of ACES, a Partner Member of The Alliance of Independent Authors (ALLi), and co-hosts The Editing Podcast.
She is an Advanced Professional Member of the Chartered Institute of Editing and Proofreading (CIEP), a member of ACES, a Partner Member of The Alliance of Independent Authors (ALLi), and co-hosts The Editing Podcast.
- Get in touch: Louise Harnby | Fiction Editor & Proofreader
- Connect: Twitter at @LouiseHarnby, Facebook and LinkedIn
- Learn: Books and courses
- Discover: Resources for authors and editors
Can you proofread your own book? Here are some quick tips on formatting your Word file ... final tidy-ups to get your file in shape, and that accord with mainstream publishing standards.
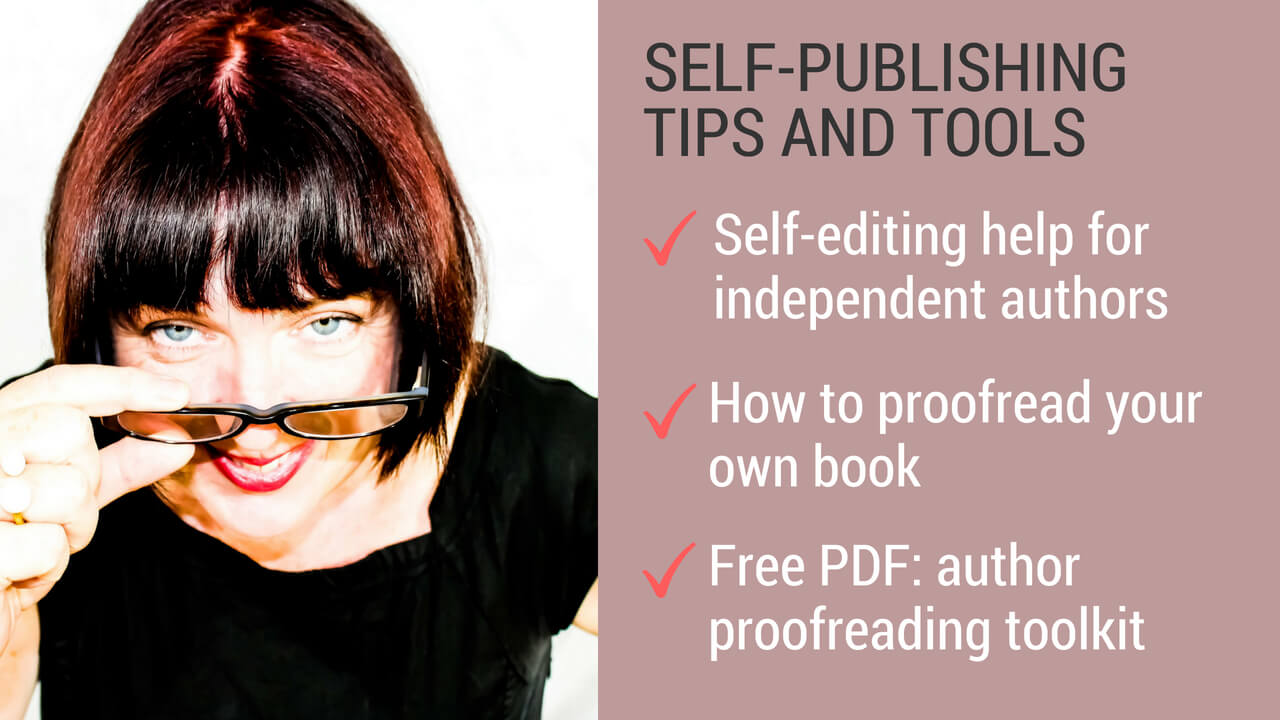
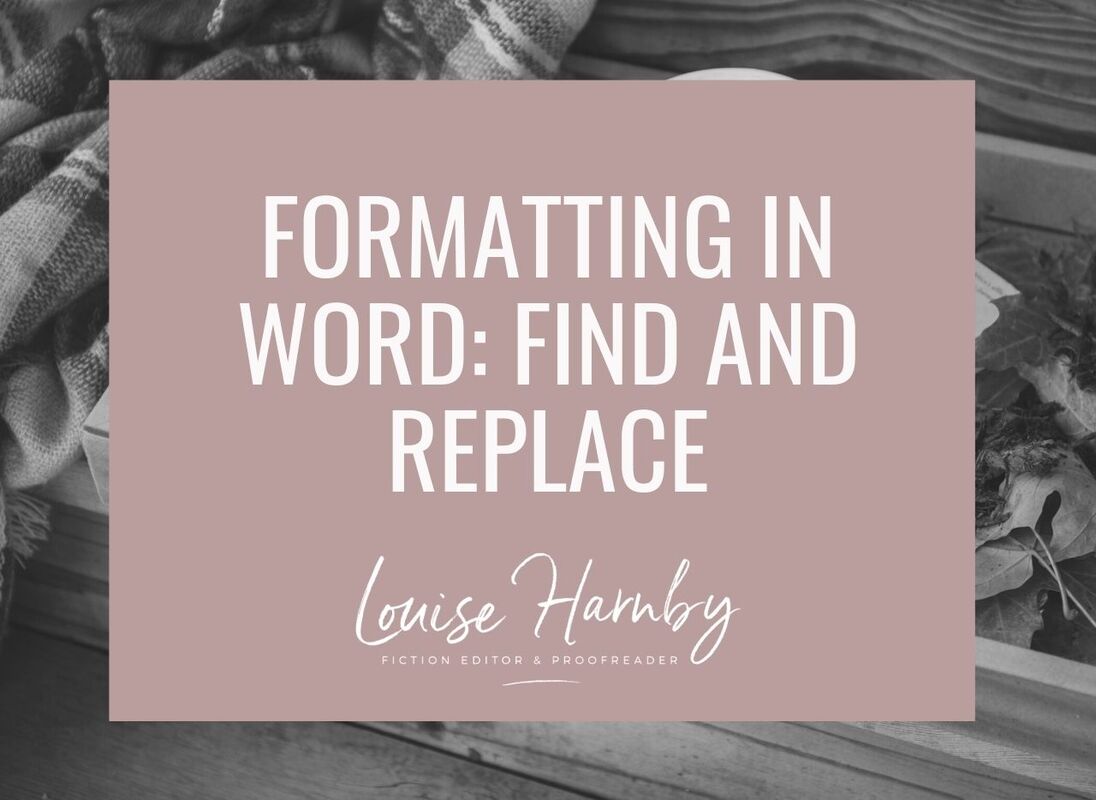
Truly, nothing beats a second pair of eyes on a piece of text, short or long. I know this all too well because I’m a professional proofreader and copyeditor, but I also write – books (yup, I've self-published four times), guides, booklets and blog posts.
And I miss stuff – not because I have a problem with grammar, punctuation or spelling, but because I’m too close to the text. I see my own writing in terms of the ideas I want to convey rather than the text in front of my eyes.
That’s why I hire fellow proofreaders and editors to help make my written materials the best they can be. I don't expect those people to guarantee perfection but I do expect to them to ramp up the quality (and they've never failed me).
Here’s another thing I know – the better shape the file's in, the better the price. Editors and proofreaders are professionals and, though we love what we do, we have bills and mortgages too. So, very broadly speaking, the more intervention needed, the higher the fee.
There are things every writer can do to tidy up a piece of text by themselves, though. I’ve compiled them in one handy resource: The Author’s Proofreading Companion.
The steps in this toolkit won’t replace a rigorous professional developmental edit, line edit/copyedit and final prepublication proofread, but they will help rid your file of some of the nasties!
Here’s what the Companion shows you how to do:
Just click on the image below to get your FREE copy!
And I miss stuff – not because I have a problem with grammar, punctuation or spelling, but because I’m too close to the text. I see my own writing in terms of the ideas I want to convey rather than the text in front of my eyes.
That’s why I hire fellow proofreaders and editors to help make my written materials the best they can be. I don't expect those people to guarantee perfection but I do expect to them to ramp up the quality (and they've never failed me).
Here’s another thing I know – the better shape the file's in, the better the price. Editors and proofreaders are professionals and, though we love what we do, we have bills and mortgages too. So, very broadly speaking, the more intervention needed, the higher the fee.
There are things every writer can do to tidy up a piece of text by themselves, though. I’ve compiled them in one handy resource: The Author’s Proofreading Companion.
The steps in this toolkit won’t replace a rigorous professional developmental edit, line edit/copyedit and final prepublication proofread, but they will help rid your file of some of the nasties!
Here’s what the Companion shows you how to do:
- Remove double spaces
- Remove all rogue spaces at the beginning and end of paragraphs
- Remove double line returns
- Change hyphens used as parentheses to dashes
- Change tabbed paragraph indents to proper line indents (using Word’s ‘Styles’)
- Change a hyphen in a number span
- Find lower-case letters at the beginning of paragraphs
- Find a paragraph that ends with no punctuation
- Find a full point followed by a lower-case letter
- Change date styles with wildcard searches
- Run a confusables macro
- Remove unnecessary spaces before or after punctuation
Just click on the image below to get your FREE copy!
Hope it helps! And come back soon for more handy tips and advice designed especially for beginner writers.
Louise Harnby is a line editor, copyeditor and proofreader who specializes in working with crime, mystery, suspense and thriller writers.
She is an Advanced Professional Member of the Chartered Institute of Editing and Proofreading (CIEP), a member of ACES, a Partner Member of The Alliance of Independent Authors (ALLi), and co-hosts The Editing Podcast.
Visit her business website at Louise Harnby | Fiction Editor & Proofreader, say hello on Twitter at @LouiseHarnby, connect via Facebook and LinkedIn, and check out her books and courses.
Every writer, copy-editor and proofreader comes across words that are used correctly but spelled incorrectly (typos), but we also have to look out for words that are spelled correctly but used incorrectly – this is the world of confusables.
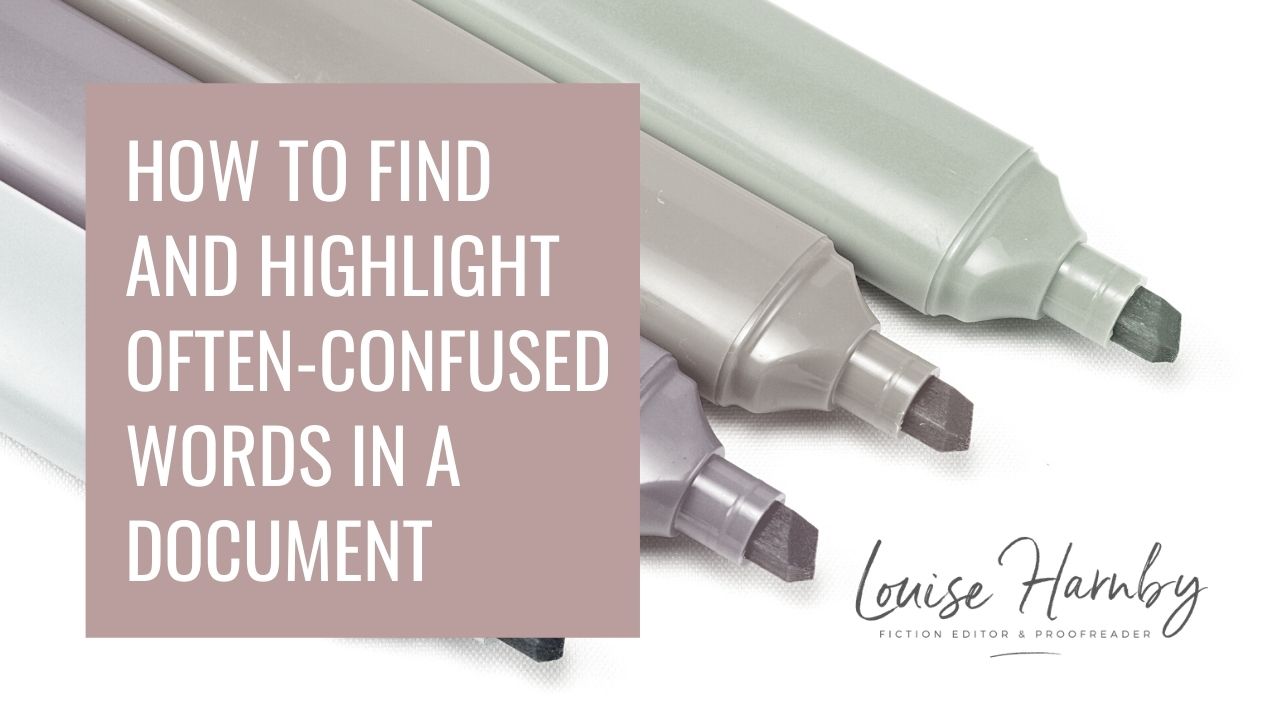

What are confusables?
Some confusables are not only spelled differently, they sound very different too, e.g. imply/infer; militate/mitigate; reactionary/reactive. In this case, the writer might have misunderstood the meaning.
Some confusables are homophones – words that are spelled differently but sound the same, e.g. rein/reign; stationary/stationery; prophecy/prophesy; loath/loathe. In this case, the writer understands the different meanings, but is unsure of the appropriate spelling.
Then there are errors that are simply a result of hands moving too fast over a keyboard – the meanings and correct spellings are known to the writer, but, in their haste, perhaps they’ve transposed a couple of letters or omitted a character.
Or it may be that the automatic spellcheck has kicked into gear and the writer hasn’t noticed the problem because they’re concentrating on the bigger picture. Examples might include e.g. filed/field; adverse/averse; pubic/public.
Blind spots
Writers aren't the only ones with blind spots. Editorial pros do too. It’s our job to spot these problems and fix them. However, we’re only human and most of us have a few blind-spot words that our eyes are, on occasion, less likely to notice, even though we do know the differences in meaning and spelling.
My own blind spots are gaffe/gaff, brake/break and peek/pique/peak. I don’t know why my eye doesn’t spot these pesky confusables as readily, especially when the likes of compliment/complement or stationary/stationery scream at me from the page! However, I accept that I do have blind spots and have taken steps to ameliorate the problem with a little mechanical help – the macro.
How can macros help?
Using macros enables us to identify possible problems before we get down to the business of actually reading, line by line, for sense.
Every time we find an error, we have to think about it and decide whether to amend. By reducing the number of interruptions, we can focus our attention on the flow of the words in front of us and increase efficiency.
For this reason, I, like many of my colleagues, run my macros at the beginning of a project (though I often repeat the process at the end stage too).
What’s on offer in the world of confusables?
There are several free macros available to the copy-editor or proofreader who wants to tackle confusables with efficiency. See, for example, the excellent “A Macro for Commonly Confused Words” published by C.K. MacLeod on Tech Tools for Writers (updated July 2015).
Another option, and the one that I’m currently using, is the CompareWordList macro created by Allen Wyatt on WordTips. See “Highlight Words from a List” (updated July 2015).
As some of you will already know, Wyatt has two WordTips sites; the one you use will be determined by which version of Word you’re running.
The linked article above will take readers to the article written for MS Word 2007, 2010 and above. If you are working with an older version of Word, you’ll need to follow Wyatt’s links to the sister site.
Why I’m using Wyatt’s CompareWordList
CompareWordList is currently my preferred tool simply because of how easy it is to create and update my own list of words to be checked – words that can, on occasion, be blind spots for me.
As I’ll show below, customizing the list of confusables doesn’t require me to amend the script of the macro once it’s installed. Instead, all I have to do is amend a basic list in a Word document – nice and simple!
Using CompareWordList 1: Create your list of confusables
The first thing to do is to create a list of the words you want the macro to find, and highlight, in a Word document.
Using CompareWordList 2: Get, and tweak, the code
Visit “Highlight Words from a List” and copy the code. If you’re completely new to installing macros, just paste the script in a Word document for now so that you can tweak it easily.
Below is a screenshot of Wyatt's code. The highlighted sections show where I’ve tweaked the code to suit my own needs.
Some confusables are not only spelled differently, they sound very different too, e.g. imply/infer; militate/mitigate; reactionary/reactive. In this case, the writer might have misunderstood the meaning.
Some confusables are homophones – words that are spelled differently but sound the same, e.g. rein/reign; stationary/stationery; prophecy/prophesy; loath/loathe. In this case, the writer understands the different meanings, but is unsure of the appropriate spelling.
Then there are errors that are simply a result of hands moving too fast over a keyboard – the meanings and correct spellings are known to the writer, but, in their haste, perhaps they’ve transposed a couple of letters or omitted a character.
Or it may be that the automatic spellcheck has kicked into gear and the writer hasn’t noticed the problem because they’re concentrating on the bigger picture. Examples might include e.g. filed/field; adverse/averse; pubic/public.
Blind spots
Writers aren't the only ones with blind spots. Editorial pros do too. It’s our job to spot these problems and fix them. However, we’re only human and most of us have a few blind-spot words that our eyes are, on occasion, less likely to notice, even though we do know the differences in meaning and spelling.
My own blind spots are gaffe/gaff, brake/break and peek/pique/peak. I don’t know why my eye doesn’t spot these pesky confusables as readily, especially when the likes of compliment/complement or stationary/stationery scream at me from the page! However, I accept that I do have blind spots and have taken steps to ameliorate the problem with a little mechanical help – the macro.
How can macros help?
Using macros enables us to identify possible problems before we get down to the business of actually reading, line by line, for sense.
Every time we find an error, we have to think about it and decide whether to amend. By reducing the number of interruptions, we can focus our attention on the flow of the words in front of us and increase efficiency.
For this reason, I, like many of my colleagues, run my macros at the beginning of a project (though I often repeat the process at the end stage too).
What’s on offer in the world of confusables?
There are several free macros available to the copy-editor or proofreader who wants to tackle confusables with efficiency. See, for example, the excellent “A Macro for Commonly Confused Words” published by C.K. MacLeod on Tech Tools for Writers (updated July 2015).
Another option, and the one that I’m currently using, is the CompareWordList macro created by Allen Wyatt on WordTips. See “Highlight Words from a List” (updated July 2015).
As some of you will already know, Wyatt has two WordTips sites; the one you use will be determined by which version of Word you’re running.
The linked article above will take readers to the article written for MS Word 2007, 2010 and above. If you are working with an older version of Word, you’ll need to follow Wyatt’s links to the sister site.
Why I’m using Wyatt’s CompareWordList
CompareWordList is currently my preferred tool simply because of how easy it is to create and update my own list of words to be checked – words that can, on occasion, be blind spots for me.
As I’ll show below, customizing the list of confusables doesn’t require me to amend the script of the macro once it’s installed. Instead, all I have to do is amend a basic list in a Word document – nice and simple!
Using CompareWordList 1: Create your list of confusables
The first thing to do is to create a list of the words you want the macro to find, and highlight, in a Word document.
- Simply open up a new Word document, give it a name (I called mine “confusables”), and save it in your preferred folder (I chose to save it in my Macros folder, but you can save yours wherever you want).
- Make a note of the location of your document (for example, mine is in c:\Users\Louise\Dropbox\Macros\confusables.docx).
Using CompareWordList 2: Get, and tweak, the code
Visit “Highlight Words from a List” and copy the code. If you’re completely new to installing macros, just paste the script in a Word document for now so that you can tweak it easily.
Below is a screenshot of Wyatt's code. The highlighted sections show where I’ve tweaked the code to suit my own needs.
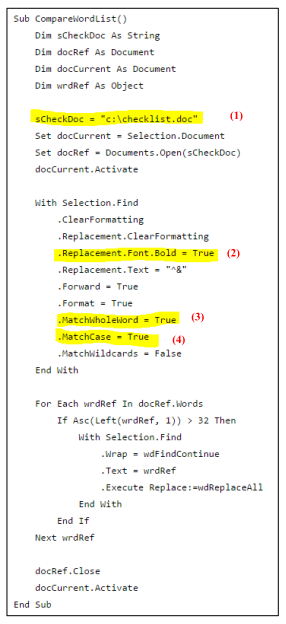
Screenshot of Allen Wyatt's CompareWordList macro code
Tweaks to consider
(1) I’ve changed Wyatt's code (as per his suggestion) so that it describes where my list of confusables is located: sCheckDoc = "c:\Users\Louise\Dropbox\Macros\confusables.docx". You’ll use the location you made a note of when you created your own list (see the section above – Using CompareWordList 1: Create your list of confusables).
(2) Wyatt's code emboldens the words found by the macro; I wanted them highlighted so I replaced the highlighted text as follows: .Replacement.Highlight = True.
(3) I changed the Match Whole Word instruction to False because I wanted the macro to find part words. This, of course, will pull up some false positives but it was the easiest solution I could find.
(4) I also changed the Match Case instruction to False.
Now that you’ve tweaked the code to suit your own needs, you’re ready to install it (the basic, step-by-step instructions below are provided for the benefit of those who are completely new to macro installation).
Using CompareWordList 3: Install the code
With Word open, open the “View” tab and click on the “Macros” icon on the ribbon.

This will open up a new window.
If you don’t have any macros already loaded:
If you don’t have any macros already loaded:
- To get you going, create a test macro that you can delete later.
- First, make sure the Normal.dotm template is showing in the "Macros in:” box.
- Type TEST into the “Macro name:” box.
- Click on the “Create”. Your TEST macro will now show up. From now on, it’ll be easy as pie to add additional macros.
If you have macros loaded (your TEST macro or any other):
- Click on “Edit”.

This will open up a further window:
- If necessary, use the scroll bar to take you to the bottom of the text.
- Paste the CompareWordList script at the end, under “End Sub”
- Close the window using the X in the top right-hand corner.
Running CompareWordList
- Open the Word file in which you want to locate potential confusbles.
- Click the “View” tab.
- Click the “Macros” icon on the ribbon.
- Select "CompareWordList" from the list.
- Click “Run”.
Removing highlights one by one
Here’s a tiny macro that I recorded to remove a highlight as I move through a Word document. Installing this means I simply have to click on a highlighted word and run the macro.
Assigning a shortcut button (see below) makes the job easy and efficient. I decided on Alt H because I don’t have that keyboard shortcut assigned to any function that I carry out regularly.
Sub UndoHighlight()
'
' UndoHighlight Macro
'
'
Options.DefaultHighlightColorIndex = wdNoHighlight
Selection.Range.HighlightColorIndex = wdNoHighlight
End Sub
To install: Simply copy the red script above and install it in the same way that you installed the CompareWordList macro.
To create a shortcut key: In Word, select File, Options, Customize Ribbon (1). Click on Customize (2). A new box will open up entitled “Customize keyboard”. In the Categories window (3), scroll down and select Macros. In the Macros window (4), select UndoHighlight. Finally, choose your preferred keyboard combination by typing it into the Press New Shortcut Key window (5). Select Assign and Close.
To remove ALL highlighting in one go: For this job, Paul Beverley’s your man. A huge number of macros are available in his free book, Computer Tools for Editors (available on his website at Archive Publications).
Hope you find this useful!
Hope you find this useful!
Louise Harnby is a line editor, copyeditor and proofreader who specializes in working with crime, mystery, suspense and thriller writers.
She is an Advanced Professional Member of the Chartered Institute of Editing and Proofreading (CIEP), a member of ACES, a Partner Member of The Alliance of Independent Authors (ALLi), and co-hosts The Editing Podcast.
Visit her business website at Louise Harnby | Fiction Editor & Proofreader, say hello on Twitter at @LouiseHarnby, connect via Facebook and LinkedIn, and check out her books and courses.
She is an Advanced Professional Member of the Chartered Institute of Editing and Proofreading (CIEP), a member of ACES, a Partner Member of The Alliance of Independent Authors (ALLi), and co-hosts The Editing Podcast.
Visit her business website at Louise Harnby | Fiction Editor & Proofreader, say hello on Twitter at @LouiseHarnby, connect via Facebook and LinkedIn, and check out her books and courses.

PDF MARKUP

AUTHOR RESOURCES

EDITOR RESOURCES


TESTIMONIALS
Dare Rogers
'Louise uses her expertise to hone a story until it's razor sharp, while still allowing the author’s voice to remain dominant.'
Jeff Carson
'I wholeheartedly recommend her services ... Just don’t hire her when I need her.'
J B Turner
'Sincere thanks for a beautiful and elegant piece of work. First class.'
Ayshe Gemedzhy
'What makes her stand out and shine is her ability to immerse herself in your story.'
Salt Publishing
'A million thanks – your mark-up is perfect, as always.'
CATEGORIES
All
Around The World
Audio Books
Author Chat
Author Interviews
Author Platform
Author Resources
Blogging
Book Marketing
Books
Branding
Business Tips
Choosing An Editor
Client Talk
Conscious Language
Core Editorial Skills
Crime Writing
Design And Layout
Dialogue
Editing
Editorial Tips
Editorial Tools
Editors On The Blog
Erotica
Fiction
Fiction Editing
Freelancing
Free Stuff
Getting Noticed
Getting Work
Grammar Links
Guest Writers
Indexing
Indie Authors
Lean Writing
Line Craft
Link Of The Week
Macro Chat
Marketing Tips
Money Talk
Mood And Rhythm
More Macros And Add Ins
Networking
Online Courses
PDF Markup
Podcasting
POV
Proofreading
Proofreading Marks
Publishing
Punctuation
Q&A With Louise
Resources
Roundups
Self Editing
Self Publishing Authors
Sentence Editing
Showing And Telling
Software
Stamps
Starting Out
Story Craft
The Editing Podcast
Training
Types Of Editing
Using Word
Website Tips
Work Choices
Working Onscreen
Working Smart
Writer Resources
Writing
Writing Tips
Writing Tools
ARCHIVES
July 2024
June 2024
May 2024
April 2024
March 2024
October 2023
August 2023
July 2023
June 2023
May 2023
April 2023
March 2023
January 2023
December 2022
November 2022
October 2022
September 2022
August 2022
July 2022
June 2022
May 2022
April 2022
March 2022
February 2022
January 2022
December 2021
November 2021
October 2021
September 2021
August 2021
July 2021
June 2021
May 2021
April 2021
March 2021
February 2021
January 2021
December 2020
November 2020
October 2020
September 2020
August 2020
July 2020
June 2020
May 2020
April 2020
March 2020
February 2020
January 2020
December 2019
November 2019
October 2019
September 2019
August 2019
July 2019
June 2019
May 2019
April 2019
March 2019
February 2019
January 2019
December 2018
November 2018
October 2018
September 2018
August 2018
July 2018
June 2018
May 2018
April 2018
March 2018
February 2018
January 2018
December 2017
November 2017
October 2017
September 2017
August 2017
July 2017
June 2017
May 2017
April 2017
March 2017
February 2017
January 2017
December 2016
November 2016
October 2016
September 2016
June 2016
May 2016
April 2016
March 2016
February 2016
January 2016
December 2015
November 2015
October 2015
September 2015
July 2015
June 2015
May 2015
March 2015
February 2015
January 2015
November 2014
October 2014
September 2014
August 2014
July 2014
June 2014
March 2014
January 2014
November 2013
October 2013
September 2013
August 2013
June 2013
February 2013
January 2013
November 2012
October 2012
September 2012
August 2012
July 2012
June 2012
May 2012
April 2012
March 2012
February 2012
January 2012
December 2011
 RSS Feed
|
|
|
|

|

|
|
|
|

© 2011–2024 Louise Harnby